Difference between revisions of "Tutorials:Unimesh 1 - New Mesh Basics"
| Line 128: | Line 128: | ||
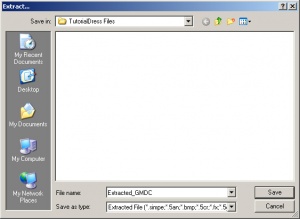
[[Image:Unimesh1-20.jpg|right|300x300px]]3. '''Save the GMDC:''' You will get a Save dialog box now titled "Extract..." Browse to your "TutorialDress Files" folder. Delete the text showing in the "File Name:" blank and type "Extracted_GMDC" and then click Save. This will save the GMDC (3D model) for your mesh in your "TutorialDress Files" folder.<br style="clear:both" /></blockquote> | [[Image:Unimesh1-20.jpg|right|300x300px]]3. '''Save the GMDC:''' You will get a Save dialog box now titled "Extract..." Browse to your "TutorialDress Files" folder. Delete the text showing in the "File Name:" blank and type "Extracted_GMDC" and then click Save. This will save the GMDC (3D model) for your mesh in your "TutorialDress Files" folder.<br style="clear:both" /></blockquote> | ||
| + | |||
| + | |||
| + | ===Part 6 - Edit the Mesh in Milkshape=== | ||
| + | |||
| + | Yay, we're finally to the actual editing part! As mentioned at the beginning, we're just going to do the most basic, simple of edits, but it will be enough that you can see that your mesh has changed when you view it in Body Shop. | ||
| + | |||
| + | <blockquote>1. '''Run Milkshape:''' You should have a Milkshape shortcut on your Desktop from when you installed it. It can also be run through Start - All Programs - Milkshape 3D 1.8.3 - Milkshape 3D 1.8.3. If you get a warning saying your copy is not registered and expires in some number of days, just click OK.<br><br> | ||
| + | |||
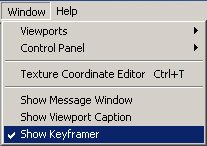
| + | [[Image:Unimesh1-21.jpg|right]]2. '''Hide Keyframer:''' Before we start editing, let's change a couple settings in Milkshape first. Under the Window menu, click on the "Show Keyframer" option to uncheck it. This will hide the keyframer at the very bottom of the Milkshape window. The keyframer is used in making multi-frame animations. Since we don't need it, we're hiding it.<br style="clear:both" /> | ||
| + | |||
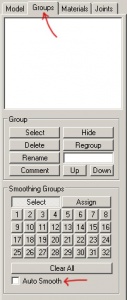
| + | [[Image:Unimesh1-22.jpg|right|300x300px]]3. '''Uncheck Smooth All:''' Click on the Groups tab over on the right control panel. Then look at the bottom of the controls there. There is an "Auto Smooth" option which is checked by default. Uncheck the Auto Smooth box. This is a very important option - if it's left checked, you will ruin your mesh as soon as you import it so make sure it is unchecked so the box is blank.<br style="clear:both" /> | ||
| + | |||
| + | [[Image:Unimesh1-25.jpg|right|300x300px]]4. '''Uncheck Show Skeleton:''' Click on the Joints tab over on the right control panel. Look in the middle of the options, right under "Vertex Weights" for the "Show Skeleton" option. This will be checked by default. Uncheck the Show Skeleton box. We will not be editing or using the skeleton, so it's not necessary that it be shown for this tutorial. If you see a bunch of crazy blue lines and circles after you've imported, you forgot to uncheck this option.<br style="clear:both" /><br> | ||
| + | |||
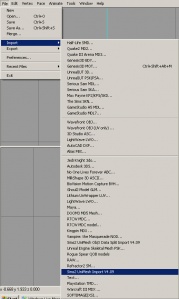
| + | [[Image:Unimesh1-23.jpg|right|300x300px]]5. '''Use Unimesh Import:''' Click on File - Import - Sims 2 UniMesh Import v4.09. There are a couple Unimesh options in Import so make sure you choose the right one - you don't want the ObjX Data Split Import.<br style="clear:both" /><br> | ||
| + | |||
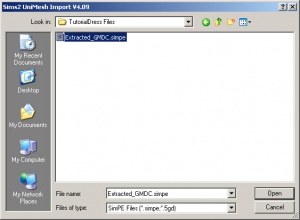
| + | [[Image:Unimesh1-24.jpg|right|300x300px]]6. '''Import Extracted GMDC:''' You'll get an Open dialog box titled "Sims 2 UniMesh Import V4.09." Browse to your "TutorialDress Files" folder. There should just be one selectable file there - "Extracted_GMDC.simpe" - this is the 3D model you extracted in Part 5. Select that file and click Open. | ||
| + | |||
| + | You will get a popup asking you a question - "Create blend groups?" Click Yes as you do want to create blend groups - this will import any morphs such as fat or pregnant. You always want to make sure to at least have a fat morph for your meshes! | ||
| + | |||
| + | You will probably also get a popup saying "Some Skin Weights do not equal 100%. Do you want these corrected?" Click Yes - this will fix any incorrect bone assignments that are under 100% - don't worry about what that means now. It will be covered in later tutorials. Just remember that you do want to say Yes to this question.<br style="clear:both" /> | ||
| + | |||
| + | |||
| + | </blockquote> | ||
Revision as of 17:19, 10 August 2008
| Tutorials by Category | |
|---|---|
|
Body Shop: Recolouring | Meshing | Modding | Sims Objects: Object Creation | Recolouring Building: Building | Landscaping | Walls & Floors | Other: Careers & Majors | Hacks and Game Mods |
Contents |
Introduction
What this tutorial will teach you
This tutorial is designed to show you the basic steps of making a Body Shop mesh using Milkshape, Unimesh, and SimPE - making a new mesh package, editing the mesh, and getting it showing up in Body Shop and the game with your changes. You will learn to make only the most basic of edits in this tutorial - it is more an absolute beginner's "proof of concept" tutorial than teaching you more advanced editing techniques. The more advanced techniques will come in the subsequent tutorials.
It's a good idea to learn using Unimesh - though there are other options (like Meshtool), nothing else will allow you to edit quite so much (including adding and deleting parts, "Frankensteining" things together, etc. - we won't be going into those more advanced techniques in this tutorial, but in later tutorials.
A little warning
Meshing is difficult! Meshing is hard! Meshing is time consuming and frustrating! This is not an easy process. Though everything will be fully explained, it's possible that you may miss something or it won't work the first time. If that happens, start over from the beginning after taking a break and try again. There is no easy 5 minute meshing technique that we're not telling you - this really is the easiest, best way to do it.
Prerequisites
You MUST have existing knowledge of creating clothing using Body Shop. This is not for absolute beginners - experience in creating clothing recolours/retextures will serve you well going forward. If you do not have that preexisting knowledge, do not continue with this tutorial. Instead...
![]() See: Body Shop Recolouring Tutorials
See: Body Shop Recolouring Tutorials
What you will need:
You must download and install all of the following programs and utilities before beginning this tutorial. If you are having any trouble or questions on installing them, please look for info on their individual sites/pages.
- Milkshape - Current version as of this writing is 1.8.3. We will be doing our mesh editing in Milkshape. This is not a free program! It will allow you to use it free for 1 month, but after that you will need to pay $25 to register it. It is worth the money. There is no version of this tutorial using free programs - nothing else uses Unimesh and allows you to make major edits for such a low price.
- Unimesh Plugin for Milkshape - Current version as of this writing is 4.09. This plugin allows proper import/export of Sims 2 meshes into Milkshape. Unimesh is free. Read the included "UniMeshReadMe.txt" file for installation instructions.
- SimPE - Current version as of this writing is 0.68. Get whatever the latest version is. SimPE allows creation of a new mesh package linking the mesh to a recolour file.
- Needed Software to Run SimPE - This is listed as a heading on the SimPE download page with links there. You will need both the Microsoft .NET Framework Version 2.0 (this is different from .NET 1.0!) and Managed DirectX 9c (this is different from regular DirectX!) - make sure to download and install both or you will get errors on the SimPE parts.
- 1-2 Hours to complete this tutorial, assuming you do it right the first time. It may be quicker or slower depending on how fast you read and work.
The Tutorial:
You may click on any image below for a larger version. Images are shown thumbnailed here for faster page loading, but all images will display full-size if clicked.
Part 1 - Create a Recolour
All Body Shop meshes are linked to a recolour file. Without both the mesh and recolour file, you will see nothing showing up in game or in Body Shop for your recolour. Therefore, you always need to start by creating a temporary recolour file.
You must use a Maxis mesh for this to work! Editing custom meshes is not covered in this tutorial, and will not work the same as described here. For the sake of learning how to do this properly, please edit the same base game dress that is shown in the tutorial. Always do the suggested project when doing a tutorial the first time - it will make it much easier to follow along.
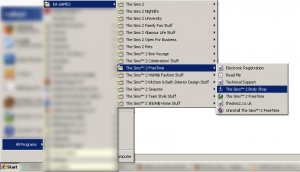
1. Run Body Shop: Remember to always use the shortcut for the most recently released expansion. Start - All Programs - EA Games - The Sims 2 (or latest expansion) - The Sims 2 Body Shop.
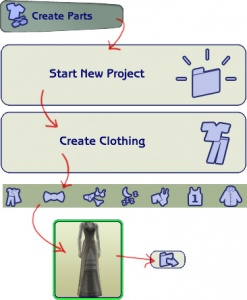
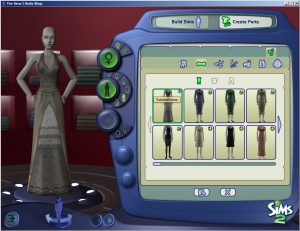
2. Select the Right Dress: Click on Create Parts - Create Clothing - Formal. Scroll toward the end of the catalog until you find the dress pictured. It comes in several colour options, but I'm choosing the cream with lace version, mainly because it's the prettiest. Click on the button at the bottom to Export Selected Textures.
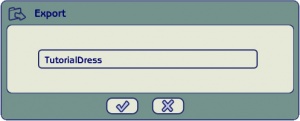
3. Name Your Project: "TutorialDress" is a good name for this project. Then click the checkmark to Accept Project Name and go ahead and make the new project.
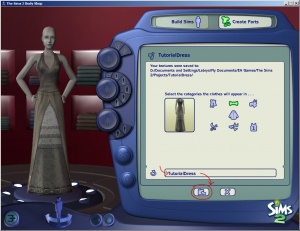
4. Tooltip and Import Give your project a tooltip. "TutorialDress" is a good tooltip. Leave the category as Formal. Then click the button at the bottom to Import to Game to finish the project.
5. Close Body Shop.
Part 2 - Create a Folder
We're going to be editing, exporting, and importing a lot of different files from here on out. It's important that you keep your files organized so you know what's what. The best way to do this is to create a new folder to hold all of your bits and pieces. That way, you know where to find them, and what they all are.
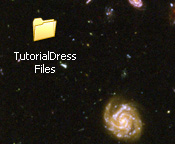
On your computer's Desktop (or whereever you can easily find it), create a new folder. Call this folder "TutorialDress Files." Don't do anything else with it for the moment - we'll be using it soon enough.
Part 3 - Assemble a Mesh Package
Now we'll get a mesh put together, using the mesh parts used by the recolour we just made. This used to be a lot harder, but we now have a great shortcut which makes this part a lot easier. It will automatically gather the needed mesh parts when you point it at a recolour file.
1. Run SimPE: You should have a shortcut for it on your Desktop after installing it.
2. Create a New File: File - New to create a new, empty file.
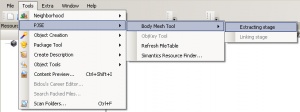
3. Run PJSE Mesh Tool: Tools - PJSE - Body Mesh Tool - Extracting Stage.
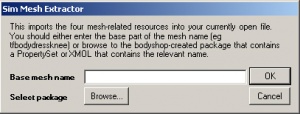
4. Browse For Your Recolour: You'll get a popup now called "Sim Mesh Extractor." Click on the Browse button.
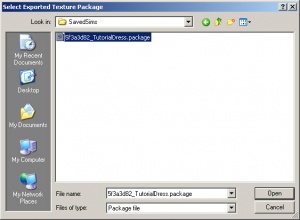
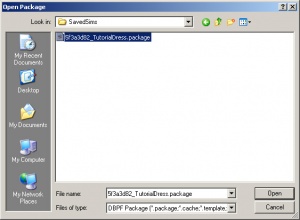
5. Find and Open Your Recolour: You'll now get an Open dialog box titled "Select Exported Texture Package." Open your My Documents\EA Games\The Sims 2\SavedSims\ folder. Inside, you should see a file called something like "5f3a3d82_TutorialDress.package" - 8 random characters, an underscore, and then your project name (TutorialDress). Click on it to select it and then click Open.
6. Mesh Parts Gathered: You should now see four new resources listed in your file - GMDC, GMND, SHPE, and CRES. These are the four parts of the original Maxis mesh - the same mesh that the dress we recoloured in Part 1 uses. The PJSE Body Mesh Tool (Extracting Stage) automatically grabs all four parts for you, without you having to go into the game files to do so.
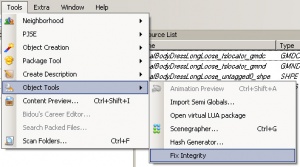
7. Bring Up Fix Integrity: We have the original mesh files now. But we want to make our own unique, custom mesh. In order to do that, we'll need to rename those files so the game sees them as unique, different files. To do this, we must Fix Integrity. Tools - Object Tools - Fix Integrity.
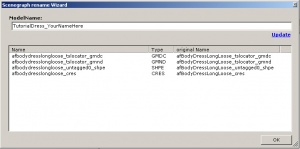
8. Give Your Mesh a Name/Make Your Mesh Unique: You'll get a popup called "Scenegraph Rename Wizard." This is where you give your mesh a new, unique name. For this project, let's call it "TutorialDress_YourNameHere" - where "YourNameHere" is your username, nickname, whatever - so mine would be "TutorialDress_HystericalParoxysm." Type the name, then click the Update button. You'll see how it changes all of the entries in the "Name" column after you click Update. Then click OK. You'll see that the resources' names have changed in the file too, to match what you typed. You now have a new, unique set of mesh files.
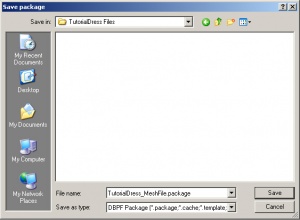
9. Save Your Mesh: File - Save As to save your mesh. Remember the "TutorialDress Files" folder you made in Part 2? Go ahead and navigate to that folder, which is where you will save your file. Give it a descriptive name. For this project, let's call it "TutorialDress_MeshFile.package" so we know exactly what this file contains.
Congratulations - you've just learned how to create a new, unique mesh package!
Part 4 - Link the Mesh to the Recolour
Now, we need to link our new mesh package to the recolour we made in Part 1. It's currently still linked to the original Maxis mesh, so nothing we do to our mesh will show any changes on that recolour. So we have to change what mesh the recolour is using. This will make it so that any changes we make to our mesh show up when we select that recolour in Body Shop or in the game. This used to be more complicated, but now there's a simple utility that makes this much easier!
1. Open the Recolour File: Open the recolour file you made in Part 1 in SimPE. Remember, this file should be in My Documents\EA Games\The Sims 2\SavedSims\ and be named something like "5f3a3d82_TutorialDress.package"
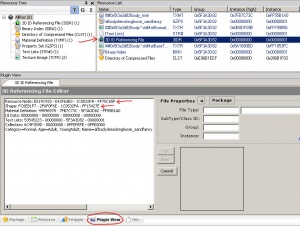
2. Look at the 3DIR: Once the file is opened, you should see a list of resources showing up in the top left and right panes. Look in the list in the right pane (the Resource List) for an item called "3D ID Referencing File" - this is the 3DIR, and this file contains the information which links your recolour file to your mesh.Now click on the Plugin View tab at the bottom (if you don't have this tab, click Window - Plugin View" to bring it up). Look in the list of stuff toward the bottom left. You should see several items. The first two are "Resource Node" and "Shape." They each have a long string of digits afterward. Make a note of the last few digits on the Resource Node and Shape lines - either in your head, or jot them down.
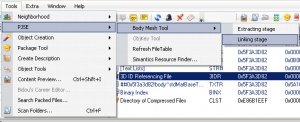
3. Use PJSE Body Mesh Tool - Linking Stage: With the 3DIR still selected in the Resource List, click on Tools - PJSE - Body Mesh Tool - Linking Stage.
You will get a popup message stating, "After beginning linking, you will be asked to close your 3DIR resource without committing; so if you have changes to save, please click Cancel and do so first. Otherwise, click OK to browse to your mesh file." Click OK to this warning message - it's just saying that if we have made any changes to the 3DIR already, we won't get to save those. We haven't made any changes, so it's fine to click OK to continue.
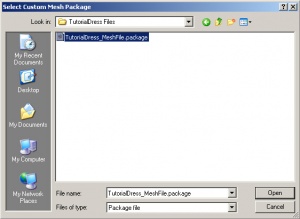
4. Select Your Mesh File: Now you'll get an Open dialog box titled "Select Custom Mesh Package." Browse to your "TutorialDress Files" folder which you made in Part 2. Select the "TutorialDress_MeshFile.package" - your custom mesh that you made in Part 3, and click Open.
You'll now get a popup saying "Now close your 3DIR resource, without committing, by opening a different resource. After that you can continue as normal. Remember to save." Click OK on this.
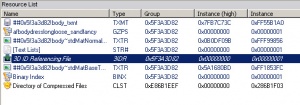
5. Check Your Linking: You'll see in the Resource List that the 3D ID Referencing File resource has gone italic, indicating it has changes which haven't been saved yet. Do what it said to do in the last popup and click on any other resource in the Resource List, and then click back onto the 3DIR again.
If you look in the list in Plugin View now, again looking at the Resource Node and Shape entries, you'll see that the information there has changed - compare the last few digits it's showing now to the last few digits that you made a note of in Part 4, Step 2 above. That means your linking has worked, and it has changed the link in the recolour from the original Maxis mesh, to your new, custom mesh.
6. Save: File - Save to save the changes to the recolour file. You will notice that the 3DIR resource changes from italic to normal font now, indicating that its no longer has any unsaved changes.
7. Copy Mesh File to Downloads: Now, in order to get the game to read our mesh file, we'll have to put it in the Downloads folder. Copy your "TutorialDress_MeshFile.package" from your "TutorialDress Files" folder to your My Documents\EA Games\The Sims 2\Downloads folder.
6. Check in Body Shop: Let's just make sure real quick that everything is still working properly. Click Create Parts - Start New Project - Create Clothing - Formal. Your recolour should be the first thing showing up, with your "TutorialDress" thumbnail on it. When you click on it, it should look like the same dress it was before. That's good - you shouldn't see any changes from how it looked originally. That means the linking worked properly. If you see any outfit other than the original one you started with, something went wrong. If you followed all the steps above, it should be fine. Close Body Shop.
Congratulations! You have just linked your new custom mesh to your recolour file!
Part 5 - Extract the 3D Model
Now that we have a recolour file and a mesh file, and both of them are linked, we're almost ready to begin editing! We just have one more step to do first: we need to get the actual 3D model out of the mesh file so we can edit it.
1. Open Your Mesh File in SimPE: Open SimPE if it's not already still open and browse to your "TutorialDress Files" folder. Select your "TutorialDress_MeshFile.package" file and open it.
2. Extract the GMDC: In the Resource List (top right), you will see a list of four resources - under Type they will be GMDC, GMND, SHPE, and CRES. Click on the one that says GMDC under Type to select it (it will also have _gmdc at the end of its name in the Name column). Now right-click on the GMDC. You will get a list of options. Choose Extract.
3. Save the GMDC: You will get a Save dialog box now titled "Extract..." Browse to your "TutorialDress Files" folder. Delete the text showing in the "File Name:" blank and type "Extracted_GMDC" and then click Save. This will save the GMDC (3D model) for your mesh in your "TutorialDress Files" folder.
Part 6 - Edit the Mesh in Milkshape
Yay, we're finally to the actual editing part! As mentioned at the beginning, we're just going to do the most basic, simple of edits, but it will be enough that you can see that your mesh has changed when you view it in Body Shop.
1. Run Milkshape: You should have a Milkshape shortcut on your Desktop from when you installed it. It can also be run through Start - All Programs - Milkshape 3D 1.8.3 - Milkshape 3D 1.8.3. If you get a warning saying your copy is not registered and expires in some number of days, just click OK.
2. Hide Keyframer: Before we start editing, let's change a couple settings in Milkshape first. Under the Window menu, click on the "Show Keyframer" option to uncheck it. This will hide the keyframer at the very bottom of the Milkshape window. The keyframer is used in making multi-frame animations. Since we don't need it, we're hiding it.
3. Uncheck Smooth All: Click on the Groups tab over on the right control panel. Then look at the bottom of the controls there. There is an "Auto Smooth" option which is checked by default. Uncheck the Auto Smooth box. This is a very important option - if it's left checked, you will ruin your mesh as soon as you import it so make sure it is unchecked so the box is blank.
4. Uncheck Show Skeleton: Click on the Joints tab over on the right control panel. Look in the middle of the options, right under "Vertex Weights" for the "Show Skeleton" option. This will be checked by default. Uncheck the Show Skeleton box. We will not be editing or using the skeleton, so it's not necessary that it be shown for this tutorial. If you see a bunch of crazy blue lines and circles after you've imported, you forgot to uncheck this option.
5. Use Unimesh Import: Click on File - Import - Sims 2 UniMesh Import v4.09. There are a couple Unimesh options in Import so make sure you choose the right one - you don't want the ObjX Data Split Import.
6. Import Extracted GMDC: You'll get an Open dialog box titled "Sims 2 UniMesh Import V4.09." Browse to your "TutorialDress Files" folder. There should just be one selectable file there - "Extracted_GMDC.simpe" - this is the 3D model you extracted in Part 5. Select that file and click Open.You will get a popup asking you a question - "Create blend groups?" Click Yes as you do want to create blend groups - this will import any morphs such as fat or pregnant. You always want to make sure to at least have a fat morph for your meshes!
You will probably also get a popup saying "Some Skin Weights do not equal 100%. Do you want these corrected?" Click Yes - this will fix any incorrect bone assignments that are under 100% - don't worry about what that means now. It will be covered in later tutorials. Just remember that you do want to say Yes to this question.
