Difference between revisions of "Tutorials:Understanding the Scenegraph"
(Added questions thread link) |
|||
| Line 1: | Line 1: | ||
| + | {{Sims2ModdingSections}} | ||
| + | |||
| + | {{Infobox Tutorial | ||
| + | | name = Understanding the Scenegraph | ||
| + | | logo1st = basegame.gif | ||
| + | | caption = Base Game | ||
| + | | author = [[:Category:Tutorials by Echo|Echo]] | ||
| + | | operating_EP = All | ||
| + | | notes = | ||
| + | | website = | ||
| + | }} | ||
| + | |||
| + | |||
| + | |||
==What's a scenegraph, and how do I read it?== | ==What's a scenegraph, and how do I read it?== | ||
| Line 211: | Line 225: | ||
If you are having problems with a package, but the problems are not directly related to this tutorial, you should post a copy of your package along with a detailed description of the problem in the [http://www.modthesims2.com/forumdisplay.php?f=482 Object Creation and Repair Workshop] instead. | If you are having problems with a package, but the problems are not directly related to this tutorial, you should post a copy of your package along with a detailed description of the problem in the [http://www.modthesims2.com/forumdisplay.php?f=482 Object Creation and Repair Workshop] instead. | ||
| + | |||
| + | |||
| + | [[Category:Sims 2 Tutorials]] | ||
| + | [[Category:Object Creation Tutorials]] | ||
| + | [[Category:Tutorials by Echo]] | ||
Latest revision as of 11:46, 13 November 2008
| Tutorials by Category | |
|---|---|
|
Build Mode | Walls & Floors | Body Shop | Object Recolouring | Careers | Sims | Object Creation | BodyShop Meshing | Hacks and Game Mods | |
| Tutorials by Level | |
| Level 1 (Newbie) | Level 2 (Beginners) | Level 3 (Intermediate) | Level 4 (Advanced) | Level 5 (Numenorean) |
| Understanding the Scenegraph | |
|---|---|
Base Game | |
| Author | Echo |
Contents |
[edit] What's a scenegraph, and how do I read it?
There are a lot of files in a package, and sometimes it's a bit hard to figure out how they're all related. How does a mesh know where to go to find its texture? How does a recolour know which mesh it belongs to? If a mesh goes in a GMDC and a texture goes in a TXTR, then why do we need all these other resources at all?
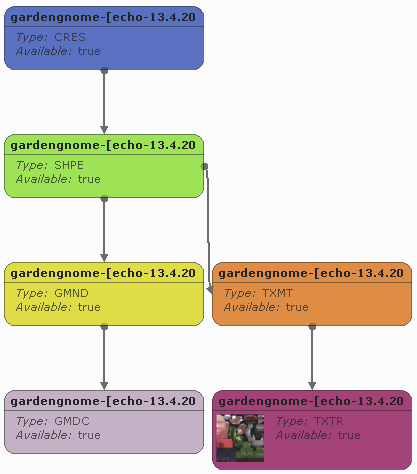
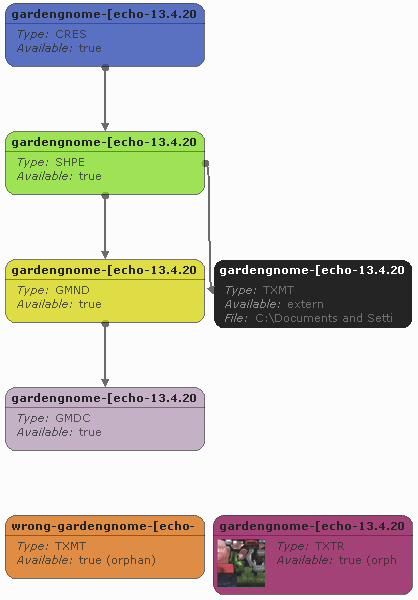
Many of the resources in a new object are part of what is called a "Scenegraph", which is like a family tree of resources showing which files are connected to which other files. Here's a really simple example of one:
So what does that all mean?
Each box in that diagram represents one resource in your package. For example, the bright pink box at the bottom right is a TXTR resource, also known as a "Texture Image" resource. That's the resource you put the texture image in. The mauve box at the bottom left? That's the GMDC resource, the "Geometric Data Container". That's where you put the mesh.
The rest of these boxes represent other resources in the file. You can tell what sort of resource each box represents by the "Type" value in that box. For example, the blue box at the very top of the scenegraph has the type "CRES".
Each type of resource is represented by a different colour in the scenegraph. Those colours are: CRES: Blue SHPE: Green GMND: Yellow TXMT: Pale orange TXTR: Bright pink GMDC: Mauve MMAT: Bright orange LGHT: White
The arrows in a scenegraph show when one resource references another resource. At the top in the above example, the CRES points to the SHPE. That means that somewhere in the CRES resource is a link which points to the SHPE resource.
In an object, the CRES is normally the top of the tree. It's the thing that starts linking all the bits together. It contains the skeleton for the object, as well as information about where all all the bits of an object are attached, (like light sources, slots, and even the meshes themselves,) relative to the object's (0,0,0) coordinates. Basically, it maps the physical layout of all the object parts in 3D space.
The CRES points to the SHPE file. The main purpose of a SHPE file is to match up each subset in a mesh with the default material for that subset. If you need to rename a subset, or add a new one, then you have to change this file so that the game can match it to the correct texture.
Because it's linking meshes to textures, the SHPE file has to reference two types of resources - GMNDs and TXMTs.
GMNDs are resources which hold information about the structure of the mesh. Amongst other things, they specify which subsets are shadows, which subsets are recolourable, which subsets can change states, and other information like that. It is basically a wrapper for the mesh itself, which is why it points to the GMDC.
The GMDC is where the mesh goes. If you've done any object meshing before you'll be quite familiar with it, so I won't go into any details. The GMDC doesn't point to any other files, it just sits all by itself at the bottom of the tree.
Back up in the other fork of the scenegraph, we've got the TXMT. The TXMT is defining a material for some part of the object. The material for an object contains information about how it should behave when light hits it, so the TXMT contains information about transparency and reflection and glowy-ness. It also contains a reference to the image which is used to texture the object; a TXTR.
The TXTR resource type should also be fairly familiar to you by now if you've been making objects for a while. It's where texture images go. Like the GMDC, it doesn't point to anything else, it just sits at the bottom of the scenegraph tree.
So when the game is trying to figure out how to draw your object in the game, it starts with the CRES then works its way down until it's able to draw the complete object.
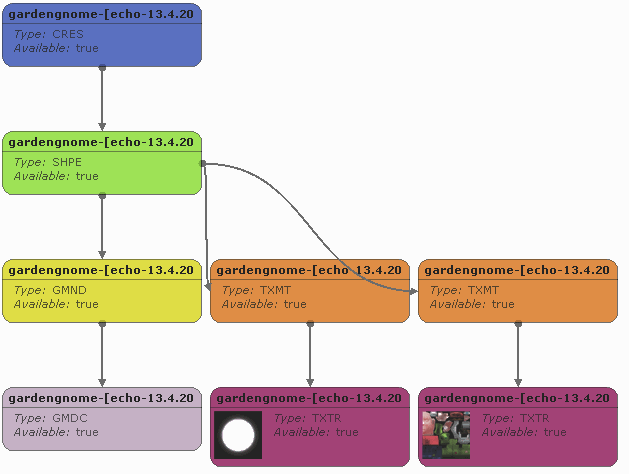
That was a fairly simple scenegraph. The object was not recolourable, and it had only one subset. Here's a slightly more complicated version:
It's still the same basic object, but there's one main difference. This object has two subsets, not just one. That means that there are two TXMT files, and they each have their own TXTR files. The SHPE is still the thing that links them into the rest of the scenegraph though, since it is keeping the list of all the subsets and their matching default textures.
If you look at the boxes representing the TXTR files (the bright pink ones), you can see that there's actually a small preview of the texture image inside them. In this example, the TXTR on the right is for the main part of the object, and the one on the left is for the shadow subset.
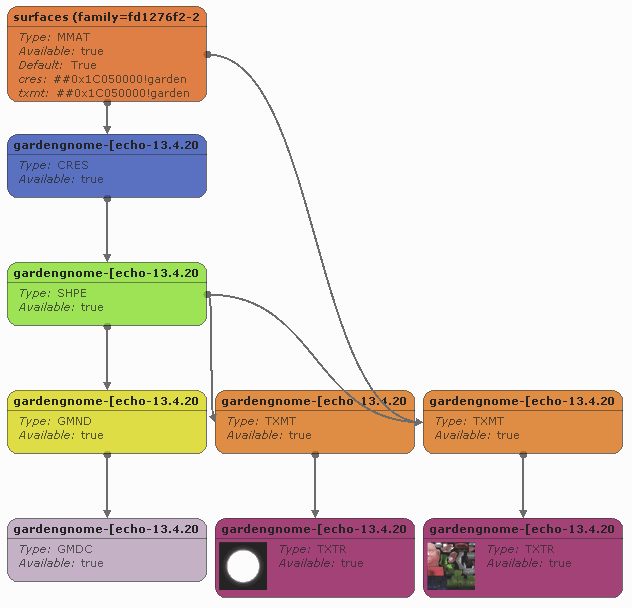
I'll show you one more version of this object's scenegraph. This version is set up to allow the main subset to be recolourable.
You can see that in this scenegraph there's an MMAT file at the top. MMATs are "Material Overrides", and are a way of connecting a CRES to a TXMT without having the rest of the scenegraph in between.
That may seem like an odd thing to do, since we can already get from the CRES to the TXMT, but it's vitally important if we want to be able to recolour something.
Think about a recolour package for a moment. All a recolour package contains is a TXTR which holds the image itself, the TXMT which defines all the material settings, and an MMAT. How does it know which mesh it belongs to? It looks in the MMAT for a link to a CRES file! That way all it has to do in the game is find the object with that CRES file in it and it has access to that object's entire scenegraph!
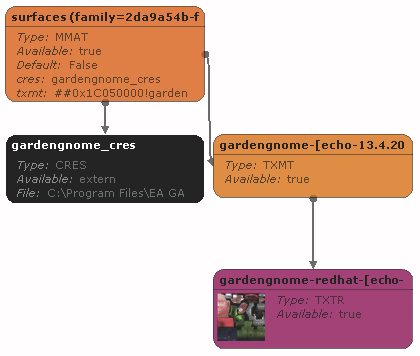
Let's say I created a recolour for the object with the above scenegraph. It would look a lot like this:
But as we said before, a recolour only has three types of resources in it, and this scenegraph has four boxes! The mysterious fourth box says it is a CRES, but unlike the CRES box in the first couple of examples, this one is black rather than blue.
That is because this resource isn't actually in the package. The MMAT is pointing at a CRES resource which is outside the package. (That's why it says "Available: extern" in there, it's "external" to the package.) When the game tries to load this, it'll look through its entire set of CRES files trying to find one to link up with this MMAT. Once it finds it, it'll join them up and you'll be able to use the recolour with the original mesh.
If we didn't have MMAT files set up to connect TXTRs to CRESs, then we wouldn't be able to create recolours without changing the original package's SHPE resource every time!
[edit] How do I get one of my own?
All of the scenegraph pictures shown above were actually automatically generated by SimPE. SimPE is able to draw scenegraphs for almost any package which has the right sorts of files.
Try to make one now. Open up an object package file, then go to "Tools", "Object Tools", and "Scenegrapher". You should get a window with a scenegraph a bit like the ones I've shown you so far. It's really that easy!
Try clicking on one of the boxes. At the bottom of your window you'll find a "Properties" box. That box can give you extra information about what resource that node in the scenegraph represents. The most important thing here is that, assuming that the resource is inside the currently open package, you can jump straight to it from this view. Press the "open" link next to it and it will take you to that resource.
Now we're going to have some fun!
Using a nice simple object, load up the scenegrapher and click on one of the TXMTs. Use the "open" link to jump straight to that resource. We're going to break it and see what happens to the scenegraph.
Change the filename of that resource, press commit, then run a "Fix Integrity". Now jump into the scenegrapher again and see what happened.
The SHPE is now pointing to a black TXMT, which means that it's expecting the TXMT to be in a different package. We know that's wrong, since the TXMT it's supposed to use is sitting down at the bottom as an orphaned resource.
If you were given this file to fix, you would need to do one of two things. You could either change the name of the TXMT to be whatever the SHPE is expecting, or you could change the SHPE so that it's looking for something with the same name as the orphaned TXMT. Either way the graph will get reconnected and everything will work again.
Try that, and remember that any time you change filenames on anything you need to run "Fix Integrity".
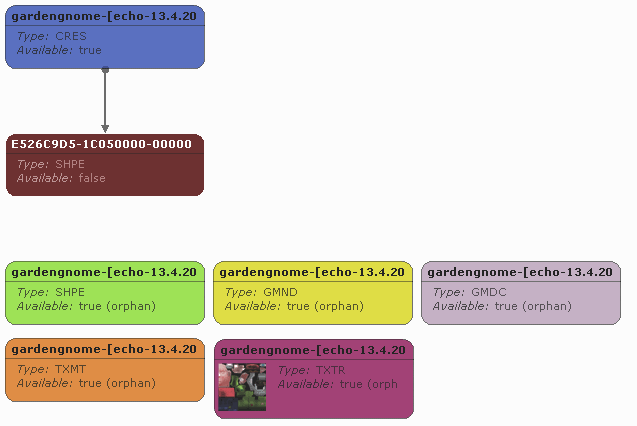
Now here's a scenegraph that I've broken in a new and exciting way. The dark red box is SimPE's way of telling us that it's expecting a resource in the current package, but can't find it. Try and guess which file(s) might need to be fixed.
If you guessed either the CRES or the SHPE, you'd be right. With a scenegraph that looks like this, something's gone wrong in the connection between the CRES and the SHPE.
In many, many cases, fixing a broken object is as simple as finding which two nodes aren't connecting correctly, and fixing it so they are connected. Blue flashing textures, untextured subsets, missing bits of meshes and other problems like that are very often caused by a simple mismatch, and following the above reasoning process will help you to diagnose the problem.
[edit] How do I make the changes?
Now that you're a master of diagnosing broken scenegraphs, you'll need to know how to fix them. Unfortunately, the way files connect to each other vary quite a bit, but here's a set of pictures which show you where the connections are between each of the different types of files:
[edit] CRES to SHPE
The CRES references the SHPE by TGI value, that is, by its "Type, Group, and Instance" numbers. Open up the CRES, and look at its "Reference" tab. The values for the "Shape" line have to match those values for the SHPE you're trying to link.
[edit] SHPE to GMND
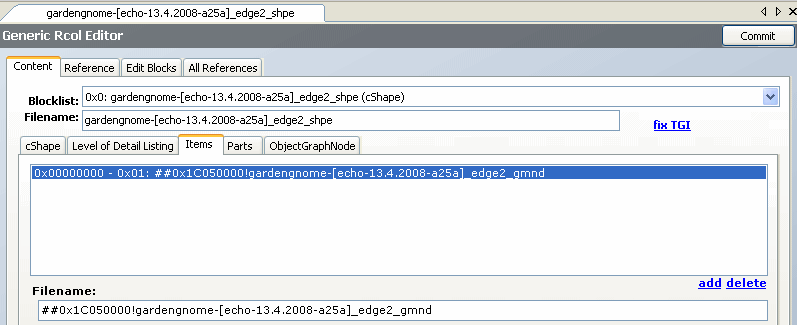
The SHPE references the GMND by its name. Open up the "Items" tab, and it should contain the full name of the GMND it is connected to.
[edit] SHPE to TXMT
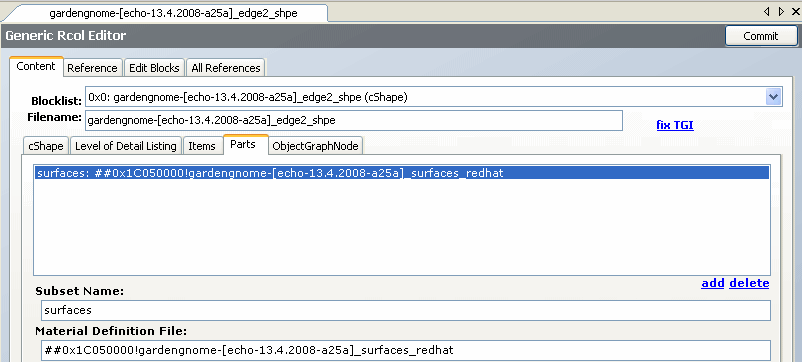
Because a SHPE can have as many TXMTs as the mesh has subsets, it has to have a list of all the TXMTs and which subsets they're linked to. This list is under the SHPE "Parts" tab, and has one line per subset/TXMT pair.
[edit] GMND to GMDC
Like the CRES to SHPE connection, the GMND to GMDC connection is set up using Type/Group/Instance. You can find what the GMND is pointing to under its Reference tab.
There's one nifty feature here - notice the button with the 'u' on it towards the far right of the settings panel? If you click on that, you'll get a list of resources in your package. If you click on one of those resources and drag it into the list of resources, then it will be added to the end of your list. Handy, eh?
[edit] TXMT to TXTR
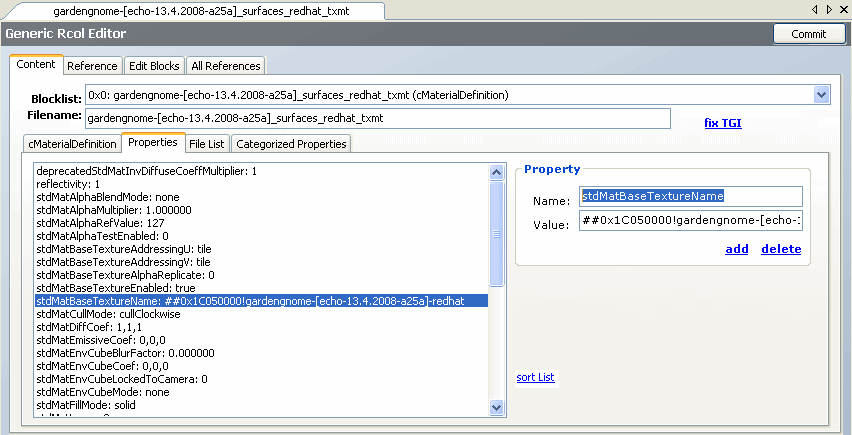
The TXMT is a bit tricky, because it references the TXTR in two places. The first is in the "stdMatBaseTextureName" field under "Properties":
But it also has a reference in the "File List" tab. Both references need to be correct.
[edit] MMAT to TXMT
The MMAT to TXMT is pretty easy. Its "name" field just needs to match the TXMT like so.
[edit] MMAT to CRES
Likewise, the MMAT to CRES connection is fairly trivial, its modelName should match the CRES name.
[edit] What other things can be scenegraphed?
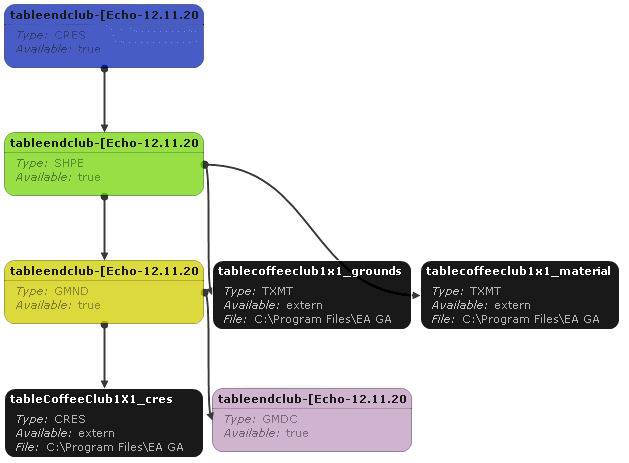
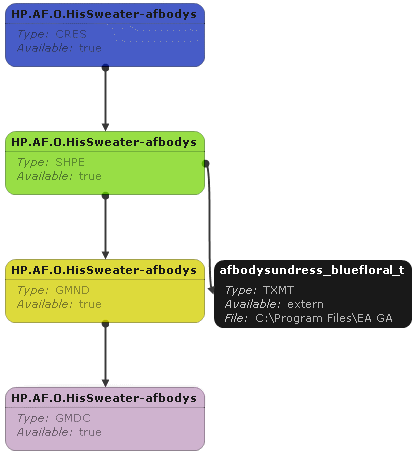
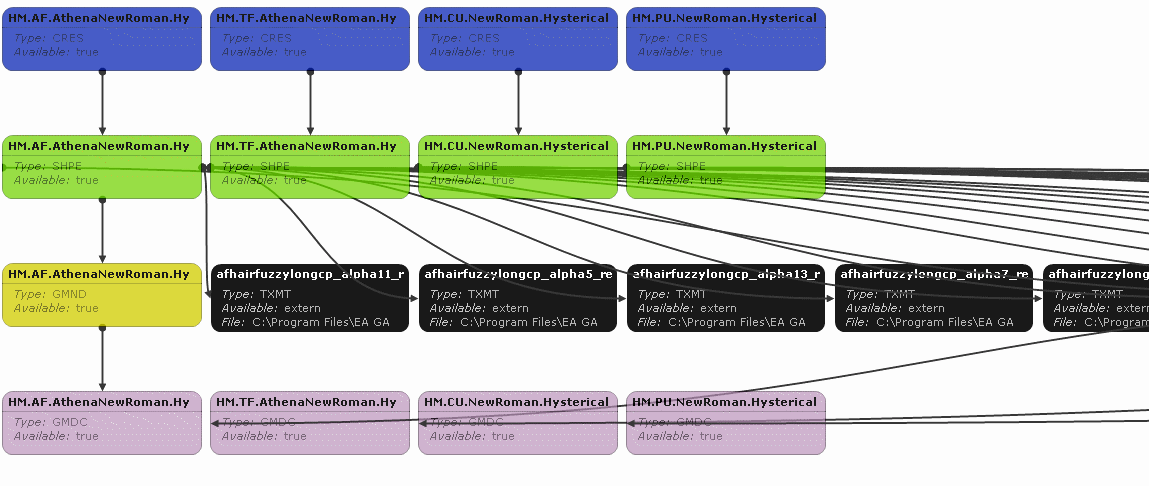
Any kind of package which can be shown in-game will have some sort of a scenegraph. Some things work better as scenegraphs than others though, and you will generally get the biggest benefit out of using them with objects. For reference though, here are some scenegraphs for a few different types of packages:
[edit] Object recolour
[edit] Object with one texture
[edit] Object with two textures
[edit] Object with one recolourable subset and one non-recolourable subset
[edit] Object which borrows a texture from a maxis object
[edit] Clothing recolour
[edit] Hair recolour
[edit] Clothing mesh
[edit] Hair mesh
(partial, hair meshes have too many resources to fit on the screen)
[edit] Help!
If you have questions related to the material in this thread, you can ask them here: http://www.modthesims2.com/showthread.php?p=2055888
If you are having problems with a package, but the problems are not directly related to this tutorial, you should post a copy of your package along with a detailed description of the problem in the Object Creation and Repair Workshop instead.
