Difference between revisions of "Sims 3:CTU Guide Designing"
(→View) |
|||
| Line 1: | Line 1: | ||
| − | |||
| − | |||
==Find a CAS Part== | ==Find a CAS Part== | ||
[[Image:param.jpg|right|400px]] | [[Image:param.jpg|right|400px]] | ||
Revision as of 04:40, 22 August 2009
Contents |
Find a CAS Part
Before adding any designs to your CAS part, you have to chose which mesh you wish to use.
Main Page
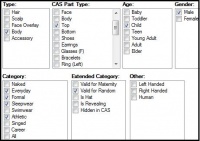
- Parameters - Use the age, gender and type parameters to dial up a mesh category. Then select the mesh you want to use from the drop down list. The thumbnail to the right of the screen allows you to preview the mesh.
- Quick Find - Once you dial up the age, gender and type, Quick Find allows you to scroll through thumbnails to pick which mesh you wish to use.
Part Details
Part Details is for informational purposes only. More advanced users can use this list to help locate specific files and details of the package.
Main Page
Part Category
The Part Category tab allows you to change the categorization of the CAS part. Most of these are pretty self-explanatory.
Changing the age and/or gender of a CAS part can cause some pretty wacky results. So don't be shocked if you get something weird.
Extended Category Other Valid for Maternity Check if you want to allow pregnant sims to wear the CAS part. Left Handed ???? Valid for Random Check if you want townies to be able to wear the CAS part. Right Handed ???? Is Hat Check if the CAS part is to be considered a hat. Human ???? Is Revealing Check if the CAS part is considered to be revealing. Hidden In CAS Check if you want the CAS part to be hidden in Create-A-Sim.
Commit
By now you've probably encountered the commit button. To save any changes you've made, it is important that you click this button before moving on to something else.Designs
Designs are a collection of stencils, patterns and textures grouped together. Each design appears as one thumbnail in CAS. Therefore, to make a CAS part set in Create-A-Sim (one scroll box), add multiple designs in the CTU.Add New Design
- Add New Blank - Adds a new design with the default texture (EA textures) and patterns/colors.
- Copy All From Base -
- Add New (Copy Last) - Makes a duplicate of the last design.
Main Page
Stencils
A stencil is a design that appears on top of the base texture of the CAS part, however the stencil itself is not recolorable.
-
 For more information on how to add a stencil see Applying Stencils
Patterns
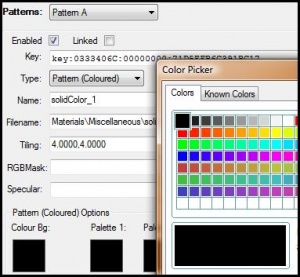
Patterns are the recolorable regions in Create-A-Sim. Here you can set the default colors/patterns you want displayed on your CAS part.
Enabled/Linked
Enabled Tick this to allow the pattern region (defined with the mask) to be recolored. Linked Unknown Type
Sets the type of color or pattern you want to use.
Solid
A solid color. To change the color, click the little colored square under Solid Color Options.
Pattern (Colored)
Colored patterns, the kind the Pattern Packager makes. They can have up to four different colors. To change the color, click the little colored squares under Pattern (Colored) Options.
Pattern (HSV)
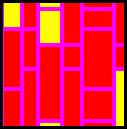
HSV patterns are base images that are color shifted by a certain amount. They usually show up as red, yellow and magenta in the pattern preview.BG Image
BG Image is used for specifying a background image behind the pattern itself. This image colors can be "shifted" by changing the HSV (Hue, Saturation and Value) ratios.
Channel
.....
Pattern Browser
The Pattern Browser allows you to easily browse through both the in-game patterns and downloaded and/or user created custom patterns.
Custom Patterns
- Use the Import Custom Pattern button to add a custom pattern to the pattern pool.
- To view custom patterns, pick the asterisk (*) from the drop-down Category list.
Tiling
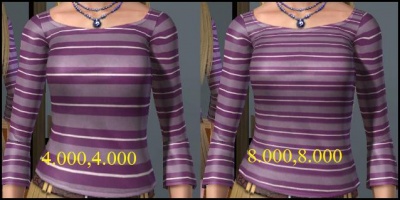
Tiling allow you to change the number of patterns tiles used to fill a pattern region. The default size is 4.0000,4.0000; to use more tiles per region, increase the tiling number (see image) and vice-versa.
RGB Mask
Changing the RGB mask under the patterns tab can be used to build a pattern from scratch, that is only used for that specific design and will not show as a usable pattern in Create-A-Sim/Style. To do this, you create a pattern but instead of packaging with Pattern Packager (or any tool of choice), import the DDS here directly.
Note: it's much easier to use the pattern browser to import a custom pattern ;)
Specular
Changing the pattern specular can alter the shinyness/reflectiveness of the pattern.
Logo
The logo is unused at the moment. My speculation is that it'll be used to distinguish items from different EPs, like The Sims 2 did.
Main Page
Textures
The vast majority of your CAS part will be defined with textures. The following is a list of all the possible textures, and what they edit on the CAS part.
* If you have four pattern regions you'll need to include the alpha channel.
Texture Use Compression Alpha Needed Base Texture The base texture--sometimes called the multiplier---maps out what parts of the mesh are used (via the alpha layer) and it adds texture (wrinkles and folds) to the CAS part. DXT5 Yes Clothing Ambient The clothing ambient indicates lighting intensity of the CAS part. This is rarely used, even by EA, so most are left pure white. DXT1 No Clothing Specular The specular indicates the shininess or reflectivity of the CAS part. DXT1 No Mask The mask uses the Red, Green, Blue and Alpha channels to define the different regions (patterns) that are recolorable using the Create-A-Sim tool. DXT1 No* Overlay An overlay is similar to a stencil except it can be placed anywhere, whereas a stencil is confined to the perimeter of the mesh. Necklaces that are attached to a clothing item are usually overlays. DXT1, DXT3, DXT5 Yes Part Mask Unknown DXT1 No* Skin Ambient The skin ambient is similar to the clothing ambient, except it indicates the lighting intensity on the skin itself. For the most part all default ambients are the same, so there's really no need to change it. DXT1 No Skin Specular Skin speculars are like clothing speculars, except they indicate the reflectivity/shininess of the skin itself. DXT1 No
Replacing Textures
For more information on how to replace a texture, see Replacing Textures
Other Details
Other Details, like Part Details, is strictly for information only. The majority of the information displayed here can be changed under the Part Category tab.
Main Page
Thumbnail
If you want your own custom thumbnail to display in Create-A-Sim, then import it here.
The image must be in .png format and 256x256 in width and height.
Main Page
Meshes
Mesh TGI Links
????
New Meshes
Name
In order to succesfully use a new mesh, you must give it a new unique name in the CTU.
LODs
LOD files are the Level Of Detail meshes that all body meshes are made up of. The highest detail is LOD1, whereas the lowest is LOD3. The game will choose which LOD to use based on graphics settings and viewing distance.
When importing LODs into the CTU, they must be imported in the correct order.
Bump Map
The bump map is an alpha layered DDS file that is used to simulate bumps and grooves on the mesh. Bump maps can be grayed out to produce a flat map, which is more useful for universal use, or they can be completely mapped out for your design.
Design Type
Design Type allows you to change between 3 channel (CasRgbMask), 4 channel (CasRgbaMask) and Tintable Overlay.
Main Page
- Switching to 4 channel allows you to successfully enable pattern D (the fourth Pattern region).
- Toggling to CasRgbMask automatically disables pattern D
- Tintable Overlays are used for face masks and makeup.
3D View
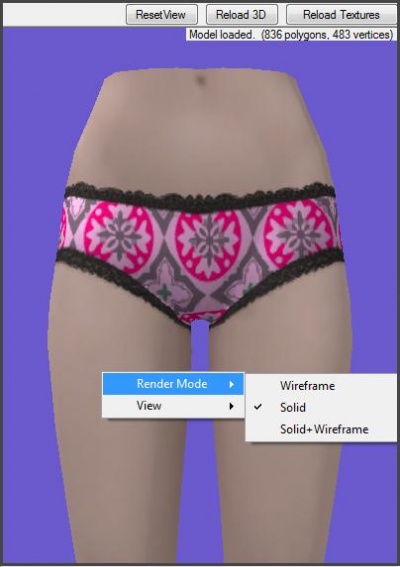
By far the neatest feature of the CTU is the 3D preview! The 3D view allows you to...well...preview your CAS part in the CTU.
How To Use
To enable 3D View, tick the Enable 3D Preview checkbox in the top left corner. When checked, a preview box will be added to the side. When you add a new design, the 3D Preview will load and should update in real-time as you change textures/patterns/etc.
• Use the mouse wheel to zoom in, or click and drag.
• Left-click and drag to rotate the mesh sideways.
• Right-click and drag to freely rotate the mesh.Render Mode
To change the way the mesh is rendered, right-click anywhere in the window and choose the mode.
View
To auto-snap to a rotation, right-click anywhere in the window and choose View -> then the position.
Reset View
Resets the 3D view to the default position.
Reload 3D
If you change a mesh, 3D view should automatically load the new mesh. If it does not, click Reload 3D.
Reload Textures
When you change a CAS part texture (i.e. base, mask, etc.) or a pattern color/swatch, the 3D view window should automatically change the textures. If it's not refreshed, then click "Reload Textures".

