Difference between revisions of "User:Armiel/Tutorial How to take upload pics for lots"
| Line 7: | Line 7: | ||
{| class="collapsible collapsed wikitable" style="width:100%" | {| class="collapsible collapsed wikitable" style="width:100%" | ||
|- | |- | ||
| − | ! style="text-align:left" | No over | + | ! style="text-align:left" | No over-Photoshopping |
|- | |- | ||
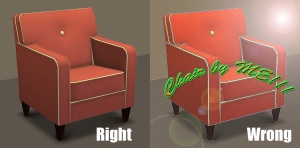
| − | | | + | |[[Image:Chairs-Photoshopped.jpg|right|300x300px]]While it can be tempting to get artistic with your screenshots in Photoshop, please don't. Screenshots need to be just as things look in the game, with no extra filtering such as contrast, sharpen, blur, saturation, etc. Also, please don't too crazy when it comes to adding text - make sure your text is in blank areas of the picture or covers an absolute minimum of your creation. Remember, you're showing off what you've made for the game, not your skill in Photoshopping your pics. |
| − | While it can be tempting to get artistic with your screenshots in Photoshop, please don't. Screenshots need to be just as things look in the game, with no extra filtering such as contrast, sharpen, blur, saturation, etc. Also, please don't too crazy when it comes to adding text - make sure your text is in blank areas of the picture or covers an absolute minimum of your creation. Remember, you're showing off what you've made for the game, not your skill in Photoshopping your pics. | + | <br style="clear:both" /> |
|} | |} | ||
| − | |||
| − | |||
| − | |||
| − | |||
| − | |||
| − | |||
| − | |||
| − | |||
| − | |||
| − | === | + | {| class="collapsible collapsed wikitable" style="width:100%" |
| − | + | |- | |
| − | + | ! style="text-align:left" | Enough Light | |
| + | |- | ||
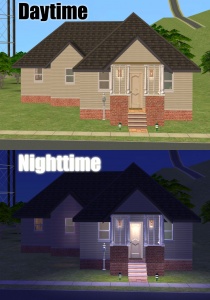
| + | |[[Image:Daynight.jpg|right|300x300px]]Your main screenshots should always be daytime screenshots, as they make it much easier to see what your lot looks like. We will only accept nighttime screenshots if they are sufficiently light enough to see your lot clearly, and they should only be used as optional, extra screenshots. Make sure your lights are turned on, and your game options are turned up enough that light makes a difference. | ||
| − | + | '''Tip''' | |
| − | + | *TS2 - If you click the "Day/Night" toggle and place lights during the night they will automatically be switched on. | |
| − | + | *TS3 - If you click the "Day/Night" toggle the lights will toggle on/off. | |
| − | + | |} | |
| − | + | ||
| − | + | ||
| − | + | ||
{| class="collapsible collapsed wikitable" style="width:100%" | {| class="collapsible collapsed wikitable" style="width:100%" | ||
|- | |- | ||
| − | ! style="text-align:left" | | + | ! style="text-align:left" | Distance |
|- | |- | ||
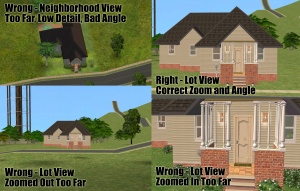
| − | | | + | |[[Image:Lots-CloseEnough.jpg|right|300x300px]]Screenshots taken on the lot should show the whole lot, zoomed in so that the lot is centered in your view. You shouldn't have a lot of blank space on the sides, or cut off the edges of the lot in your picture. |
| − | + | ||
| − | + | ||
| − | + | ||
| − | + | Screenshots of lots taken from neighborhood view are low detail and often have holes in the walls and are missing objects. They have a poor angle, too high up, and really don't show off your lot very well. | |
| − | + | ||
| − | + | ||
| − | + | ||
| − | + | ||
| − | + | ||
| − | + | ||
| − | + | ||
| − | + | ||
| − | + | ||
| − | + | ||
| − | + | ||
| − | + | ||
| − | + | ||
| − | + | ||
| − | + | ||
| − | + | ||
| − | + | ||
| − | + | ||
| − | + | ||
|} | |} | ||
{| class="collapsible collapsed wikitable" style="width:100%" | {| class="collapsible collapsed wikitable" style="width:100%" | ||
|- | |- | ||
| − | ! style="text-align:left" | | + | ! style="text-align:left" | Centered |
|- | |- | ||
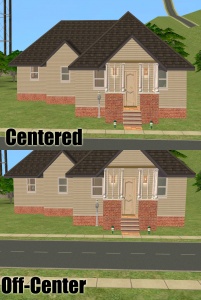
| − | | | + | |[[Image:Centered.jpg|right|300x300px]]Make sure that your building is the main focus of your screenshots, and adjust your camera angle so that the lot is centered and fills the whole image. Don't take your pictures at an angle that shows something irrelevant like the sky, the street, or the house next door, while cutting off your lot. |
| − | + | |} | |
| − | + | {| class="collapsible collapsed wikitable" style="width:100%" | |
| − | + | |- | |
| + | ! style="text-align:left" | Angle | ||
| + | |- | ||
| + | |[[Image:Angle.jpg|right|300x300px]]When taking your pictures, drop down to a low level with the camera, so that you are taking your pictures basically from a sim's perspective. Many beginners make the mistake of taking pictures from high above the lot, from the normal perspective one would have as a player. This gives mostly a picture of the roof and not the lot itself, and really doesn't show off the lot very well. | ||
|} | |} | ||
{| class="collapsible collapsed wikitable" style="width:100%" | {| class="collapsible collapsed wikitable" style="width:100%" | ||
|- | |- | ||
| − | ! style="text-align:left" | | + | ! style="text-align:left" | No Gridlines and Interface |
|- | |- | ||
| − | | | + | |[[Image:GridlinesUI.jpg|right|300x300px]]When taking your screenshots, you should take them in Cameraman Mode (using the TAB key) so that you don't get the User Interface (the blue control panel) in your shots. You also have better control of the camera in Cameraman Mode. |
| − | + | ||
| − | ''' | + | '''Tip:''' |
| + | *TS2 - If you press R on your keyboard before hitting Tab, it will also temporarily remove the gridlines. | ||
| + | *TS3 - You will have to move in a sim to the lot to take your pictures in Cameraman Mode, and without the gridlines. While this is a bit of a hassle, the camera controls (and resulting pictures) are MUCH better that way. | ||
| + | |||
|} | |} | ||
{| class="collapsible collapsed wikitable" style="width:100%" | {| class="collapsible collapsed wikitable" style="width:100%" | ||
|- | |- | ||
| − | ! style="text-align:left" | | + | ! style="text-align:left" | Lot Picture as Main Thumbnail |
|- | |- | ||
| − | | | + | |If you have based your lot off a real house or house plan, please choose an actual picture of the house you've built (i.e. an in-game picture) as your default thumbnail. Don't use a photo,drawing or floorplan of the original lot – people want to see at a glance what they'll get in-game, not the picture you used as inspiration. Also, please edit the thumbnail as little as possible – a border or a title is fine, but a collage with real photos or drowning the picture in photoshop effects are not. |
| − | + | ||
| − | + | ||
| − | + | ||
| − | + | ||
| − | |||
|} | |} | ||
| + | |||
| + | {{Guidelines-Screenshots-InlineandAttached}} | ||
| + | {{Guidelines-Screenshots-NoPayContent}} | ||
| + | {{Guidelines-Screenshots-Tips}} | ||
| + | |||
| + | ===Required Screenshots=== | ||
| + | Certain screenshots are absolutely required when uploading lots. | ||
| + | We require certain screenshots for lot uploads - if you do not include these screenshots, your lot will not be approved! | ||
{| class="collapsible collapsed wikitable" style="width:100%" | {| class="collapsible collapsed wikitable" style="width:100%" | ||
|- | |- | ||
| − | ! style="text-align:left" | | + | ! style="text-align:left" | Exterior Shot |
|- | |- | ||
| − | | | + | |[[Image:TS3-Exterior01.jpg|right|300x300px]]Show the entire lot from the outside as it is seen from the street. |
| − | + | Show the back of the house from the outside making sure to include any patios or pools. | |
| − | + | Make sure you show the house with all levels visible, and the roof on - and that you do it from a sim's eye view, not high above, from a player's eye view. | |
| − | + | Show a top down view of the whole lot with walls and roofs up. This will show all landscaping as well as the roof. | |
|} | |} | ||
{| class="collapsible collapsed wikitable" style="width:100%" | {| class="collapsible collapsed wikitable" style="width:100%" | ||
|- | |- | ||
| − | ! style="text-align:left" | | + | ! style="text-align:left" | Interior Floor Plans |
|- | |- | ||
| − | | | + | |[[Image:TS3-FloorPlans01.jpg|right|300x300px]]Show a basic layout or floor plan of the lot, ensuring that for each building on it, the entire level is displayed. (This pic needs to present the complete layout and not just a collage of individual rooms.) This is best accomplished with an overhead shot. Make sure these pictures are large enough so people can see details. |
| − | + | ||
| − | + | Make sure that you display the floor plan for each playable level on your lot if there is more than one accessible floor, and be sure to center just the house itself in the picture. | |
| − | + | ||
| − | + | '''TS3 Apartments''' | |
| − | + | ||
| − | + | Make sure the floor plans include the livable area as well as the NPC areas that are marked with the hidden room marker. For levels that you have used the '''level skip''' marker, you can just state that in the description about those levels, you do not need to provide those floor plan views. | |
|} | |} | ||
| − | |||
| − | + | {| class="collapsible collapsed wikitable" style="width:100%" | |
| + | |- | ||
| + | ! style="text-align:left" | Comparison Picture | ||
| + | |- | ||
| + | |If your lot is based on a real building (for example, a particular castle, a particular chain of supermarket, a house from a movie), then please include a comparison picture of the real building. We understand there are some major limitations in the build tools and lot sizes, so it may not be possible to reproduce a building exactly, but it should bear a close resemblance as best as can be achieved with the tools available. | ||
| + | |} | ||
Revision as of 09:39, 3 August 2012
A tutorial on how to take good screenshots of lots. Please see the screenshot basics for learning how to control the game's camera, and adjust your graphics options for best results here.
Screenshots
People want to see what they're downloading! Your screenshots sell your upload - if people don't like the look of your screenshots, they're not going to download - and if your screenshots are too bad, you won't get your upload approved. Please make sure your screenshots show your lot as you have packaged it.
| Big Enough |
|---|
The larger your pics, the better! Tiny pics won't show enough detail to see what you've made.
Please don't just take a small pic and size it up in your graphics program to get bigger pics - this only makes the dimensions larger but doesn't add any detail and just gives you a blurry, pixellated larger pic, not a nice clear one. |
| No over-Photoshopping |
|---|
| While it can be tempting to get artistic with your screenshots in Photoshop, please don't. Screenshots need to be just as things look in the game, with no extra filtering such as contrast, sharpen, blur, saturation, etc. Also, please don't too crazy when it comes to adding text - make sure your text is in blank areas of the picture or covers an absolute minimum of your creation. Remember, you're showing off what you've made for the game, not your skill in Photoshopping your pics.
|
| Enough Light |
|---|
| Your main screenshots should always be daytime screenshots, as they make it much easier to see what your lot looks like. We will only accept nighttime screenshots if they are sufficiently light enough to see your lot clearly, and they should only be used as optional, extra screenshots. Make sure your lights are turned on, and your game options are turned up enough that light makes a difference.
Tip
|
| Distance |
|---|
| Screenshots taken on the lot should show the whole lot, zoomed in so that the lot is centered in your view. You shouldn't have a lot of blank space on the sides, or cut off the edges of the lot in your picture.
Screenshots of lots taken from neighborhood view are low detail and often have holes in the walls and are missing objects. They have a poor angle, too high up, and really don't show off your lot very well. |
| Centered |
|---|
| Make sure that your building is the main focus of your screenshots, and adjust your camera angle so that the lot is centered and fills the whole image. Don't take your pictures at an angle that shows something irrelevant like the sky, the street, or the house next door, while cutting off your lot. |
| Angle |
|---|
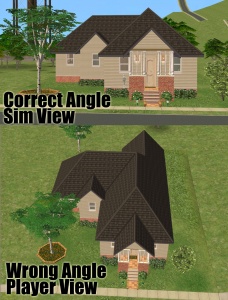
| When taking your pictures, drop down to a low level with the camera, so that you are taking your pictures basically from a sim's perspective. Many beginners make the mistake of taking pictures from high above the lot, from the normal perspective one would have as a player. This gives mostly a picture of the roof and not the lot itself, and really doesn't show off the lot very well. |
| No Gridlines and Interface |
|---|
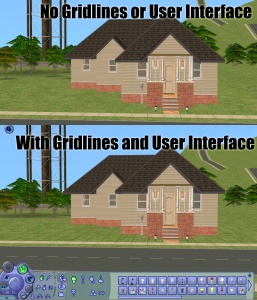
| When taking your screenshots, you should take them in Cameraman Mode (using the TAB key) so that you don't get the User Interface (the blue control panel) in your shots. You also have better control of the camera in Cameraman Mode.
|
| Lot Picture as Main Thumbnail |
|---|
| If you have based your lot off a real house or house plan, please choose an actual picture of the house you've built (i.e. an in-game picture) as your default thumbnail. Don't use a photo,drawing or floorplan of the original lot – people want to see at a glance what they'll get in-game, not the picture you used as inspiration. Also, please edit the thumbnail as little as possible – a border or a title is fine, but a collage with real photos or drowning the picture in photoshop effects are not. |
| Maximum Number of Inline/attached screenshots |
|---|
You may now upload up to 100 pics! Of course, please keep it to a reasonable quantity... only things like huge sets, full worlds, etc. should have that many pics! Remember, you can always collage several different images together into one image if you have a bunch of stuff to show off, or want to show multiple angles of an item. For the bonus photos, we recommend you use a spoiler tag to hide the images, then people can click on it to see them. Their pages will load faster if all the images aren't downloading at once. [spoiler=interior rooms]http:// wheveremypictureis/picture.jpg[/spoiler] The 'interior rooms' can be replaced by whatever grouping you want to present, 'hidden garden', 'pool views', 'master suite', 'kids room', etc. You may place as many photos within a spoiler grouping as you'd like.
|
| No pay content in screenshots |
|---|
| Do not use pay content in your screenshots! Do not use pay hair in your screenshots!
You MUST use free or EA/Maxis items in your screenshots! MTS promotes and supports free content, and using pay content in screenshots is basically like free advertisement for paysites. This includes pay content you found elsewhere for free - if it was pay originally, it's still promoting pay content. We strongly recommend taking pics with neutral backgrounds, just showing off what you've made and nothing more. Not only does this look nicer for uploads, it also eliminates any possibility that you may inadvertently include pay items in your screenshots. As per the news item of November 2010, do not use pay items in your upload. A pay item is an item that you'd have to donate money to access if you went to the original creator's website. It doesn't matter if you can get it for free through a file sharing site - it's still a pay item. Don't use pay items in your screenshots either, even if they are not included. Links for "optional" or "recommended" content may be included as long as they are free sites only. If you need free hair for a model in your pics, MTS has an extensive collection of free hairstyles in our Downloads section. You can also look in the TS2 Hair Gallery or TS3 Hair Gallery for more free hairstyles to find something you'll like. We STRONGLY recommend that you credit the hair (and other content) used in your screenshots in the text of your upload post. With hundreds of hairstyles out there, it's very difficult for our upload moderators to know every hairstyle on sight, and if we have to hunt down where the hair is from to see if it's pay or free, it may take longer for your upload to be approved. Make it easy on us and at least say something like, "Hair from XM Sims (free)" in the text of your post under a little section for model credits.
|
| Screenshot tips |
|---|
| Camera Controls:
Take some time to just play around with the camera. It can take a while to get used to the camera controls, and even once you are experienced in their use, it may be challenging to get the shot you want with the constraints on the controls. If you haven't taken many sim pictures before, here is a list of camera controls:
Using Print Screen: If you have enough RAM to run Photoshop or another graphics editing program at the same time as TS2/TS3, you may want to take screenshots yourself, without the use of a program to store them for you. To do that, simply press the Print Screen or PrntScn key on your keyboard - it's usually off toward the right, over the arrow keys, above Insert and Delete. This will copy your current screen to your Windows clipboard, as if you had selected and copied it as an image. Then open any graphics editing program, create a new document the size of your monitor's resolution, and paste into that document. Your screenshot should appear in the document.
There are many programs available, free and pay, that will take screenshots for you by using a hotkey, and save them to a folder - just like The Sims 2 with the C key, but with options for much better quality settings. A quick Google search for 'free screenshot program' will also bring up many other options, which may have other features that are of interest to you.
Many simmers struggle with getting their images to be clear, crisp and under the maximum file size while keeping the image size larger than 800px by 600px. After getting your images from the in game camera or using a print screen program you will need to resize them and compress them into a jpeg image. Many graphics programs have a built in optimizing feature. Here are a few common ones: |
Required Screenshots
Certain screenshots are absolutely required when uploading lots. We require certain screenshots for lot uploads - if you do not include these screenshots, your lot will not be approved!
| Exterior Shot |
|---|
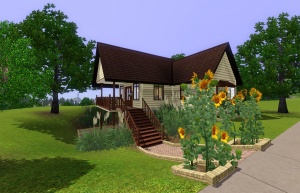
| Show the entire lot from the outside as it is seen from the street.
Show the back of the house from the outside making sure to include any patios or pools. Make sure you show the house with all levels visible, and the roof on - and that you do it from a sim's eye view, not high above, from a player's eye view. Show a top down view of the whole lot with walls and roofs up. This will show all landscaping as well as the roof. |
| Interior Floor Plans |
|---|
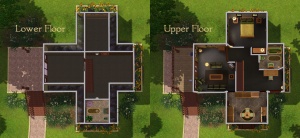
| Show a basic layout or floor plan of the lot, ensuring that for each building on it, the entire level is displayed. (This pic needs to present the complete layout and not just a collage of individual rooms.) This is best accomplished with an overhead shot. Make sure these pictures are large enough so people can see details.
Make sure that you display the floor plan for each playable level on your lot if there is more than one accessible floor, and be sure to center just the house itself in the picture.
Make sure the floor plans include the livable area as well as the NPC areas that are marked with the hidden room marker. For levels that you have used the level skip marker, you can just state that in the description about those levels, you do not need to provide those floor plan views. |
| Comparison Picture |
|---|
| If your lot is based on a real building (for example, a particular castle, a particular chain of supermarket, a house from a movie), then please include a comparison picture of the real building. We understand there are some major limitations in the build tools and lot sizes, so it may not be possible to reproduce a building exactly, but it should bear a close resemblance as best as can be achieved with the tools available. |
