Difference between revisions of "Tutorials:3D Meshing Part VI"
(→3D Meshing, Part VI: Ready, Set, Go!) |
|||
| (5 intermediate revisions by 4 users not shown) | |||
| Line 1: | Line 1: | ||
| − | ==3D Meshing | + | {| style="border:none; background-color:#f9f9f9" width="100%" align="center" |
| + | |- | ||
| + | !align="left" style="font-weight:normal" |[[Tutorials:3D Meshing Part V|<<Back]] | ||
| + | |align="center"|[[Tutorials:3D Meshing Index|Index]] | ||
| + | |align="right"|[[Tutorials:3D Meshing Part VII|Next>>]] | ||
| + | |} | ||
| + | |||
{{Infobox Tutorial | {{Infobox Tutorial | ||
| Line 10: | Line 16: | ||
| website = | | website = | ||
}} | }} | ||
| + | |||
| + | |||
| + | ==3D Meshing, Part VI: Ready, Set, Go!== | ||
In the last five lessons we learned a lot, I hope, and if you got number five done, you have a model that is ready to go. So load that model up, we're going to learn to animate it now. | In the last five lessons we learned a lot, I hope, and if you got number five done, you have a model that is ready to go. So load that model up, we're going to learn to animate it now. | ||
| Line 19: | Line 28: | ||
Next, go to the File menu, pick preferences, click on the misc tab and make sure that 24 is in the Animation FPS box. FPS is frames per second, and when we have 24 in our animation and it plays at 24 per second, then the animation will happen at a rate we can calculate... one second in length. | Next, go to the File menu, pick preferences, click on the misc tab and make sure that 24 is in the Animation FPS box. FPS is frames per second, and when we have 24 in our animation and it plays at 24 per second, then the animation will happen at a rate we can calculate... one second in length. | ||
| − | Now, the crane is in the position I want it to be in at the beginning and end, so we will learn to set a '''keyframe'''. At the bottom there should be a | + | Now, the crane is in the position I want it to be in at the beginning and end, so we will learn to set a '''keyframe'''. At the bottom there should be a time line pointer with some ruler marks under it. If that is not visible, you turn it on in the Window menu (Show Keyframer). |
Also, make sure that "Operate on Selected Joints Only" in the Animate menu is turned off. That is for making advanced animation overlays. | Also, make sure that "Operate on Selected Joints Only" in the Animate menu is turned off. That is for making advanced animation overlays. | ||
| Line 32: | Line 41: | ||
| − | + | I will post a screenshot below showing the windows as it should look after you set the ending keyframe: | |
| + | |||
| + | [[Image:setlastframe.jpg|300x300px|center]] | ||
<br style="clear:both" /> | <br style="clear:both" /> | ||
| − | |||
| − | |||
First, we are going to make the arm swing. Be sure that the root joint is selected, and move the pointer to frame 12. Now, go to the Model panel and click on rotate, and then check the origin and local round buttons. | First, we are going to make the arm swing. Be sure that the root joint is selected, and move the pointer to frame 12. Now, go to the Model panel and click on rotate, and then check the origin and local round buttons. | ||
| Line 45: | Line 54: | ||
If it just sort of jiggles and doesn't play smoothly, save your file ()turn the Anim button off for this, and back on when reloaded) and reload it. If it doesn't look like what I posted below, you can go to the Animate menu and use Remove all Keyframes to start over. | If it just sort of jiggles and doesn't play smoothly, save your file ()turn the Anim button off for this, and back on when reloaded) and reload it. If it doesn't look like what I posted below, you can go to the Animate menu and use Remove all Keyframes to start over. | ||
| − | + | The order that you do things in is important to getting the desired results: | |
| + | [[Image:cranemotion.gif|center]]<br style="clear:both" /> | ||
OK, so why did we make two joints, and why is your picture so small? | OK, so why did we make two joints, and why is your picture so small? | ||
| Line 54: | Line 64: | ||
Anyway, the second bone is to add another range of motion to just the arm. You can select just that bone, and add a frame at 6 with it raised, and one at 18 with it lowered, and you should then have a motion like I posted below (and OK, I made it a little bigger). | Anyway, the second bone is to add another range of motion to just the arm. You can select just that bone, and add a frame at 6 with it raised, and one at 18 with it lowered, and you should then have a motion like I posted below (and OK, I made it a little bigger). | ||
| − | [[Image:dualmotion.gif| | + | [[Image:dualmotion.gif|center]] |
| − | + | ||
| − | + | ||
| − | + | ||
| − | + | ||
| − | + | ||
| + | Now, you can texture the crane, load a background image onto a plane placed behind the crane and make a video and put it on you-tube. I'm not so sure that it would be a hit, but maybe you have better ideas. This project was designed just to be easy to teach from. All of the most-needed skills are shown, and while there are many more cool things you can learn to do yet that we didn't cover, you have definitely moved past GO.<br style="clear:both" /> | ||
| + | ==Questions and Answers== | ||
| − | |||
| + | *[http://www.customsims3.com/forum1/YaBB.pl?num=1203954633/0 Custom Sims3 Forums] Visit Custom Sims3 Forums for Questions and Answers | ||
| + | {| style="border:none; background-color:#f9f9f9" width="100%" align="center" | ||
| + | |- | ||
| + | !align="left" style="font-weight:normal" |[[Tutorials:3D Meshing Part V|<<Back]] | ||
| + | |align="center"|[[Tutorials:3D Meshing Index|Index]] | ||
| + | |align="right"|[[Tutorials:3D Meshing Part VII|Next>>]] | ||
| + | |} | ||
| − | [[Category:Sims 2 Tutorials]] | + | [[Category:Sims 2 Modding Tutorials]] |
| − | [[Category:Sims 3 Tutorials]] | + | [[Category:Sims 3 Modding Tutorials]] |
[[Category:Sims 3 Meshing Tutorials]] | [[Category:Sims 3 Meshing Tutorials]] | ||
[[Category:Tutorials by Wes Howe]] | [[Category:Tutorials by Wes Howe]] | ||
| + | [[Category:Milkshape Tutorials]] | ||
Latest revision as of 15:47, 17 September 2012
| <<Back | Index | Next>> |
|---|
| 3D Meshing Part VI | |
|---|---|
| Author | WesHowe |
[edit] 3D Meshing, Part VI: Ready, Set, Go!
In the last five lessons we learned a lot, I hope, and if you got number five done, you have a model that is ready to go. So load that model up, we're going to learn to animate it now.
The first thing we need to learn is that there is a big button labeled Anim in the bottom right corner that we will use, and that when we turn that on, some things happen differently. You can't build and make mesh changes while that button is down.
But when it is down, and I want you to click it now, we can animate our model. The first thing we want to do is set our frame length to 24. To the left of the Anim button are four text boxes with numbers in them. Put 24 in the two right hand side boxes. One is the last frame to be played, the rightmost one is the last frame of the animation. You can set the last frame to be smaller than the whole animation if you want to work on a part of the animation, but that is more advanced than we are going to go today.
Next, go to the File menu, pick preferences, click on the misc tab and make sure that 24 is in the Animation FPS box. FPS is frames per second, and when we have 24 in our animation and it plays at 24 per second, then the animation will happen at a rate we can calculate... one second in length.
Now, the crane is in the position I want it to be in at the beginning and end, so we will learn to set a keyframe. At the bottom there should be a time line pointer with some ruler marks under it. If that is not visible, you turn it on in the Window menu (Show Keyframer).
Also, make sure that "Operate on Selected Joints Only" in the Animate menu is turned off. That is for making advanced animation overlays.
We need to specify which bones we want to work on, so go to the joints panel, check "Draw vertices with bone colors" and then double-click on the root joint, making sure everything is selected like in the last lesson.
If you grab the pointer on the keyframer with your mouse, you can slide it right and left to different tick marks, and the number in the second text box changes to show what is the current frame. Move back to the leftmost tick and make sure the box says 1 (or 1.0) in it. Now, set a keyframe by going to the Animate menu and picking "Set Keyframe". When you do this, the bones will turn from green to deep red, which indicates that they are part of a keyframe.
The important things we did was we have one or more bones selected, a timevalue (pointer set on 1.0) and then we locked it in by using the menu (I prefer to use the shortcut, Ctrl-k). Now, slide the pointer all the way to the right and set another keyframe. This makes our start and end points identical, so we can loop cleanly.
If you slide the pointer back and forth, you will see the bones are red only on the first and last frames, and green in the middle. You could press the play button now, but nothing visible will happen because none of our position have changed.
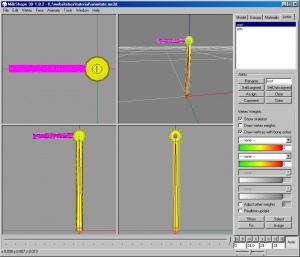
I will post a screenshot below showing the windows as it should look after you set the ending keyframe:
First, we are going to make the arm swing. Be sure that the root joint is selected, and move the pointer to frame 12. Now, go to the Model panel and click on rotate, and then check the origin and local round buttons.
We will do an exact setting, rather than a mouse one. There are three buttons X, Y and Z that can be used to lock the rotation axes, it's OK that they should all three be pressed in. In the text box under them, type in -60 into the box underneath Y, make sure X and Z have 0 in them and click on the Rotate button right next to the boxes. The entire crane should rotate to it's right by sixty degrees.
Now we will lock that in by setting a keyframe (menu or ctrl-k). Now turn rotate back off, click in the perspective (3D) window to activate it, click on the rewind button [||<] and then on the play button [>]. The crane should swing back and forth as the animation loops.
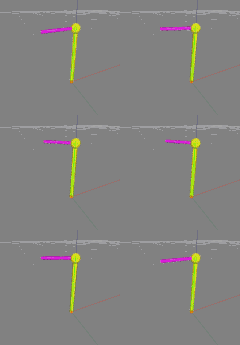
If it just sort of jiggles and doesn't play smoothly, save your file ()turn the Anim button off for this, and back on when reloaded) and reload it. If it doesn't look like what I posted below, you can go to the Animate menu and use Remove all Keyframes to start over.
The order that you do things in is important to getting the desired results:
OK, so why did we make two joints, and why is your picture so small?
To make the animated GIF, I right-clicked on the perspective window and picked Maximize, and then I right clicked (Anim button down) and selected "Record AVI..." to make a video. I used the JASC Animation Shop, which I think is still free, to size it way smaller and export it as a GIF file, to save website space.
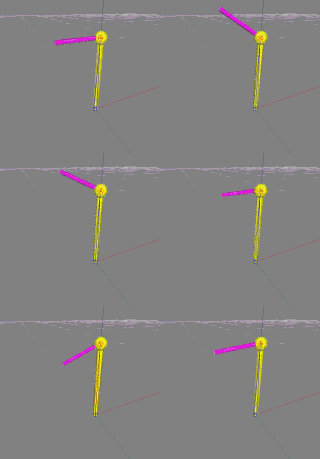
Anyway, the second bone is to add another range of motion to just the arm. You can select just that bone, and add a frame at 6 with it raised, and one at 18 with it lowered, and you should then have a motion like I posted below (and OK, I made it a little bigger).
Now, you can texture the crane, load a background image onto a plane placed behind the crane and make a video and put it on you-tube. I'm not so sure that it would be a hit, but maybe you have better ideas. This project was designed just to be easy to teach from. All of the most-needed skills are shown, and while there are many more cool things you can learn to do yet that we didn't cover, you have definitely moved past GO.
[edit] Questions and Answers
- Custom Sims3 Forums Visit Custom Sims3 Forums for Questions and Answers
| <<Back | Index | Next>> |
|---|


