Difference between revisions of "Tutorials:TS3 HTMG SectG2 Specular"
From SimsWiki
EllaCharm3d (Talk | contribs) (→Questions? Problems?) |
|||
| (2 intermediate revisions by 2 users not shown) | |||
| Line 23: | Line 23: | ||
#* Select a layer and click trashcan | #* Select a layer and click trashcan | ||
#* Double-click the name (red/green/blue, whichever one is left) to edit and rename this layer – I called it "main"<br><br> | #* Double-click the name (red/green/blue, whichever one is left) to edit and rename this layer – I called it "main"<br><br> | ||
| − | # If it is missing, add an alpha channel: '''Layer''' → '''Transparency''' → '''Add Alpha Channel'''. It needs to be all | + | # If it is missing, add an alpha channel: '''Layer''' → '''Transparency''' → '''Add Alpha Channel'''. It needs to be all black.<br><br> |
# Do the same thing we did for the main texture – float and extract parts of it into its own layers.<br><br> | # Do the same thing we did for the main texture – float and extract parts of it into its own layers.<br><br> | ||
# When you<nowiki>'</nowiki>re done - save as .xcf, and then do a '''Save As '''for a .jpg/.dds version | # When you<nowiki>'</nowiki>re done - save as .xcf, and then do a '''Save As '''for a .jpg/.dds version | ||
| Line 29: | Line 29: | ||
| + | |||
| + | {{MTS2ThankThread|2901305}} | ||
== Questions? Problems? == | == Questions? Problems? == | ||
| Line 56: | Line 58: | ||
{{Navigator|Tutorials:TS3_Basic_HowTo_Mesh_Guide|Tutorials:TS3_HTMG_ChapF_Decompiling|Tutorials:TS3_HTMG_ChapH_MeshingMilkshape}} | {{Navigator|Tutorials:TS3_Basic_HowTo_Mesh_Guide|Tutorials:TS3_HTMG_ChapF_Decompiling|Tutorials:TS3_HTMG_ChapH_MeshingMilkshape}} | ||
| − | [[Category:Sims 3]] | + | [[Category:Sims 3 Modding Tutorials]] |
| − | [[Category:Sims 3 Tutorials]] | + | [[Category:Sims 3 Meshing Tutorials]] |
| + | [[Category:Tutorials by ellacharm3d]] | ||
Latest revision as of 15:59, 17 September 2012
| Texturing in Gimp | |
|---|---|
|
Main texture | Specular | PartMask | DropShadow | Overlay |
[edit] G. Texture me beautiful
[edit] G2. Specular
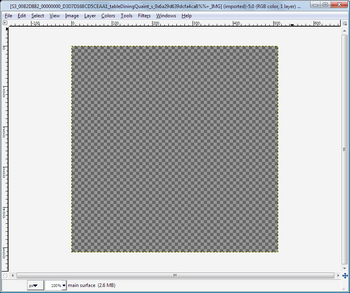
- When we first open this, you might just see a transparent image (the gray checkered background)
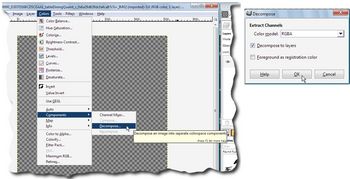
- We need to do Colors → Decompose, and select RGBA. This will give us the four channels as layers. FYI, RGB would only gives us 3 channels (the RGB, no Alpha) and only if they are in use. So, in this case we would not get the Blue channel. Might have no impact in this case, but good to start best practices early on, so we won't hit a brick wall later.
- Close the original, we won't need it yet
- Save as a Gimp image with an .xcf extension
- When we decomposed, the Image mode is switched to Grayscale. Revert it back:
- Under Image → Mode → RGB.
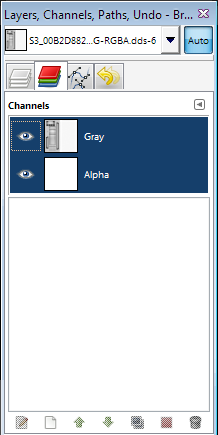
- Channels will now have all four with thumbnails of our pic in gray as it should
- In Layers Dialog, delete all but one layer
- Select a layer and click trashcan
- Double-click the name (red/green/blue, whichever one is left) to edit and rename this layer – I called it "main"
- If it is missing, add an alpha channel: Layer → Transparency → Add Alpha Channel. It needs to be all black.
- Do the same thing we did for the main texture – float and extract parts of it into its own layers.
- When you're done - save as .xcf, and then do a Save As for a .jpg/.dds version
[edit] Questions? Problems?
- If you encounter any problems with the steps outlined in this tutorial and need help, head on over to the Step-by-step Start-to-Finish HowTo mesh guide for TS3 thread to post your questions or
- If you need help in fixing your mesh, you may want to browse through our TS3 Meshing FAQs for some of the more common Meshing issues and their fixes or
- If none of the above links provided any help, you may want to browse through the threads in MTS' Meshing Forum or even start your own thread.
| |
|
TS3 HTMG SectG2 Specular | |
|
| Texturing in Gimp | |
|---|---|
|
Main texture | Specular | PartMask | DropShadow | Overlay |
| |
|
TS3 HTMG SectG2 Specular | |
|


