Difference between revisions of "Tutorial:Sims 3 Eyebrows Tutorial"
m |
|||
| (28 intermediate revisions by 2 users not shown) | |||
| Line 1: | Line 1: | ||
| − | + | {{TS3ModdingHeader}} | |
| − | + | <blockquote>'''It has come to my attention that many people would like to learn how to make their own eyebrows for their Sims. I've put together this Tutorial and I hope that anyone who uses it will be able to succeed in this endeavour.''' | |
| − | + | ||
| − | + | ||
| − | + | ||
| − | + | You can find my MTS facial hair/eyebrow creations [http://www.modthesims.info/browse.php?f=342&u=2633275&gs=0 here at MTS.]</blockquote> | |
| − | + | <blockquote> | |
| + | *'''This is a fairly detailed tutorial and uses [http://www.modthesims.info/d/364926 CTU], [http://www.gimp.org/ GIMP] and [http://code.google.com/p/gimp-dds/downloads/list GIMP's DDS plugin]</blockquote> | ||
| + | |||
| + | |||
| + | |||
| + | |||
| + | |||
| + | |||
| + | <blockquote> | ||
| + | Since many people do not know where to place the DDS plugin, you put it in Programs/GIMP2.0/lib/gimp/2.0/plug-ins.'''</blockquote> | ||
| + | |||
| + | |||
| + | |||
| + | [[File:Ddslocation.jpg]] | ||
| + | |||
| + | |||
| + | |||
| + | |||
| + | =Let's Begin!= | ||
| + | |||
| + | ==Open CTU== | ||
| + | |||
| + | Open CTU. Hsve no fear, the steps gradually become more and more complicated. | ||
| + | |||
| + | ==Finding a Maxis eyebrow package to clone== | ||
| + | |||
| + | Under "Find a CAS part" choose Adult, Female (or Male if that's what you want to create), and Makeup. Yes, Makeup. You will see all of the young adult/adult female eyebrows that come with the game. These are Sims 3 Package files. Choose any one, they all work. | ||
| + | |||
| + | |||
| + | |||
| + | [[File:CTU_Locating_the_Eyebrows-2.jpg]] | ||
| + | |||
| + | ==Locating the correct files in CTU== | ||
| + | |||
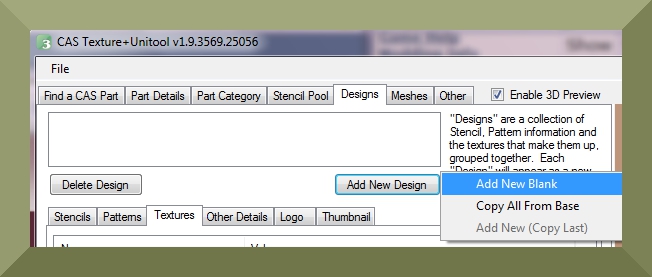
| + | Go to the "Designs" tab, and click "Add New Design," then "Add New Blank." Directly beneath this you will see 6 other tabs. Click on "Textures." | ||
| + | |||
| + | |||
| + | [[File:CTU_Add_New_Blank_Screen-2.jpg]] | ||
| + | |||
| + | |||
| + | Under "Value" you will see 3 sets of numbers. We want to change the "Face Overlay," so click where it says key:00B2D882:00000000:...to the right. | ||
| + | |||
| + | |||
| + | Then go to the bottom and click "Find." This will bring up a window with our very important DDS file. This is the file we will be working on in GIMP (or whatever such program you prefer). At the bottom of that window, click "Export." Give a name to the file and save it somewhere on your computer. I usually have a file in My Documents called "CTU Projects," and I always start my file name with my MTS user name and what type of file it is. For this tutorial I will call my file: Simmiller_Eyebrows_Eyebrow Tutorial. You can put it anywhere you like as long as you remember its location. | ||
Close the DDS preview window in CTU. | Close the DDS preview window in CTU. | ||
| − | |||
| − | |||
| − | |||
| − | '' | + | :'''***CTU TIP #1***''' |
| + | You have the option at this point of closing CTU, but I never do unless something from Real Life comes up. If you do, you will have to repeat steps 1 through 4. Not to worry, though, because your DDS file will already be saved, and again, this is the critical file we will be altering in GIMP. I like to keep CTU open though, because we are going to be going back and forth from GIMP to CTU to check our progress. | ||
| − | |||
| − | + | ==Opening your files in GIMP== | |
| − | '''***GIMP TIP #2***''' When all of the eyes are showing open, there is a heirarchy of layers that you will see on your open DDS file. Red is the bottom layer of the file, but if it's eye is open, that will be the only layer you will see, regardless of whether or not the other layers' eyes are open. | + | Open GIMP and bring up your DDS file. '''***Very Important*** Make sure you UN-tick "Load Mipmaps!!!!''' It comes up as a one layer file, so we need to break it down in order to clearly see what we need to change. Click "Colors," move down the menu to "Components," and click "Decompose." A cute little "Decompose" window pops up and has a drop down menu entitled "Color model." |
| + | |||
| + | |||
| + | |||
| + | *Make absolutely sure you have '''RGBA''' showing on this drop down menu, then click OK. Your funky little DDS file comes up broken down into 4 layers. | ||
| + | |||
| + | You may now close your original DDS file in GIMP because we will only be working with the decomposed file's layers. | ||
| + | |||
| + | |||
| + | ==What layer will change the actual eyebrow in GIMP== | ||
| + | |||
| + | Click on your "Layers" tab on the Toolbox. This will bring up 4 windows with an eye symbol to the left of each layer. The eyes mean that you can "see" the layers. Close the view of the red, green, and blue layers by clicking on the corresponding eye icon. Now you will only see the alpa layer. | ||
| + | |||
| + | *This is the most important layer because this is the main shape and texture of your eyebrow. | ||
| + | |||
| + | |||
| + | |||
| + | :'''***GIMP TIP #1***''' Clicking on the eye will hide the layer from view, but the file does NOT go anywhere. It's kind of like having 4 pages, and turning over 1 or more of the pages to show the blank backside. This will be necessary to work on individual layers. Also, the highlighted layer is the one that your changes will affect. You see red, green, blue, alpha. | ||
| + | |||
| + | |||
| + | |||
| + | :'''***GIMP TIP #2***''' When all of the eyes are showing open, there is a heirarchy of layers that you will see on your open DDS file. Red is the bottom layer of the file, but if it's eye is open, that will be the only layer you will see, regardless of whether or not the other layers' eyes are open. | ||
| + | |||
| + | |||
| + | ==Working with the alpha== | ||
| + | |||
| + | Highlight the alpha layer by clicking on it. | ||
| + | |||
| + | |||
| + | |||
| + | [[File:GIMP_alpha_layer.jpg]] | ||
| + | |||
| + | |||
| + | |||
| + | :'''***GIMP TIP #3***''' It's time to change the alpha layer to make our own unique eyebrows. To do this, I use the Paintbrush, Pencil, Rectangle, Elipse, Free, Fuzzy, Select by Colour, Flip, and Smudge Tools in the toolbox. You also will be using the Foreground colour block in shades of black, grey, and white. DDS files don't use other colours, no matter what you try!!!! White will show the darkest on your actual eyebrow, and black areas won't show at all. On the layer window, I use File, Edit, View, Colors, and Filter tabs. Go in and see what you can do. | ||
| + | |||
| + | |||
| + | |||
| + | [[File:GIMP_Tools_I_Use.jpg]] | ||
| − | |||
| − | |||
I am going to use my imagination on this one, instead of using a picture or preset idea. You will find that drawing and perfecting the eyebrow is the longest and most difficult part of the process. I am not ashamed to say that I sometimes come back and alter this layer about 20 or 30 times. Don't panic, though. You may very well be a better artist than I am and can get your changes done lickety-split! Either way, be happy with what you create. | I am going to use my imagination on this one, instead of using a picture or preset idea. You will find that drawing and perfecting the eyebrow is the longest and most difficult part of the process. I am not ashamed to say that I sometimes come back and alter this layer about 20 or 30 times. Don't panic, though. You may very well be a better artist than I am and can get your changes done lickety-split! Either way, be happy with what you create. | ||
| − | |||
| − | |||
| − | |||
| − | + | Make the "View" bigger, generally 200% or 400%. This makes it a lot easier to create details. Use whatever size you are comfortable with. | |
| − | |||
| − | |||
| − | I'm thinking that I don't like all that solid white colour | + | [[File:GIMP_View_Zoom.jpg]] |
| + | |||
| + | |||
| + | |||
| + | The beauty here is that you only need to work on one eyebrow on your alpha layer to start with. (We'll get to changing both later on) I pick the left one. It doesn't matter, again, use whichever you are most comfortable with. | ||
| + | |||
| + | |||
| + | |||
| + | Start drawing! This means it's time to use those tools I mentioned in GIMP TIP #3. This you will have to learn how to do on your own through trial and error. I'll keep posting pictures to show you my progress, though. | ||
| + | |||
| + | |||
| + | |||
| + | :'''***GIMP TIP #4***''' Copy and paste are your friends! Don't be afraid to use them to help you make your eyebrows longer, shorter, thinner, or wider. | ||
| + | |||
| + | |||
| + | |||
| + | :'''***GIMP TIP #5***''' Make sure you have the "Open the tool options dialogue" tab on your Toolbox so that you can change the tool's characteristics that you are currently using. It's usually there, along with the "Open the brushes dialogue" tab, if not, you can add it. | ||
| + | |||
| + | |||
| + | |||
| + | |||
| + | I'm using the copy and paste routine as an example to make this eyebrow thinner. | ||
| + | |||
| + | |||
| + | |||
| + | [[File:GIMP_copying_the_selection.jpg]] | ||
| + | |||
| + | |||
| + | |||
| + | I want a lot more detail in the eyebrow. I also want to get rid of some of the inner corner hair, so I'll use the Pencil tool for that. Any shade other than black will affect your eyebrow's actual shape. | ||
| + | |||
| + | |||
| + | |||
| + | I'm thinking that I don't like all that solid white colour, so I will choose a nice dark grey to define hairs into the centre section of the eyebrow, and I can use either the Pencil or the Paintbrush, or even the Smudge tool. My lines are very sharp looking right now because I used a basic circle and the Pencil tool. You can also use a fading circle as your drawing tool, or go under "Filters," then "Blur" to soften the edges. | ||
| + | |||
| + | |||
| + | |||
| + | [[File:GIMP_Pencilling_in_Hair_Definition.jpg]] | ||
| + | |||
| + | |||
| + | |||
| + | [[File:GIMP_Smudging_in_Hair_Lines.jpg]] | ||
| + | |||
| + | |||
| + | ==Matching the alpha and RGB layers== | ||
| + | |||
| + | Now go back to your "Layers" tab on the Toolbox. You will want to check to make sure that your Alpha coincides with your Red, Green, and Blue layers. Highlight one of the RGB layers, making sure to have the eye visible on only that layer and the alpha layer. On your highlighted layer, slide the "Opacity" indicator to the left until you can see where the new eyebrow is on the alpha. The location of the eyebrow on the alpha can be anywhere and any size as long as it appears on the eyebrow area in game. | ||
| + | |||
| − | |||
The RGB layers colour your alpha layer once the file becomes a Sims 3 package file. If they're not in line with the Alpha layer, your eyebrow will look very weird. | The RGB layers colour your alpha layer once the file becomes a Sims 3 package file. If they're not in line with the Alpha layer, your eyebrow will look very weird. | ||
| − | |||
| − | |||
| − | '''***GIMP TIP #6***''' You have the option of creating even more texture to your eyebrows by fiddling with the | + | '''''If your alpha and RGB layers coincide''''', realign the opacity on the RGB layer you used as comparison to the far right. Copy and paste that layer to the other RGB layers...don't go near the alpha with that layer!! Now, go to step 12. |
| − | + | ||
| − | + | ||
| + | |||
| + | '''''If your RGB layer and Alpha layer do not coincide''''', you will have to change the RGB layers to match the location of the alpha. This is done most easily by using the copy and paste method using chunks of what's already on the RGB layer you are working on, and by using the Smudge tool on a larger scale setting to move the colours around. Make certain that you make the 3 RGB layers identical to each other. The RGB layers colour your alpha layer once the file becomes a Sims 3 package file. If they're not in line with the Alpha layer, your eyebrow will look very weird. Copy and paste that layer to the other RGB layers...don't go near the alpha with that layer!! | ||
| + | |||
| + | |||
| + | |||
| + | :'''***GIMP TIP #6***''' You have the option of creating even more texture to your eyebrows by fiddling with the RGBA and alpha layers' brightness. Trial and error is also your friend. | ||
| + | |||
| + | |||
| + | |||
| + | ==Saving your dds file== | ||
| + | |||
| + | Now, I want to see how what I've done looks. Remember in Step 4 we "Decomposed" our file? Let's "Compose" it back to one layer, save it, and Replace the "Face Overlay" file in CTU. | ||
| + | |||
| + | |||
| + | |||
| + | To do this, click on "Colors," "components," then "compose." Make absolutely certain that you click RGBA in the "Color model:" dropdown menu. | ||
| + | |||
| + | |||
| + | |||
| + | [[File:GIMP_Compose_RGBA.jpg]] | ||
| + | |||
| + | |||
| + | |||
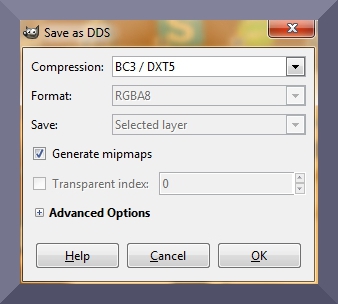
| + | Click "OK." Then click "File," "Save As," your DDS file name, "Replace." In the "Save as DDS" window that pops up, first click "Generate mipmaps," then under Format "RGBA8," and then, under "Compression" click BC3/DXT5. Click "OK," and your file is saved. | ||
| + | |||
| + | |||
| + | |||
| + | [[File:GIMP_saving_as_DDS.jpg]] | ||
| + | |||
| − | |||
Since you are very likely going to go back and alter the DDS file in GIMP again, '''DO NOT CLOSE IT!''' | Since you are very likely going to go back and alter the DDS file in GIMP again, '''DO NOT CLOSE IT!''' | ||
| − | |||
| − | + | ==Check your work in CTU== | |
| − | + | It's time to go back to CTU and see what's happening with the actual eyebrow. Click on the "Face Overlay" numbers again, then "Replace" at the bottom. | |
| − | |||
| − | |||
| − | + | [[File:CTU_Replacing_Face_Overlay.jpg]] | |
| + | |||
| + | |||
| + | |||
| + | Find your DDS file that you just saved, click on it, then click "Commit" at the bottom on the CTU. | ||
| + | |||
| + | |||
| + | |||
| + | [[File:CTU_Commit_changes.jpg]] | ||
| + | |||
| + | |||
| + | |||
| + | If you do not "commit" your changes, they will not take effect. Your changes will show in the 3D preview window. I kind of like what I've done, so I'll go back to GIMP and make both eyebrows the same. If you don't like what you've done, go back to Step 6 and start making more changes. | ||
| + | |||
| + | |||
| + | ==Make the left and right eyebrows match in GIMP== | ||
| + | |||
| + | Select the "Decomposed" DDS file with 4 layers showing, and change the "View" back to where you can see all of the edges. I'll make it back to 50%. Using the rectangle select tool, select and drag from 0,0 (top left corner), to 512 and anywhere below the bottom edge. Click "Edit, copy," "Select, Invert," then "Edit, paste.". "Flip" it horizontally using the "Flip" tool on the toolbox. | ||
| + | |||
| + | |||
| + | [[File:GIMP_Flip_horizontally.jpg]] | ||
| + | |||
| + | |||
| + | |||
| + | Now we want that to be a part of the alpha, so we'll make it stick by clicking the "Layer" tab on the main window (not the Toolbox), then "Anchor Layer." | ||
| + | |||
| + | |||
| + | |||
| + | Do this for the RGB layers as well if changes were necessary. | ||
| + | |||
| + | |||
| + | |||
| + | |||
| + | |||
| + | Repeat Steps 4 through 10 until you get what you want. | ||
| + | |||
| + | |||
| + | |||
| + | ==Save your file from CTU== | ||
| + | |||
| + | Save your file from the CTU in the same place as your DDS file to keep everything together in case you want to work on it again in the future. This is your Sims 3 package file. | ||
| + | |||
| + | |||
| + | ==Check your package in-game== | ||
| + | |||
| + | Now comes the real test! Select and copy your Sims 3 Package file and paste it into your Documents/Sims3/Mods/Packages folder (or whatever subfolder of Packages you like). I have a subfolder called Makeup and Stuff. Glamourous, isn't it? LOL! Go in game and try your eyebrows out on a Sim in CAS. Go back in game, and view your Sim's face closeup to see how they look (CAS is not a good indicator of the results!). Sometimes, the effect you're looking for is achieved back in CAS under the Looks section, then eyes, then, eyebrows. See what you can do with your eyebrows! | ||
| + | |||
| + | ---- | ||
| + | |||
| + | '''Once again, if you don't like the outcome, repeat Steps 4 onward until you get what you want.''' | ||
| + | |||
| − | |||
I hope this tutorial helps. If you have any suggestions for changes or more tips, please let me know at MTS. | I hope this tutorial helps. If you have any suggestions for changes or more tips, please let me know at MTS. | ||
Simmiller | Simmiller | ||
| + | |||
| + | {{TS3ModdingHeader}} | ||
| + | [[Category:Sims 3 CAS Tutorials]] | ||
| + | [[Category:Tutorials by Simmiller]] | ||
Latest revision as of 17:16, 17 September 2012
| Tutorials by Category | |
|---|---|
|
CAS | Patterns | Objects | Building | Worlds | Modding | Modding Reference |
It has come to my attention that many people would like to learn how to make their own eyebrows for their Sims. I've put together this Tutorial and I hope that anyone who uses it will be able to succeed in this endeavour. You can find my MTS facial hair/eyebrow creations here at MTS.
- This is a fairly detailed tutorial and uses CTU, GIMP and GIMP's DDS plugin
Since many people do not know where to place the DDS plugin, you put it in Programs/GIMP2.0/lib/gimp/2.0/plug-ins.
[edit] Let's Begin!
[edit] Open CTU
Open CTU. Hsve no fear, the steps gradually become more and more complicated.
[edit] Finding a Maxis eyebrow package to clone
Under "Find a CAS part" choose Adult, Female (or Male if that's what you want to create), and Makeup. Yes, Makeup. You will see all of the young adult/adult female eyebrows that come with the game. These are Sims 3 Package files. Choose any one, they all work.
[edit] Locating the correct files in CTU
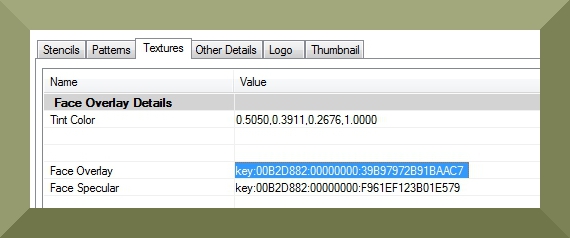
Go to the "Designs" tab, and click "Add New Design," then "Add New Blank." Directly beneath this you will see 6 other tabs. Click on "Textures."
Under "Value" you will see 3 sets of numbers. We want to change the "Face Overlay," so click where it says key:00B2D882:00000000:...to the right.
Then go to the bottom and click "Find." This will bring up a window with our very important DDS file. This is the file we will be working on in GIMP (or whatever such program you prefer). At the bottom of that window, click "Export." Give a name to the file and save it somewhere on your computer. I usually have a file in My Documents called "CTU Projects," and I always start my file name with my MTS user name and what type of file it is. For this tutorial I will call my file: Simmiller_Eyebrows_Eyebrow Tutorial. You can put it anywhere you like as long as you remember its location.
Close the DDS preview window in CTU.
- ***CTU TIP #1***
You have the option at this point of closing CTU, but I never do unless something from Real Life comes up. If you do, you will have to repeat steps 1 through 4. Not to worry, though, because your DDS file will already be saved, and again, this is the critical file we will be altering in GIMP. I like to keep CTU open though, because we are going to be going back and forth from GIMP to CTU to check our progress.
[edit] Opening your files in GIMP
Open GIMP and bring up your DDS file. ***Very Important*** Make sure you UN-tick "Load Mipmaps!!!! It comes up as a one layer file, so we need to break it down in order to clearly see what we need to change. Click "Colors," move down the menu to "Components," and click "Decompose." A cute little "Decompose" window pops up and has a drop down menu entitled "Color model."
- Make absolutely sure you have RGBA showing on this drop down menu, then click OK. Your funky little DDS file comes up broken down into 4 layers.
You may now close your original DDS file in GIMP because we will only be working with the decomposed file's layers.
[edit] What layer will change the actual eyebrow in GIMP
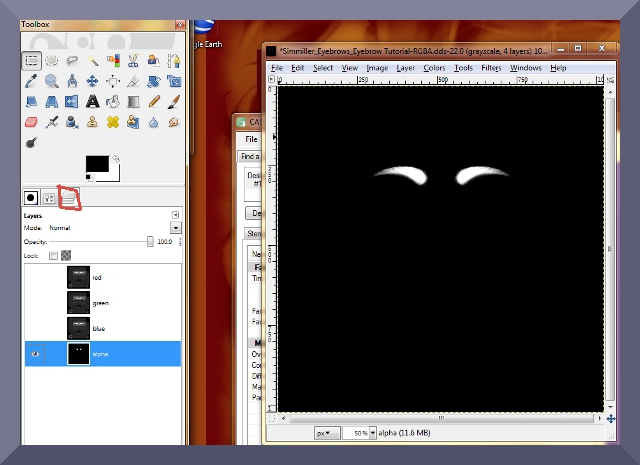
Click on your "Layers" tab on the Toolbox. This will bring up 4 windows with an eye symbol to the left of each layer. The eyes mean that you can "see" the layers. Close the view of the red, green, and blue layers by clicking on the corresponding eye icon. Now you will only see the alpa layer.
- This is the most important layer because this is the main shape and texture of your eyebrow.
- ***GIMP TIP #1*** Clicking on the eye will hide the layer from view, but the file does NOT go anywhere. It's kind of like having 4 pages, and turning over 1 or more of the pages to show the blank backside. This will be necessary to work on individual layers. Also, the highlighted layer is the one that your changes will affect. You see red, green, blue, alpha.
- ***GIMP TIP #2*** When all of the eyes are showing open, there is a heirarchy of layers that you will see on your open DDS file. Red is the bottom layer of the file, but if it's eye is open, that will be the only layer you will see, regardless of whether or not the other layers' eyes are open.
[edit] Working with the alpha
Highlight the alpha layer by clicking on it.
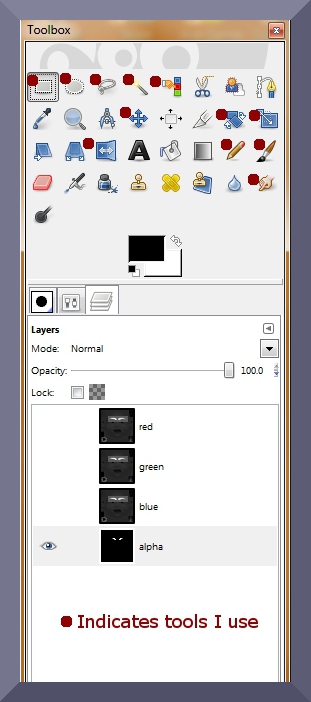
- ***GIMP TIP #3*** It's time to change the alpha layer to make our own unique eyebrows. To do this, I use the Paintbrush, Pencil, Rectangle, Elipse, Free, Fuzzy, Select by Colour, Flip, and Smudge Tools in the toolbox. You also will be using the Foreground colour block in shades of black, grey, and white. DDS files don't use other colours, no matter what you try!!!! White will show the darkest on your actual eyebrow, and black areas won't show at all. On the layer window, I use File, Edit, View, Colors, and Filter tabs. Go in and see what you can do.
I am going to use my imagination on this one, instead of using a picture or preset idea. You will find that drawing and perfecting the eyebrow is the longest and most difficult part of the process. I am not ashamed to say that I sometimes come back and alter this layer about 20 or 30 times. Don't panic, though. You may very well be a better artist than I am and can get your changes done lickety-split! Either way, be happy with what you create.
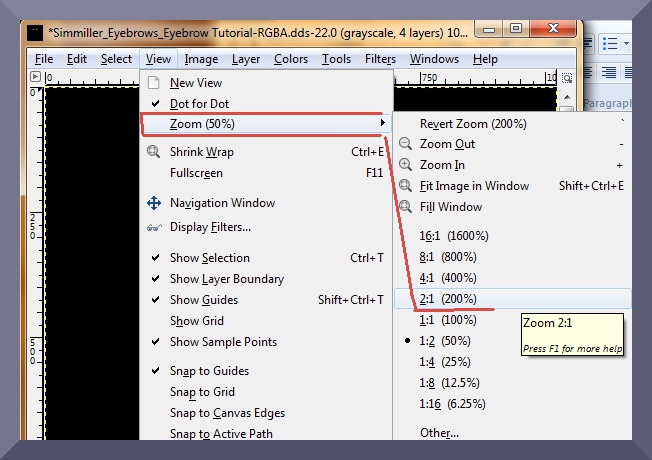
Make the "View" bigger, generally 200% or 400%. This makes it a lot easier to create details. Use whatever size you are comfortable with.
The beauty here is that you only need to work on one eyebrow on your alpha layer to start with. (We'll get to changing both later on) I pick the left one. It doesn't matter, again, use whichever you are most comfortable with.
Start drawing! This means it's time to use those tools I mentioned in GIMP TIP #3. This you will have to learn how to do on your own through trial and error. I'll keep posting pictures to show you my progress, though.
- ***GIMP TIP #4*** Copy and paste are your friends! Don't be afraid to use them to help you make your eyebrows longer, shorter, thinner, or wider.
- ***GIMP TIP #5*** Make sure you have the "Open the tool options dialogue" tab on your Toolbox so that you can change the tool's characteristics that you are currently using. It's usually there, along with the "Open the brushes dialogue" tab, if not, you can add it.
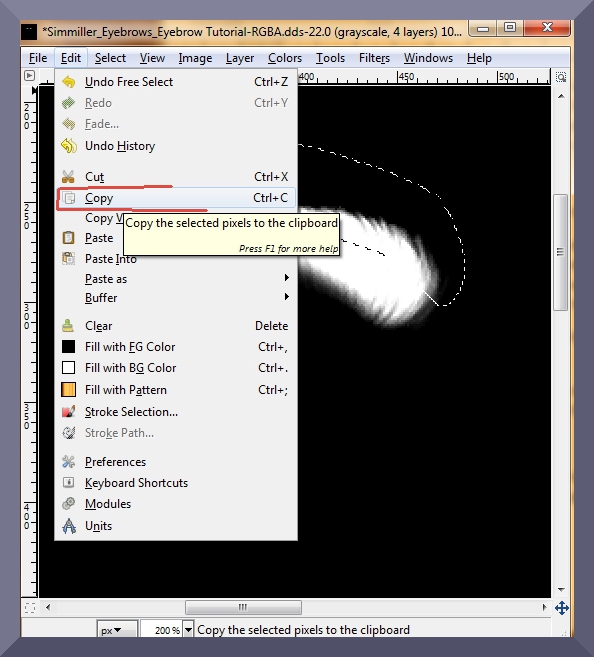
I'm using the copy and paste routine as an example to make this eyebrow thinner.
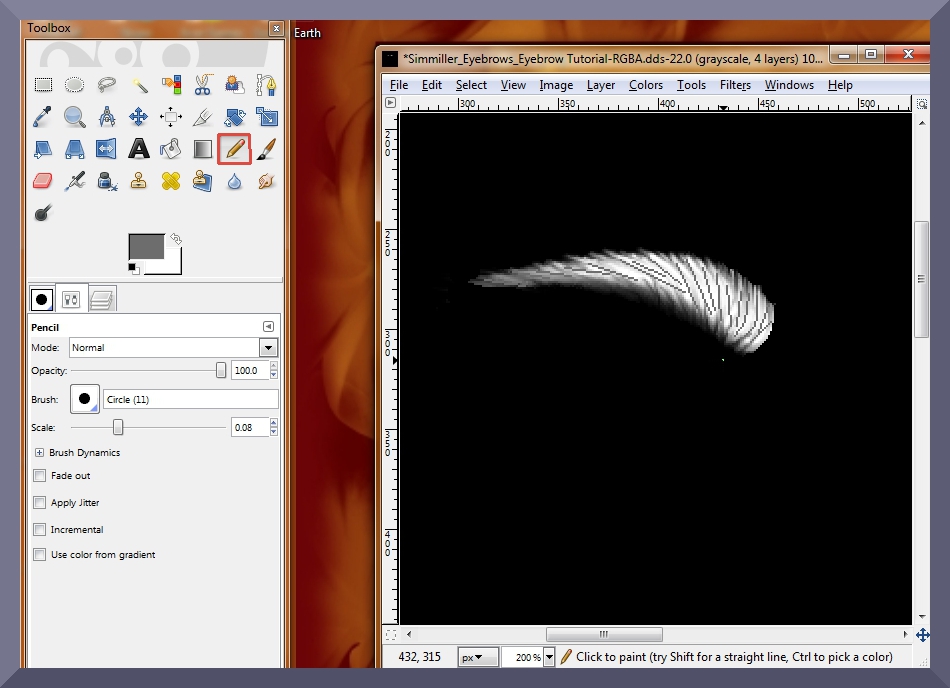
I want a lot more detail in the eyebrow. I also want to get rid of some of the inner corner hair, so I'll use the Pencil tool for that. Any shade other than black will affect your eyebrow's actual shape.
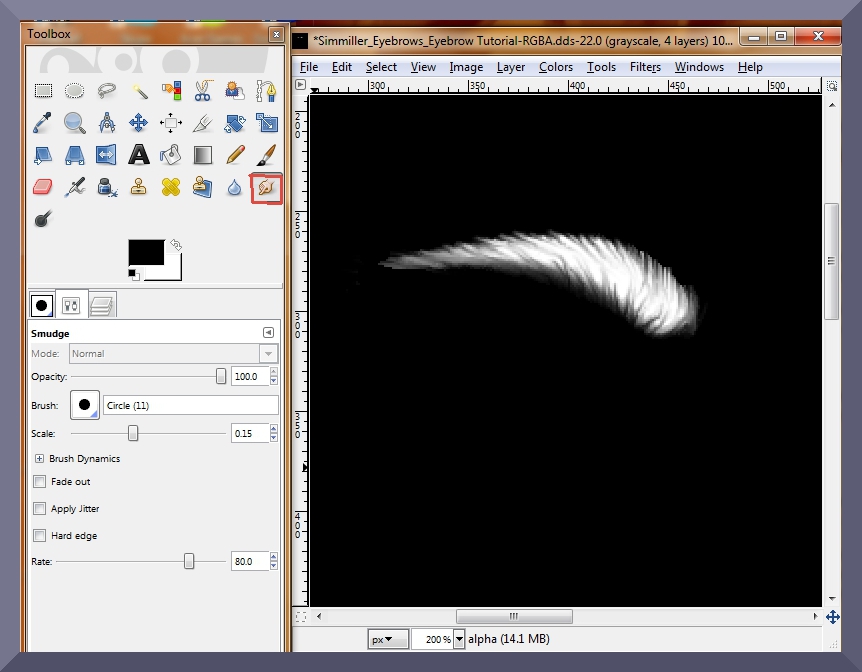
I'm thinking that I don't like all that solid white colour, so I will choose a nice dark grey to define hairs into the centre section of the eyebrow, and I can use either the Pencil or the Paintbrush, or even the Smudge tool. My lines are very sharp looking right now because I used a basic circle and the Pencil tool. You can also use a fading circle as your drawing tool, or go under "Filters," then "Blur" to soften the edges.
[edit] Matching the alpha and RGB layers
Now go back to your "Layers" tab on the Toolbox. You will want to check to make sure that your Alpha coincides with your Red, Green, and Blue layers. Highlight one of the RGB layers, making sure to have the eye visible on only that layer and the alpha layer. On your highlighted layer, slide the "Opacity" indicator to the left until you can see where the new eyebrow is on the alpha. The location of the eyebrow on the alpha can be anywhere and any size as long as it appears on the eyebrow area in game.
The RGB layers colour your alpha layer once the file becomes a Sims 3 package file. If they're not in line with the Alpha layer, your eyebrow will look very weird.
If your alpha and RGB layers coincide, realign the opacity on the RGB layer you used as comparison to the far right. Copy and paste that layer to the other RGB layers...don't go near the alpha with that layer!! Now, go to step 12.
If your RGB layer and Alpha layer do not coincide, you will have to change the RGB layers to match the location of the alpha. This is done most easily by using the copy and paste method using chunks of what's already on the RGB layer you are working on, and by using the Smudge tool on a larger scale setting to move the colours around. Make certain that you make the 3 RGB layers identical to each other. The RGB layers colour your alpha layer once the file becomes a Sims 3 package file. If they're not in line with the Alpha layer, your eyebrow will look very weird. Copy and paste that layer to the other RGB layers...don't go near the alpha with that layer!!
- ***GIMP TIP #6*** You have the option of creating even more texture to your eyebrows by fiddling with the RGBA and alpha layers' brightness. Trial and error is also your friend.
[edit] Saving your dds file
Now, I want to see how what I've done looks. Remember in Step 4 we "Decomposed" our file? Let's "Compose" it back to one layer, save it, and Replace the "Face Overlay" file in CTU.
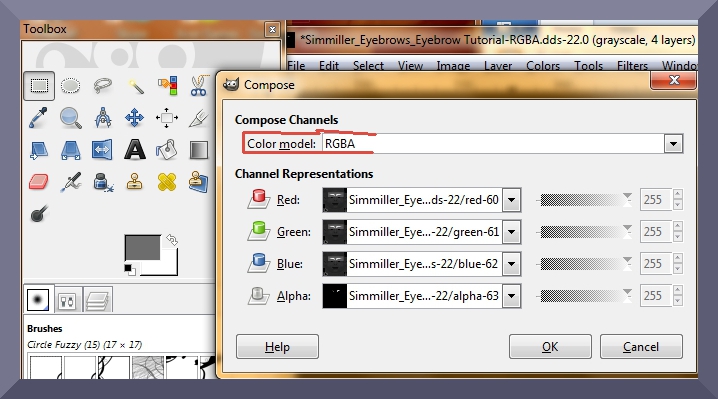
To do this, click on "Colors," "components," then "compose." Make absolutely certain that you click RGBA in the "Color model:" dropdown menu.
Click "OK." Then click "File," "Save As," your DDS file name, "Replace." In the "Save as DDS" window that pops up, first click "Generate mipmaps," then under Format "RGBA8," and then, under "Compression" click BC3/DXT5. Click "OK," and your file is saved.
Since you are very likely going to go back and alter the DDS file in GIMP again, DO NOT CLOSE IT!
[edit] Check your work in CTU
It's time to go back to CTU and see what's happening with the actual eyebrow. Click on the "Face Overlay" numbers again, then "Replace" at the bottom.
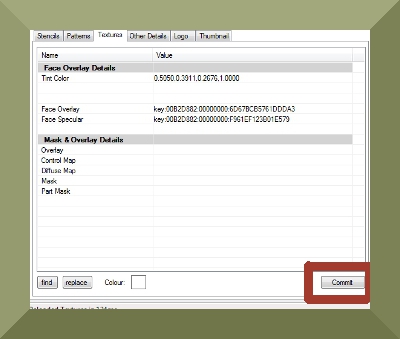
Find your DDS file that you just saved, click on it, then click "Commit" at the bottom on the CTU.
If you do not "commit" your changes, they will not take effect. Your changes will show in the 3D preview window. I kind of like what I've done, so I'll go back to GIMP and make both eyebrows the same. If you don't like what you've done, go back to Step 6 and start making more changes.
[edit] Make the left and right eyebrows match in GIMP
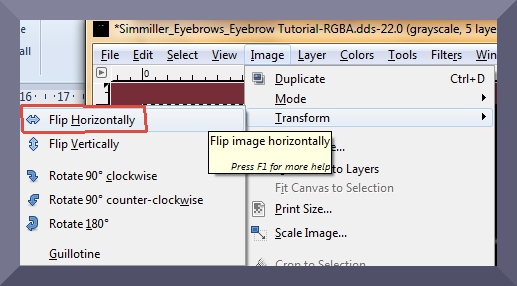
Select the "Decomposed" DDS file with 4 layers showing, and change the "View" back to where you can see all of the edges. I'll make it back to 50%. Using the rectangle select tool, select and drag from 0,0 (top left corner), to 512 and anywhere below the bottom edge. Click "Edit, copy," "Select, Invert," then "Edit, paste.". "Flip" it horizontally using the "Flip" tool on the toolbox.
Now we want that to be a part of the alpha, so we'll make it stick by clicking the "Layer" tab on the main window (not the Toolbox), then "Anchor Layer."
Do this for the RGB layers as well if changes were necessary.
Repeat Steps 4 through 10 until you get what you want.
[edit] Save your file from CTU
Save your file from the CTU in the same place as your DDS file to keep everything together in case you want to work on it again in the future. This is your Sims 3 package file.
[edit] Check your package in-game
Now comes the real test! Select and copy your Sims 3 Package file and paste it into your Documents/Sims3/Mods/Packages folder (or whatever subfolder of Packages you like). I have a subfolder called Makeup and Stuff. Glamourous, isn't it? LOL! Go in game and try your eyebrows out on a Sim in CAS. Go back in game, and view your Sim's face closeup to see how they look (CAS is not a good indicator of the results!). Sometimes, the effect you're looking for is achieved back in CAS under the Looks section, then eyes, then, eyebrows. See what you can do with your eyebrows!
Once again, if you don't like the outcome, repeat Steps 4 onward until you get what you want.
I hope this tutorial helps. If you have any suggestions for changes or more tips, please let me know at MTS.
Simmiller
| Tutorials by Category | |
|---|---|
|
CAS | Patterns | Objects | Building | Worlds | Modding | Modding Reference |


