Difference between revisions of "Tutorial:Cloning EP content with CTU"
Whiterider (Talk | contribs) |
|||
| (6 intermediate revisions by 3 users not shown) | |||
| Line 1: | Line 1: | ||
{{TS3ModdingHeader}} | {{TS3ModdingHeader}} | ||
| + | |||
| + | '''This tutorial is obsolete! EP CAS parts can now be cloned far more quickly and easily using S3OC. This tutorial remains for the sake of curiosity only.''' | ||
=Overview= | =Overview= | ||
| Line 105: | Line 107: | ||
Look at the top right corner of the 3D view. Is there a little grey box there which says "Sorry, we could not find a mesh!"? If so, that means that the file containing your item's mesh isn't in CTU's Custom Packages list. Go back into Options and double-check that you've got all the right files in the list. | Look at the top right corner of the 3D view. Is there a little grey box there which says "Sorry, we could not find a mesh!"? If so, that means that the file containing your item's mesh isn't in CTU's Custom Packages list. Go back into Options and double-check that you've got all the right files in the list. | ||
| + | =Questions? Comments? Suggestions?= | ||
| + | Post here! [http://www.modthesims.info/showthread.php?t=414124 MTS thread] | ||
| + | {{MTS2ThankThread|3264778}} | ||
{{TS3ModdingHeader}} | {{TS3ModdingHeader}} | ||
| − | [[Category:Sims 3]][[Category:Tutorials]][[Category: | + | [[Category:Sims 3 CAS Tutorials]][[Category:CTU Tutorials]][[Category:Obsolete Tutorials]] |
Latest revision as of 16:31, 17 September 2012
| Tutorials by Category | |
|---|---|
|
CAS | Patterns | Objects | Building | Worlds | Modding | Modding Reference |
This tutorial is obsolete! EP CAS parts can now be cloned far more quickly and easily using S3OC. This tutorial remains for the sake of curiosity only.
Contents |
[edit] Overview
If you want to clone EA content using CTU, then you can only clone basegame content using the normal CTU methods. It is, however, possible to use CTU to edit EP content - it just takes a bit of setting up. You can also use the methods in this tutorial to create content based on custom meshes.
[edit] What You Will Need
[edit] Cloning EP (or custom) content in CTU
[edit] Setting up CTU
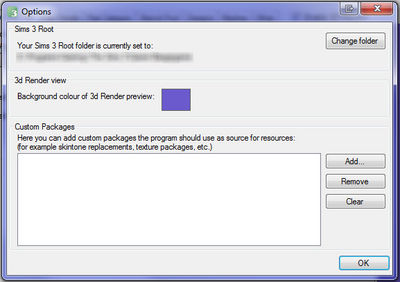
Before we start cloning anything, we need to set up CTU so that it can use EP meshes and textures. CTU has a handy feature which allows you to tell it to "see" content from any package file; so we're going to start by telling CTU to see the files that contain EP content. Open up CTU, and go to File -> Options. You should see a window like this:
The bottom section of this window, Custom Packages, will allow you to make CTU use any package file just like the game would. You can use this for all sorts of interesting things - like making CTU preview content with neutral bumpmaps, or allowing you to edit CC which requires other CC for a texture or mesh. For now, we're just going to use it for EP content.
Click Add, and browse to the installation files for the EP whose content you want to clone. By default, this will be C:/Program Files/Electronic Arts/The Sims 3 EPName. Once you've found that folder, go to GameData/Shared/Packages. You should see a file called FullBuildep0x.package or FullBuild_p0x.package - select it, and hit Open. If you want to make content based on a custom mesh, browse to the CC package file instead, and add that to the list. It should appear on the list in CTU. You can do this for all your EPs and SPs.
Once you've added all the packages, remember to press OK and close CTU.
[edit] Finding an EP item
For the purposes of this tutorial, I'm going to edit the adult male robe thing from WA. Decide what you want to clone, and check which EP it's from. Then open that EP's installation folder and get to the Shared/Packages folder - we want to get to the file that you just added to CTU's Custom Packages list.If you are cloning custom content, you can skip this step and go straight to #Cloning an EP Item.
Open the FullBuildetc.package in S3PE - be patient, it may take a while to load. You might want to make a copy of the file before you open it, just in case - if you accidentally delete anything in this file, you may have to reinstall (if you don't have a backup of the file).
Once S3PE has loaded, make sure that you have both Names and Tags ticked in the bottom of the window, where it says Display: - this will make sure that we can see everything we need to.
Then, copy 0x034AEECB into the ResourceType box at the bottom of the S3PE window; tick the box to the left of ResourceType and then click Set - this should copy the ResourceType into the box underneath the one you pasted into. Tick the Filter active box, and wait while S3PE filters everything in the file. Everything you have left in the main list of resources should now say CASP in the ResourceType.
Click the header of the Name column in the list of resources to sort them into alphabetical order. Now, we have to find our item. All EA content is named according a pattern, which makes it easy to find what we're looking for. The pattern works like this:
agTypeName
- a - Age. This is one letter, representing the age that the item is available for. Young adult and adult items are the same - they're marked a for adult. The letters used for the different ages are:
- p - Toddler
- c - Child
- t - Teen
- a - Young adult & Adult
- e - Elder
- g - Gender. This is also one letter, representing the gender(s) the item is available for. Be aware that there's a lot of child and toddler content which is marked as being unisex, but is only actually available for one gender - for example, the toddler socks have a female version used by girls, and a "unisex" version which is only actually used for boys. The letters used for the different genders are:
- f - Female
- m - Male
- u - Unisex
- Type. This is the type of the item - tops, shoes, hair, accessory etc. It's pretty self-explanatory. The different types are:
- Accessory
- Beard
- Body - full body outfits, such as dresses and suits
- Bottom
- CostumeMakeup
- Hair
- Makeup
- Shoes
- Top
Note: Ambitions content also has EP2 as part of the type.
- Name. This is whatever EA have chosen to name the item - these names range from very obvious to completely obscure and ridiculous.
So, if you were looking for a pair of shoes for boys, you'd look for resources in S3PE whose names start with cmShoes or cuShoes. Since I'm looking for the adult male robe, I'll look for amBody.
Now, I happen to be smart (read: I used Google), so I know that the proper name for the "adult male robe thing" is in fact a gellabiya - and one of the items in S3PE is "amBodyEGPGellabiya". However, it's not always obvious what's what when you're looking at files like this. If you think you've found the right item, but you're not sure, then select it in S3PE and untick the Filter Active box. Once S3PE has finished doing its thing, the resource you selected should still be selected, and underneath it there should be several _IMG resources - these are the textures for the item. You can use the View DDS button (next to the Names and Tags tickboxes) to preview these textures, to make sure you've got the right item. Once you've found the item, it's time to clone it.
[edit] Cloning an EP Item
If you're cloning custom content, welcome back. At this stage, you should have S3PE open, with the CASP resource for the item you want to clone selected. Right-click the CASP resource, hit Export -> To package..., and save your new package somewhere.
Now, close S3PE - if you leave S3PE open, then CTU won't be able to use the EP file, because S3PE is already using it.
Now find your newly created package file. Right now, you could edit it in CTU just fine, and it'd work - but it'd be a default replacement, which we don't want. (If you do want a default replacement, then you can skip this step and go straight to #Finished!.) To make it non-default, we're going to open it in S3PE.
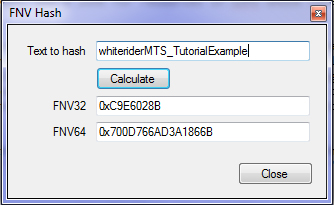
Once you've opened your new package file in S3PE, go to Tools -> FNV Hash. Type a name for your new item into the first box - I'll go with "whiteriderMTS_TutorialExample" - then click Calculate.
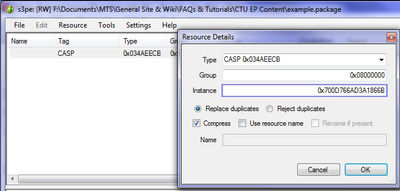
Now, copy the number from the FNV64 box, and close the FNV popup. Back in the main S3PE window, double-click the CASP resource (it should be the only thing on the list), and paste the number you just copied from the FNV popup into the Instance box.
Now save, and close S3PE.
[edit] Finished!
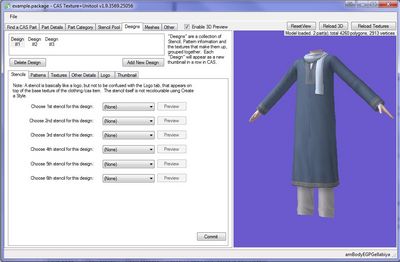
That's it! Well, sort of. You now have a non-replacement file based on the EP item - you can open this in CTU and edit it the way you normally would. This file will require the EP you cloned it from (or the CC item you cloned from).
[edit] It's not working!
Usually, you'll be having one of the following problems:
[edit] When I try to open my cloned item in CTU, I get a Microsoft .NET Framework Error!
I told you to close S3PE, didn't I? This means that you have one of the files in your Custom Packages list, or the basegame FullBuild0.package, open in S3PE. Close all your S3PE windows and try again.[edit] I can open my cloned item in CTU, but it doesn't show up in the 3d view!
Look at the top right corner of the 3D view. Is there a little grey box there which says "Sorry, we could not find a mesh!"? If so, that means that the file containing your item's mesh isn't in CTU's Custom Packages list. Go back into Options and double-check that you've got all the right files in the list.
[edit] Questions? Comments? Suggestions?
Post here! MTS thread
| Tutorials by Category | |
|---|---|
|
CAS | Patterns | Objects | Building | Worlds | Modding | Modding Reference |
