Difference between revisions of "User:Porkypine/Sandbox"
| Line 2: | Line 2: | ||
{{BodyShopMeshingTutorialsHeader}} | {{BodyShopMeshingTutorialsHeader}} | ||
| + | |||
| + | Unimesh/Milkshape Tutorial: Level 3, Combining Mesh Parts | ||
==Overview== | ==Overview== | ||
| Line 8: | Line 10: | ||
| logo1st = basegame.gif | | logo1st = basegame.gif | ||
| caption = Base Game | | caption = Base Game | ||
| − | | author = [[:Category:Tutorials by | + | | author = [[:Category:Tutorials by tiggerypum|tiggerypum]] |
| operating_EP = All | | operating_EP = All | ||
| notes = | | notes = | ||
| website = | | website = | ||
}} | }} | ||
| − | |||
| − | + | ===Prerequisites=== | |
| + | '''You are expected to have successfully completed the Unimesh Beginner Tutorial and the Unimesh Tutorial: Level 2''' | ||
| − | + | This tutorial assumes mastery of the materials in the other tutorials, and some steps (even new ones) might not include screenshots. Even with that, there are over 100 steps in it and 36 screenshots. | |
| − | + | This tutorial covers a lot of ground – the many steps necessary to combine parts of meshes to create a new mesh of your own. It also covers an alternative way to create the fat morph, which is handy especially when the edits being made to the mesh are complex. This method can also be used to repair an exploding ‘fat mesh’. | |
| − | + | Basically in the first tutorial, you took baby steps, and it was designed to avoid many complex things. In the second tutorial, you were walking along, getting aquainted with some more milkshape commands and learning about uvmaps. This tutorial is going straight to a full out run. Some people will be able to read parts of this tutorial and apply it to a mesh they’re editing and it will work. But if one step is missed, things might not work. | |
| − | + | So – if you decide use this tutorial as reference and then have questions, please do the tutorial as written and maybe that will clear some of those issues up for you. If you have questions and the project you’re working on is not this tutorial project, please post them in a new thread in the BodyShop Meshing forum. And of course, if you do have questions, include as many details, step numbers, and screenshots as applies. | |
| − | + | This tutorial covers putting new shoes on a mesh. In this case, I’m using Maxis shoes from another mesh. Tips for using Al’s shoes or shoes from another age mesh will be covered at the end. The goal is to learn a whole lot about editing meshes. | |
| − | + | ||
| − | + | ||
| − | + | ||
| − | + | ||
===Special Thanks=== | ===Special Thanks=== | ||
| Line 38: | Line 36: | ||
==What you will need:== | ==What you will need:== | ||
| − | + | SimPE, Milkshape, Unimesh 4.06 (or higher) | |
| + | Make sure Unimesh is 4.0.6 or above, because it has improved code for reading in second meshes. (don't have them, go do the beginner tutorial!) | ||
| + | |||
| + | The downloadable patterns from this tutorial '''[http://www.modthesims.info/showthread.php?t=135136 templates for UV mapping]''' | ||
| + | |||
| + | '''[http://www.modthesims.info/showthread.php?t=139859 Demon432's Tools]''' – both align normals and extended edit. To install them, download both files. You then need to move the two files named msExtendedManualEdit.dll and msAlignNormals.dll to | ||
| + | My Computer/Local Disk/Program Files/Milkshape 3D (whatever version you’re using) | ||
| + | |||
| + | For this tutorial I used Unimesh 4.06, Milkshape 1.7.9, SimPE .58 | ||
| + | |||
| + | |||
| + | ===Part 1: Set Up Your New Mesh=== | ||
| + | |||
| + | We’re going to dive right in from the end of the Unimesh Tutorial #2. This section is a summary, you should know how to build a mesh by now. | ||
| + | |||
| + | Did you save your project? If so, you can use the final SimPE file for this edit. If not, you can use the unaltered mesh and it will work just fine. | ||
| + | |||
| + | Make a new folder for your work files named TUTORIAL3TEENSHOES | ||
| + | |||
| + | In BodyShop create a new project and import it to the game with either the unaltered sundress or your new dress from tutorial 2 ( tfbodysundress_) Quit BodyShop. | ||
| + | |||
| + | In SimPE, build a new mesh file with the 4 parts of the mesh ( tfbodysundress_), save to your DOWNLOADS folder (I named mine MESH_tig_tutorial3teenshoes) | ||
| + | |||
| + | Fix Integrity, save again, and save the modified shape and cres to TUTORIAL3TEENSHOES folder | ||
| + | |||
| + | |||
| + | |||
| + | |||
| + | |||
| + | Put the modified shape and cres into the recolor file from your SAVED SIMS folder. Quit SimPE. | ||
| + | |||
| + | Check if the recolor shows correctly in Body Shop | ||
| + | |||
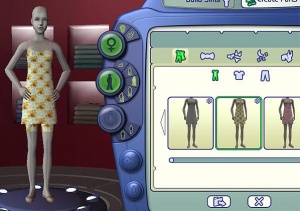
| + | <blockquote>[[Image:p1-2.jpg|right|300x300px]]When I went to check in BodyShop, this is what I saw:<br style="clear:both" /> | ||
| − | + | My skirt is coming down onto the legs and it’s too short! Why? | |
| + | The texture is for my new sundress, but the MESH pieces I just used to build the mesh are from the original Maxis sundress. I’m going to fix that when I read in my meshes into milkshape, so no worries. Matter of fact, this is nice because I can clearly see that the recolor is working correctly.</blockquote> | ||
| − | |||
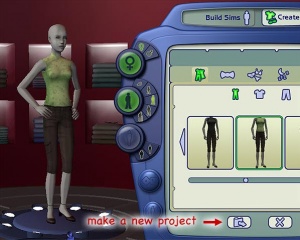
| − | + | <blockquote>[[Image:p1-3.jpg|right|300x300px]]Now let’s go find some new shoes. I picked the shoes from this outfit:<br style="clear:both" /> | |
| − | + | While we have it, make a new project with the outfit, because we’ll want the shoes texture and alpha for our dress. Name it TEENHEELS. Quit BodyShop. | |
| − | + | The name of the outfit is: tfbodyhipmandarintop_ | |
| + | In SimPE use the finder and extract the gmdc file for that mesh, and save it to the tutorial3teenshoes folder – I named it tf-bodyhipmandarintop so that I can tell it apart from the gmdc of the sundress. We don’t need anything else. Quit SimPE. </blockquote> | ||
| − | == | + | ===Part 2: Begin the Edit=== |
| − | + | In Milkshape I’m going to import first my original dress, and then the mesh I’d like to get shoes from. I am NOT going to make the fat morph yet, I’m going to work through all the details with my fit body first, and then later make the fat morph. | |
| + | <blockquote> | ||
| + | 1. Fire up Milkshape, make sure autosmooth is off. | ||
| + | 2. I am going to Unimesh Import dress3.simpe from my tutorial2 folder. If you made more edits than 3, simply import the last edit. If you don’t have your files from tutorial2, you’ll need to use the gmdc from tfbodysundress (which you just used to build the mesh) | ||
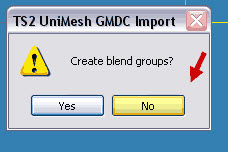
| − | + | 3.[[Image:p2-3.jpg|right|300x300px]] This is important – answer NO to ‘create blend groups’ | |
| + | (this means you do not want to make the fat morph, we'll do that later)<br style="clear:both" /> | ||
| − | + | 4. Now we’re going to Unimesh import in the 2nd mesh that I saved to tf-bodyhipmandarintop in my tutorial3teenshoes folder. | |
| − | ''' | + | 5. You’ll get a new dialog box – “If you import over another model, results may be unreliable. Do you want to continue? |
| + | Click '''OK''' | ||
| − | + | 6. '''THIS NEXT STEP IS CHANGED FROM THE (now deleted) SCREENSHOT''', Unimesh's behavior around this has now been changed twice... Make sure your Unimesh says 'include' or does not ask at all. If it doesn't ask you have the latest unimesh and that's even better! | |
| − | + | Then you’ll get another dialog box – “Do you want to INCLUDE additional bone definitions?” (this prevents another entire skeleton from being added to our project) | |
| + | Click '''NO''' | ||
| − | + | If you don't see this box, and you have unimesh 4.09 that's all good, it's being smart for you | |
| − | + | 7. And lastly you’ll be asked again if you want to '''‘Create Blend Groups’''', answer '''NO'''. | |
| − | + | '''Finding the Place to Cut''' | |
| − | + | Now, you will see 2 body groups, and you should also notice that some parts of the mesh look identical, to the point that you can’t tell there are two sets of vertices there, and other parts of the mesh look different (skirt, shorts, parts of the shoes) | |
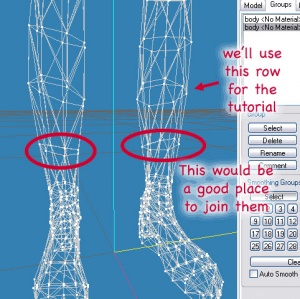
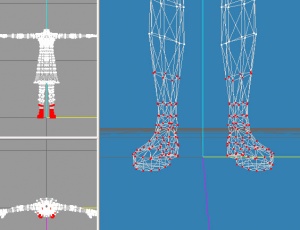
| − | + | 8. [[Image:p2-8.jpg|right|300x300px]]Now I’m going to zoom in on the area around the shoes. IDEALLY, I should look for a spot where the two meshes match up identically… like the set of vertices right above the ankle. That’s where I’d then choose to join the mesh. Here, I’ll circle it for you.<br style="clear:both" /> | |
| − | + | Now, because this is a tutorial and I want to teach you MORE, we’re going to use the row above that instead – which does not look identical on the different meshes. That way I can teach you how to properly adjust everything – and you’ll better be able to combine any mesh parts you want in the future. (I might regret this decision, but here we go!) | |
| − | |||
| + | 9. Hide the second body by selecting the group and using the HIDE button. (the pants mesh) | ||
| − | |||
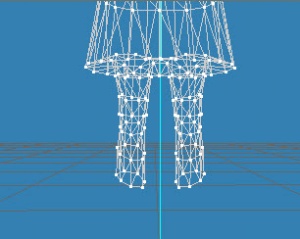
| − | + | 10. [[Image:p2-10.jpg|right|300x300px]]Using Model – Select – Vertex, select all the vertices below that row of vertices on the dress body (the shoes and ankles)<br style="clear:both" /> | |
| − | |||
| − | + | 11. [[Image:p2-11.jpg|right|300x300px]] Hit DELETE on the keyboard and delete those vertices. Now we’ve got a footless dress mesh.<br style="clear:both" /> | |
| − | |||
| − | + | 12. Go back to the groups tab, and click the 2nd body group and HIDE to show the 2nd body with the shoes we want. | |
| − | |||
| − | + | 13. Click on the first body, and click HIDE to hide the skirt mesh. Now you should not see the skirt any more, just the pants mesh. | |
| − | |||
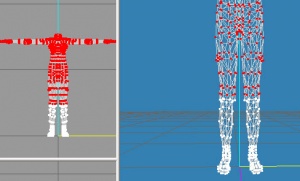
| − | [[Image: | + | 14.[[Image:p2-14.jpg|right|300x300px]] Using Model – Select – Vertex, let's start deleting the body of that mesh. As we're not sure exactly where the dividing line is, let's first going to simply delete everything from the pants up. Zoom back out so you can see the body, or simply use one of the smaller left windows to select a large area to delete. And then hit DELETE on the keyboard. <br style="clear:both" /> |
| − | |||
| − | + | 15. [[Image:p2-15.jpg|right|300x300px]]In order to be able to tell the mesh pieces apart more easily, right click on the window and set the display to ‘textured’ and then right click again and select ‘colored groups’ and right click once more for ‘wireframe overlay’<br style="clear:both" /> | |
| − | + | 16. [[Image:p2-16.jpg|right|300x300px]]Now hide and show the first body, and then go in and select the rest of the vertices above the joining line, and delete them. Notice when hiding and showing the 2 meshes, there's an almost perfect match at that seam. Remember we picked a seam that was not perfect, and you can see that at the back of the leg. We’ll fix that later.<br style="clear:both" /> | |
| − | + | Okay, so now you have the two parts of the mesh in two groups. Time to SAVE! We’ve been editing for quite a while now. | |
| − | |||
| − | + | 17. SAVE AS - tut1.ms3d in your tutorial3teenshoes folder </blockquote> | |
| − | |||
| − | + | ===Part 3: Joining the Vertices Exactly=== | |
| − | + | If we put the mesh into the game the way that it is, the legs would show a line (and actually have a section that does not match properly. So the first goal is to get the vertices to have EXACTLY the same value. We can’t do that by eyeball, we must use either of these two methods below. | |
| − | + | Select one pair of vertices at a time | |
| + | Then either use – | ||
| + | VERTEX – SNAP TOGETHER (useful if they look lined up already) | ||
| + | Or use Demon’s Extended Manual Edit | ||
| − | + | I’m going to use Extended Manual Edit because I want to show this to you – it’s a way for you to make the edges meet and choose which mesh you want to use as your guideline. While it doesn’t matter that much for this particular outfit, you might want to someday join a skirt to a belt area or such where you will not want the belt to be distorted. | |
| − | + | Extended Manual Edit is also the tool to use to make sure that the neck is an exact match (if moving a mesh from one age to another) and to make sure that the waistline meets on top and bottom meshes. | |
| − | + | 18) Select a vertex on the front of the leg (which is really 2 vertices, 1 from the top mesh, one from the feet). | |
| − | |||
| − | |||
| − | |||
| − | |||
| + | 19) Use MENU – VERTEX – EXTENDED MANUAL EDIT. Set the settings to show Index, XYZ and B.Names. Now look at the values. In this case, the values on these front center vertices ARE identical, so just click CANCEL or close it with the red X in the upper right corner. | ||
| − | |||
| − | |||
| − | |||
| − | |||
| − | + | 20) Then continue around the leg seam, selecting one vertex (or the two close to each other). Once you’ve done a couple more, you’ll see this, a spot with 4 vertices! | |
| − | |||
| − | |||
| − | |||
| − | + | This is because you’ve hit the seam that separates the front of the sim from the back. So yes, there really are 4 vertices all aligned perfectly so that they look and act as one. These vertices also have identical x, y, z values and bone assignments, so it’s all good. Be sure to check the values on yours and make sure they are identical, if they are not, follow the directions below. | |
| − | + | 21) As you continue around the back of the leg, you will hit a spot that DEFINITELY has different values, because you can see the vertices are not touching. Select both vertices and then bring up Extended Manual Edit. | |
| − | |||
| − | |||
| − | |||
| − | |||
| − | + | 22) The Mesh marked with the 0 at the front is the dress mesh, the mesh marked 1 is the shoes mesh. (that is the order we read them into the program) Select the X value for the first mesh, and ctrl-C (copy). Select the X value for the second mesh and ctrl-V (paste). Repeat for the Y and Z values as necessary. When all the values are identical, press ACCEPT. | |
| − | |||
| − | |||
| − | |||
| − | |||
| − | |||
| − | |||
| − | |||
| − | + | 23) Now select the next pair of vertices. Yes, this is a bit tedious, but careful work here will give you a mesh that acts as if it was always part of the same mesh! Go around both legs. Examine them and make sure things look right to your eyes. | |
| − | + | 24) Now let’s SAVE AS tut2.ms3d | |
| − | + | ===Part 4: Adjusting the Normals=== | |
| − | + | 25) Right click on the 3D window. Turn off ‘Colored Groups’ | |
| + | Right click again, turn off ‘Wireframe Overlay’ | ||
| + | Right click again, select ‘Smooth Shaded’ | ||
| − | + | 26) Now look really closely at that seam. Rotate the mesh around. I was able to see ever so slight a line on the back of the leg where the meshes meet. It’s not a gap, just a change in the gray shading. In this case it is very subtle, but we will smooth it over anyway. | |
| − | + | 27) Select ‘Colored Groups’ again so that you can easily spot the seam line. | |
| − | + | 28) Model Tab – Select – Vertex – and select the seam. | |
| − | + | 29) Right click and go back to wireframe, just so you can see you selected all the vertices. | |
| − | |||
| − | |||
| − | |||
| − | |||
| − | + | 30) Now we'll use Demon’s Tool – Align Normals. | |
| + | Do NOT EVER use the Milkshape ‘Smooth All’ command, because it will make all the seams on your mesh have a line on them. | ||
| − | + | Use menu VERTEX – ALIGN NORMALS | |
| − | + | 31) Now right click and select ‘Smooth Shaded’. This time it should look perfect! | |
| − | + | 32) SAVE AS tut3.ms3d | |
| − | + | Part 5: Bone Assignments | |
| − | + | 33) First, use menu VERTEX – Sims 2 Unimesh Fix Underweighted Bones | |
| − | + | You *always* need to do this on your mesh, so that any rounding errors are corrected and all the bone assignments add up to exactly 100%. If there are assignments that are not exactly 100%, there will be small display quirks; the mesh might appear to have holes or semi-transparent areas in some views. | |
| − | + | Now, because we chose to use ‘Extended Manual Edit’ to join the vertices at the seam, we’ve already seen the bone assignments. And on this particular example (and likely with many Maxis meshes you might take pieces from) the bone assignments are identical and fine. Still, I’m covering how to check and change the bone assignments using the Unimesh Bone Tool – because you will need to set bone assignments if you make new pieces for your mesh or read in object file additions for your mesh, like Al’s shoes. | |
| − | + | Also, if you did the quick thing and ‘snapped together’ the vertices, you still need to check their bone assignments. | |
| − | + | 34) Select a vertex along the seam (which you know will be 2-4 vertices that are precisely at the same spot). | |
| − | + | 35) Menu – VERTEX – Sims2 Unimesh Bone Tool | |
| − | + | A pop up will show. To just view (and not change) the bone settings, simply press the arrows on the bottom of the screen. In this shot, there are 2 vertices selected. As you flip back and forth you can see they have the same value. | |
| − | |||
| − | |||
| − | |||
| − | + | If you change any of the values in the vertex’s bones, you must click the COMMIT button before you click on the arrow to view the next vertex, or the changes will be lost. When you are done making changes, click COMMIT ALL (or CANCEL). | |
| − | + | Some areas of the mesh have complex bone assignments (such as the stomach area). On the other hand, some areas of the arms and legs have as simple bone assignment (just like this edit) and all the vertices have the same assignment. You can do many bone assignments at once with the Unimesh Bone tool. | |
| − | + | If you have a ring of vertices that you want to ALL have identical bone assignments, the easiest way to make the change is to select them all and bring up the bone tool. Then make sure the first vertex has the bones assigned the way you want. Click APPLY TO ALL and then COMMIT ALL. | |
| − | + | This section about using the Unimesh bone tool was primarily for your information. The bone assignments on the leg should all be fine – all that was needed was to fix the underweight bones. For practice, select a couple more vertices and bring up the bone tool to check their values. You can also check bone assignments on other parts of the mesh, for instance, if you check some of the vertices on the sim’s stomach area, you will find they have 2-3 bone assignments instead of just one. | |
| − | + | Note: if you are working on a different mesh and/or cut your mesh pieces close to the ankle or knee (or are joining 2 meshes at, say, the waist) the bone assignments will probably NOT automatically match as they do in this project. So do make sure to check them and make them identical. A difference of as little as 1% on any assignment can cause your mesh to get a tiny gap along the seam as the sim animates. | |
| − | + | 36) Bone assignments are done - SAVE AS tut4.ms3d | |
| − | 6 | + | ===Part 6: Separate the UV Mapping=== |
| + | We need to make sure that the points on the uvmapping match up exactly where they were snapped together. I expect that some of the lower leg’s mapping is currently very close to the upper leg mapping, but it should be exact. In order to make it easy to know which points belong to the lower leg once they’re merged, I’m going to pull the top row of vertices down a bit on the lower leg on the uvmap (not the mesh!), and then I'll realign them after I've combined the meshes into one. So, let’s get a texture on that mesh and look at the uvmap. | ||
| − | + | 37) Assign a texture and bring up the Texture Coordinator | |
| + | (This is covered in the 2nd Unimesh Tutorial ) | ||
| − | + | • use menu – EDIT – SELECT ALL | |
| + | • go to materials, hit new, read in checkpattern.bmp, hit assign | ||
| + | • menu – WINDOW – TEXTURE COORDINATOR | ||
| + | • change scale to .5 | ||
| − | + | Now, because we didn’t change it, both groups are named ‘body’ which is a bit confusing. The 2nd one is the shoes, and you can see them there at the bottom of the screen. | |
| − | + | 38) Click SELECT and then select the top row of the leg. Then MOVE and move them downward some. | |
| − | |||
| − | |||
| − | |||
| − | |||
| − | + | 39) Close the Texture Coordinate Window | |
| + | 40) SAVE AS tut5.ms3d | ||
| + | continued in next message | ||
==Homework== | ==Homework== | ||
Revision as of 22:57, 16 February 2013
this is my sandbox - Converting Tig's Unimesh 3 tutorial to wiki format and restoring inline images
| Tutorials by Category | |
|---|---|
|
Body Shop: Recolouring | Meshing | Modding | Sims Objects: Object Creation | Recolouring Building: Building | Landscaping | Walls & Floors | Other: Careers & Majors | Hacks and Game Mods |
Unimesh/Milkshape Tutorial: Level 3, Combining Mesh Parts
Overview
| Porkypine/Sandbox | |
|---|---|
Base Game | |
| Author | tiggerypum |
Prerequisites
You are expected to have successfully completed the Unimesh Beginner Tutorial and the Unimesh Tutorial: Level 2
This tutorial assumes mastery of the materials in the other tutorials, and some steps (even new ones) might not include screenshots. Even with that, there are over 100 steps in it and 36 screenshots.
This tutorial covers a lot of ground – the many steps necessary to combine parts of meshes to create a new mesh of your own. It also covers an alternative way to create the fat morph, which is handy especially when the edits being made to the mesh are complex. This method can also be used to repair an exploding ‘fat mesh’.
Basically in the first tutorial, you took baby steps, and it was designed to avoid many complex things. In the second tutorial, you were walking along, getting aquainted with some more milkshape commands and learning about uvmaps. This tutorial is going straight to a full out run. Some people will be able to read parts of this tutorial and apply it to a mesh they’re editing and it will work. But if one step is missed, things might not work.
So – if you decide use this tutorial as reference and then have questions, please do the tutorial as written and maybe that will clear some of those issues up for you. If you have questions and the project you’re working on is not this tutorial project, please post them in a new thread in the BodyShop Meshing forum. And of course, if you do have questions, include as many details, step numbers, and screenshots as applies.
This tutorial covers putting new shoes on a mesh. In this case, I’m using Maxis shoes from another mesh. Tips for using Al’s shoes or shoes from another age mesh will be covered at the end. The goal is to learn a whole lot about editing meshes.
Special Thanks
This tutorial is the third revision, passed down from generation to generation of mesher (okay, not really, but it sounds better than "This is the third update/rewrite for new tools and plugins."). Many thanks to WDS Brianna for the original version and Tiggerypum for v2. Also thanks to Inge and Peter for bringing us the PJSE plugin which makes this so much easier, and of course, Wes H for the awesomeness that is Unimesh.
What you will need:
SimPE, Milkshape, Unimesh 4.06 (or higher) Make sure Unimesh is 4.0.6 or above, because it has improved code for reading in second meshes. (don't have them, go do the beginner tutorial!)
The downloadable patterns from this tutorial templates for UV mapping
Demon432's Tools – both align normals and extended edit. To install them, download both files. You then need to move the two files named msExtendedManualEdit.dll and msAlignNormals.dll to My Computer/Local Disk/Program Files/Milkshape 3D (whatever version you’re using)
For this tutorial I used Unimesh 4.06, Milkshape 1.7.9, SimPE .58
Part 1: Set Up Your New Mesh
We’re going to dive right in from the end of the Unimesh Tutorial #2. This section is a summary, you should know how to build a mesh by now.
Did you save your project? If so, you can use the final SimPE file for this edit. If not, you can use the unaltered mesh and it will work just fine.
Make a new folder for your work files named TUTORIAL3TEENSHOES
In BodyShop create a new project and import it to the game with either the unaltered sundress or your new dress from tutorial 2 ( tfbodysundress_) Quit BodyShop.
In SimPE, build a new mesh file with the 4 parts of the mesh ( tfbodysundress_), save to your DOWNLOADS folder (I named mine MESH_tig_tutorial3teenshoes)
Fix Integrity, save again, and save the modified shape and cres to TUTORIAL3TEENSHOES folder
Put the modified shape and cres into the recolor file from your SAVED SIMS folder. Quit SimPE.
Check if the recolor shows correctly in Body Shop
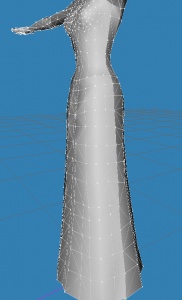
When I went to check in BodyShop, this is what I saw:
My skirt is coming down onto the legs and it’s too short! Why?
The texture is for my new sundress, but the MESH pieces I just used to build the mesh are from the original Maxis sundress. I’m going to fix that when I read in my meshes into milkshape, so no worries. Matter of fact, this is nice because I can clearly see that the recolor is working correctly.
Now let’s go find some new shoes. I picked the shoes from this outfit:
While we have it, make a new project with the outfit, because we’ll want the shoes texture and alpha for our dress. Name it TEENHEELS. Quit BodyShop.
The name of the outfit is: tfbodyhipmandarintop_
In SimPE use the finder and extract the gmdc file for that mesh, and save it to the tutorial3teenshoes folder – I named it tf-bodyhipmandarintop so that I can tell it apart from the gmdc of the sundress. We don’t need anything else. Quit SimPE.
Part 2: Begin the Edit
In Milkshape I’m going to import first my original dress, and then the mesh I’d like to get shoes from. I am NOT going to make the fat morph yet, I’m going to work through all the details with my fit body first, and then later make the fat morph.
1. Fire up Milkshape, make sure autosmooth is off. 2. I am going to Unimesh Import dress3.simpe from my tutorial2 folder. If you made more edits than 3, simply import the last edit. If you don’t have your files from tutorial2, you’ll need to use the gmdc from tfbodysundress (which you just used to build the mesh) 3. This is important – answer NO to ‘create blend groups’(this means you do not want to make the fat morph, we'll do that later)
4. Now we’re going to Unimesh import in the 2nd mesh that I saved to tf-bodyhipmandarintop in my tutorial3teenshoes folder.
5. You’ll get a new dialog box – “If you import over another model, results may be unreliable. Do you want to continue? Click OK
6. THIS NEXT STEP IS CHANGED FROM THE (now deleted) SCREENSHOT, Unimesh's behavior around this has now been changed twice... Make sure your Unimesh says 'include' or does not ask at all. If it doesn't ask you have the latest unimesh and that's even better!
Then you’ll get another dialog box – “Do you want to INCLUDE additional bone definitions?” (this prevents another entire skeleton from being added to our project) Click NO
If you don't see this box, and you have unimesh 4.09 that's all good, it's being smart for you
7. And lastly you’ll be asked again if you want to ‘Create Blend Groups’, answer NO.
Finding the Place to Cut
Now, you will see 2 body groups, and you should also notice that some parts of the mesh look identical, to the point that you can’t tell there are two sets of vertices there, and other parts of the mesh look different (skirt, shorts, parts of the shoes)
8. Now I’m going to zoom in on the area around the shoes. IDEALLY, I should look for a spot where the two meshes match up identically… like the set of vertices right above the ankle. That’s where I’d then choose to join the mesh. Here, I’ll circle it for you.
Now, because this is a tutorial and I want to teach you MORE, we’re going to use the row above that instead – which does not look identical on the different meshes. That way I can teach you how to properly adjust everything – and you’ll better be able to combine any mesh parts you want in the future. (I might regret this decision, but here we go!)
9. Hide the second body by selecting the group and using the HIDE button. (the pants mesh)10. Using Model – Select – Vertex, select all the vertices below that row of vertices on the dress body (the shoes and ankles)
11. Hit DELETE on the keyboard and delete those vertices. Now we’ve got a footless dress mesh.
12. Go back to the groups tab, and click the 2nd body group and HIDE to show the 2nd body with the shoes we want.
13. Click on the first body, and click HIDE to hide the skirt mesh. Now you should not see the skirt any more, just the pants mesh.14. Using Model – Select – Vertex, let's start deleting the body of that mesh. As we're not sure exactly where the dividing line is, let's first going to simply delete everything from the pants up. Zoom back out so you can see the body, or simply use one of the smaller left windows to select a large area to delete. And then hit DELETE on the keyboard.
15. In order to be able to tell the mesh pieces apart more easily, right click on the window and set the display to ‘textured’ and then right click again and select ‘colored groups’ and right click once more for ‘wireframe overlay’
16. Now hide and show the first body, and then go in and select the rest of the vertices above the joining line, and delete them. Notice when hiding and showing the 2 meshes, there's an almost perfect match at that seam. Remember we picked a seam that was not perfect, and you can see that at the back of the leg. We’ll fix that later.
Okay, so now you have the two parts of the mesh in two groups. Time to SAVE! We’ve been editing for quite a while now.
17. SAVE AS - tut1.ms3d in your tutorial3teenshoes folder
Part 3: Joining the Vertices Exactly
If we put the mesh into the game the way that it is, the legs would show a line (and actually have a section that does not match properly. So the first goal is to get the vertices to have EXACTLY the same value. We can’t do that by eyeball, we must use either of these two methods below.
Select one pair of vertices at a time Then either use – VERTEX – SNAP TOGETHER (useful if they look lined up already) Or use Demon’s Extended Manual Edit
I’m going to use Extended Manual Edit because I want to show this to you – it’s a way for you to make the edges meet and choose which mesh you want to use as your guideline. While it doesn’t matter that much for this particular outfit, you might want to someday join a skirt to a belt area or such where you will not want the belt to be distorted.
Extended Manual Edit is also the tool to use to make sure that the neck is an exact match (if moving a mesh from one age to another) and to make sure that the waistline meets on top and bottom meshes.
18) Select a vertex on the front of the leg (which is really 2 vertices, 1 from the top mesh, one from the feet).
19) Use MENU – VERTEX – EXTENDED MANUAL EDIT. Set the settings to show Index, XYZ and B.Names. Now look at the values. In this case, the values on these front center vertices ARE identical, so just click CANCEL or close it with the red X in the upper right corner.
20) Then continue around the leg seam, selecting one vertex (or the two close to each other). Once you’ve done a couple more, you’ll see this, a spot with 4 vertices!
This is because you’ve hit the seam that separates the front of the sim from the back. So yes, there really are 4 vertices all aligned perfectly so that they look and act as one. These vertices also have identical x, y, z values and bone assignments, so it’s all good. Be sure to check the values on yours and make sure they are identical, if they are not, follow the directions below.
21) As you continue around the back of the leg, you will hit a spot that DEFINITELY has different values, because you can see the vertices are not touching. Select both vertices and then bring up Extended Manual Edit.
22) The Mesh marked with the 0 at the front is the dress mesh, the mesh marked 1 is the shoes mesh. (that is the order we read them into the program) Select the X value for the first mesh, and ctrl-C (copy). Select the X value for the second mesh and ctrl-V (paste). Repeat for the Y and Z values as necessary. When all the values are identical, press ACCEPT.
23) Now select the next pair of vertices. Yes, this is a bit tedious, but careful work here will give you a mesh that acts as if it was always part of the same mesh! Go around both legs. Examine them and make sure things look right to your eyes.
24) Now let’s SAVE AS tut2.ms3d
Part 4: Adjusting the Normals
25) Right click on the 3D window. Turn off ‘Colored Groups’ Right click again, turn off ‘Wireframe Overlay’ Right click again, select ‘Smooth Shaded’
26) Now look really closely at that seam. Rotate the mesh around. I was able to see ever so slight a line on the back of the leg where the meshes meet. It’s not a gap, just a change in the gray shading. In this case it is very subtle, but we will smooth it over anyway.
27) Select ‘Colored Groups’ again so that you can easily spot the seam line.
28) Model Tab – Select – Vertex – and select the seam.
29) Right click and go back to wireframe, just so you can see you selected all the vertices.
30) Now we'll use Demon’s Tool – Align Normals. Do NOT EVER use the Milkshape ‘Smooth All’ command, because it will make all the seams on your mesh have a line on them.
Use menu VERTEX – ALIGN NORMALS
31) Now right click and select ‘Smooth Shaded’. This time it should look perfect!
32) SAVE AS tut3.ms3d
Part 5: Bone Assignments
33) First, use menu VERTEX – Sims 2 Unimesh Fix Underweighted Bones
You *always* need to do this on your mesh, so that any rounding errors are corrected and all the bone assignments add up to exactly 100%. If there are assignments that are not exactly 100%, there will be small display quirks; the mesh might appear to have holes or semi-transparent areas in some views.
Now, because we chose to use ‘Extended Manual Edit’ to join the vertices at the seam, we’ve already seen the bone assignments. And on this particular example (and likely with many Maxis meshes you might take pieces from) the bone assignments are identical and fine. Still, I’m covering how to check and change the bone assignments using the Unimesh Bone Tool – because you will need to set bone assignments if you make new pieces for your mesh or read in object file additions for your mesh, like Al’s shoes.
Also, if you did the quick thing and ‘snapped together’ the vertices, you still need to check their bone assignments.
34) Select a vertex along the seam (which you know will be 2-4 vertices that are precisely at the same spot).
35) Menu – VERTEX – Sims2 Unimesh Bone Tool
A pop up will show. To just view (and not change) the bone settings, simply press the arrows on the bottom of the screen. In this shot, there are 2 vertices selected. As you flip back and forth you can see they have the same value.
If you change any of the values in the vertex’s bones, you must click the COMMIT button before you click on the arrow to view the next vertex, or the changes will be lost. When you are done making changes, click COMMIT ALL (or CANCEL).
Some areas of the mesh have complex bone assignments (such as the stomach area). On the other hand, some areas of the arms and legs have as simple bone assignment (just like this edit) and all the vertices have the same assignment. You can do many bone assignments at once with the Unimesh Bone tool.
If you have a ring of vertices that you want to ALL have identical bone assignments, the easiest way to make the change is to select them all and bring up the bone tool. Then make sure the first vertex has the bones assigned the way you want. Click APPLY TO ALL and then COMMIT ALL.
This section about using the Unimesh bone tool was primarily for your information. The bone assignments on the leg should all be fine – all that was needed was to fix the underweight bones. For practice, select a couple more vertices and bring up the bone tool to check their values. You can also check bone assignments on other parts of the mesh, for instance, if you check some of the vertices on the sim’s stomach area, you will find they have 2-3 bone assignments instead of just one.
Note: if you are working on a different mesh and/or cut your mesh pieces close to the ankle or knee (or are joining 2 meshes at, say, the waist) the bone assignments will probably NOT automatically match as they do in this project. So do make sure to check them and make them identical. A difference of as little as 1% on any assignment can cause your mesh to get a tiny gap along the seam as the sim animates.
36) Bone assignments are done - SAVE AS tut4.ms3d
Part 6: Separate the UV Mapping
We need to make sure that the points on the uvmapping match up exactly where they were snapped together. I expect that some of the lower leg’s mapping is currently very close to the upper leg mapping, but it should be exact. In order to make it easy to know which points belong to the lower leg once they’re merged, I’m going to pull the top row of vertices down a bit on the lower leg on the uvmap (not the mesh!), and then I'll realign them after I've combined the meshes into one. So, let’s get a texture on that mesh and look at the uvmap.
37) Assign a texture and bring up the Texture Coordinator (This is covered in the 2nd Unimesh Tutorial )
• use menu – EDIT – SELECT ALL • go to materials, hit new, read in checkpattern.bmp, hit assign • menu – WINDOW – TEXTURE COORDINATOR • change scale to .5
Now, because we didn’t change it, both groups are named ‘body’ which is a bit confusing. The 2nd one is the shoes, and you can see them there at the bottom of the screen.
38) Click SELECT and then select the top row of the leg. Then MOVE and move them downward some.
39) Close the Texture Coordinate Window
40) SAVE AS tut5.ms3d continued in next message
Homework
Once you have successfully completed this tutorial, it's best to experiment with the techniques taught in this tutorial before moving on to more advanced techniques.
So, for "homework" your assignment is to create at least two more meshes. For simplicity's sake as a beginner, you need to make sure they are full body meshes.
Try to make one with a skinnier waist as you did in this tutorial. See if you can make the other with a fatter waist using these same techniques. Get them showing up properly in Body Shop and the game.
- NOTE: You will not be able to use the technique of deleting vertices to remove stuff in most cases, as you did with the dangly thing. As mentioned in that part of the tutorial above, it is a special case as it is a separate part. If you try doing the same thing with most meshes (for example, trying to delete the sleeves off a shirt) you will end up with big holes in your mesh, not a sleeveless mesh.
Followup
If you're done with this tutorial, and you've done your homework and that's all worked fine, then you are ready to move on to the next tutorial, to do a more substantial edit, and changing UV mapping.
![]() Unimesh 2 - Editing and UV Mapping
Unimesh 2 - Editing and UV Mapping
A note on uploading...
It's great to be excited about having completed your first few projects. However, these first few beginner projects are usually just that: basic beginner projects, meant more to show you that you can do it than make anything spectacular. You and a thousand other people will have done this tutorial, and there's really no need for you to upload your finished mesh (especially considering that WDS Brianna uploaded her dress without the dangle way back in 2005. So please don't upload either this tutorial's project or your homework projects to MTS2 - such basic stuff will not be accepted. Wait until you've got a bit more experience under your belt (i.e. when you have gone through the other Unimesh tutorials) before uploading.
Having trouble?
In a perfect world, everyone would follow this tutorial word-for-word and do everything just right and never have any trouble. But sometimes things go wrong. So here's a list of common problems and mistakes people make, and the most likely fixes.
Body Shop Shows Wrong Dress
If you are getting this in Part 4, Step 6:If you are getting this in Part 8, Step 2:
- Did you forget to put your "TutorialDress_MeshFile.package" in your Downloads folder before running Body Shop?
- Something may have gone wrong with the linking. Go over the linking parts again.
- Did you forget to put your "TutorialDress_MeshFile.package" in your Downloads folder before running Body Shop, making sure to replace the existing file already there?
- Are you sure it's actually showing the wrong dress? Remember, the thumbnail will be wrong, but clicking on the dress should show you the right outfit.
- Maybe you accidentally replaced your GMDC with the original GMDC in Part 7, Step 3.
- Maybe you forgot to click Commit after replacing your GMDC in Part 7, Step 5.
- Maybe you forgot to save your edited file after replacing the GMDC in Part 7, Step 6.
Body Shop Shows No Changes
If you are getting this in Part 8, Step 2:
- Did you forget to put your "TutorialDress_MeshFile.package" in your Downloads folder before running Body Shop, making sure to replace the existing file already there?
- Are you sure it's actually showing the wrong dress? Remember, the thumbnail will be wrong, but clicking on the dress should show you the right outfit.
- Maybe you accidentally replaced your GMDC with the original GMDC in Part 7, Step 3.
- Maybe you forgot to click Commit after replacing your GMDC in Part 7, Step 5.
- Maybe you forgot to save your edited file after replacing the GMDC in Part 7, Step 6.
Wrong Dress Shows In-Game
If you test in-game and you are getting an unexpected or wrong outfit showing up, the most likely cause is incorrect game settings. In the game's graphics settings, you must set "Sim/Object Detail" to high for custom meshes to show up properly. At this time there is no known way to edit the low detail meshes properly.
Milkshape Error: "Face Count Mismatch"
This error occurs if you try to export your edited mesh and your morphs have a different number of faces/vertices. This most often happens if you have deleted too much/not deleted enough in removing the dangly thing or forgotten to remove it from the morphs. Start over the Milkshape editing part and make sure to delete the whole dangly thing from all three morphs - normal, fat, and pregnant. Make sure there are not any holes or anything else selected before you delete to prevent deleting too much.
Blue Lines/Circles in Milkshape
If you are seeing a bunch of weird blue lines/circles all over the place after importing your mesh, then you forgot to uncheck Show Skeleton as described in Part 6, Step 4. Uncheck it to hide the skeleton.
You can also reset the Skeleton joint size to be compatible with Sims2. For Milkshape 3D 1.8.5 Beta:
- Click File
- Select Preferences
- Click the Misc tab
- Set the joint size to .011
- Click OK
When you click on each viewport, the joint size will reset to a more pertinent proportion for Sims 2.
Sharp Seams/Lines Down Arms and Sides
If you are seeing sharp lines, seams, or edges down the arms and sides either in Milkshape or once you're looking at your edited mesh in Body Shop, then you forgot to uncheck Auto Smooth as described in Part 6, Step 3, or at some point you accidentally hit "Smooth All" on the Face menu. This is not fixable once imported - you must start over the Milkshape editing parts, and import without Auto Smooth checked.
Strange Transparency or Holes
If your mesh appears to have invisible parts, things showing through that shouldn't, or holes, then you probably said No when asked if you wanted to correct underweight bones in Part 6, Step 4. Reopen your MS3D file in Milkshape that you saved in the last step of Part 6. Then on the Vertex menu, select "Sims 2 UniMesh Fix Underweighted Bones V4.09" and then click OK when it tells you how many were adjusted. Re-export your mesh and continue with the rest of the steps in the tutorial from Part 7 onward.
Confused When Linking
If, on Part 4 when you open your recolour file, there are only 6 items in the Resource List rather than the correct number (8), and your file is just named "TutorialDress.package" rather than something like "5f3a3d82_TutorialDress.package" then you are likely opening the file from your My Documents\EA Games\The Sims 2\Projects\TutorialDress\ folder. That is an unfinished file. Make sure you are opening the finished file from your My Documents\EA Games\The Sims 2\SavedSims\ folder instead.
DirectX Error on Part 5
If you get a DirectX related error when you try to export the GMDC in Part 5, then you didn't get the Managed DirectX 9.0c mentioned in the "What you will need" section. It's linked on the SimPE download page under "Needed software to run SimPE" and you must get it and install it before continuing.
Mesh Replaces Maxis Original
If you suddenly notice that the Maxis outfit you based yours on has had its mesh replaced by your modified one, then you have unwittingly made a default replacement by forgetting to do Fix Integrity properly and give your mesh a new name. Go back and repeat Part 3, Steps 7 and 8, plus all of Parts 4, 5, and 7.
Questions? Comments?
There is a discussion thread for this tutorial which is here: http://www.modthesims2.com/showthread.php?t=296915
Please make sure you've checked the "Having trouble?" section above and re-read anything you're stuck on before posting. Also remember that the discussion thread is -only- for questions directly relating to this tutorial. If you're having trouble with or have questions regarding something else, please post in the main Body Shop Meshing Forum.
Related Links
| Tutorials by Category | |
|---|---|
|
Body Shop: Recolouring | Meshing | Modding | Sims Objects: Object Creation | Recolouring Building: Building | Landscaping | Walls & Floors | Other: Careers & Majors | Hacks and Game Mods |
