Difference between revisions of "Tutorials:STF Conversion Tute Step 12"
| (8 intermediate revisions by 2 users not shown) | |||
| Line 1: | Line 1: | ||
| − | + | ===Creating multiple color variations=== | |
| − | + | For extra color variations of the same plant or furniture, or whatever, you only need to work on the full color texture using the same techniques described previously. | |
| − | + | You import your images files back into '''S3PE''', and then get the '''instance''' number of the full color texture and use S3pe to generate a new hash. That hash is used as the new '''instance''' for your new recolor and the new texture is saved with that new hash and imported into S3PE as an extra color. Then you have to tell the package how to recognize the extra color variation. | |
| − | + | ||
| − | + | ||
| − | + | ||
| − | + | ||
| − | + | ||
| − | + | ||
| − | + | ||
| − | + | ||
| + | Ready? | ||
| + | |||
| + | ===Import your new images parts into the package=== | ||
| + | |||
| + | # Open ''S3pe''. | ||
| + | # Click '''Resource''' and '''IMPORT From File''' | ||
| + | # Navigate to your image files, | ||
| + | # Block select all your '''DDS''' image files | ||
| + | # Click '''OPEN''' | ||
| + | # Select '''IMPORT''' | ||
| + | # Click '''File''' and '''Save''' | ||
| + | # Prep your extra full color texture | ||
| + | |||
| + | === If You Have More Than One Mesh Color=== | ||
| + | |||
| + | # After importing the original mesh click on it and then click the '''CTRL''' and '''F''' keys. | ||
| + | # This brings up the has generator which you need to create a ''new instance number'' for the second texture color. | ||
| + | # Type anything into the '''Text to Hash''' field, and click '''Calculate'''. | ||
| + | # What you want to copy is the '''Instance FNV64 value''' after the ''0x'' part. | ||
| + | For the purposes of this tutorial - I faked up a recolor by painting a 50% pink opacity over the existing texture. Of course, in a real second color, you'd pick something better. | ||
<gallery> | <gallery> | ||
| − | Image: | + | Image:recolor-hash.jpg|Hash generator |
| − | Image: | + | Image:fake-recolor.jpg|Fake Recolor |
| − | + | </gallery> | |
| − | + | ||
| − | + | ||
| − | + | ||
| + | ===Changing the Instance value=== | ||
| + | # Select your 2 texture color and click '''File''' and '''Save As''' | ||
| + | # Before clicking '''Save''' copy the '''instance''' part of the filename with the new instance you got from the hash generator. (See picture.) | ||
| + | # You are only changing one small part of the file name. Overwrite the '''instance value''' in the image (highlighted) | ||
| + | # Save it as an interpolated DDS just like the other texture. | ||
| + | # In ''s3pe'', import the new texture - '''Resource-Import-From File''' | ||
| + | <br clear="all" \> | ||
| + | <gallery> | ||
| + | Image:original-instance.jpg|Original Texture's Instance in original filename | ||
| + | Image:replaced-instance.jpg|Replaced instance in recolor's filename | ||
</gallery> | </gallery> | ||
| + | |||
| + | * [[Tutorials:STF Conversion Tute Step 13]] | ||
| + | |||
| + | [[Category:Sims 3 Modding Tutorials]][[Category:Sims 3 Objects Tutorials]][[Category:Tutorials by porkypine]] | ||
Latest revision as of 01:31, 10 March 2013
Contents |
[edit] Creating multiple color variations
For extra color variations of the same plant or furniture, or whatever, you only need to work on the full color texture using the same techniques described previously.
You import your images files back into S3PE, and then get the instance number of the full color texture and use S3pe to generate a new hash. That hash is used as the new instance for your new recolor and the new texture is saved with that new hash and imported into S3PE as an extra color. Then you have to tell the package how to recognize the extra color variation.
Ready?
[edit] Import your new images parts into the package
- Open S3pe.
- Click Resource and IMPORT From File
- Navigate to your image files,
- Block select all your DDS image files
- Click OPEN
- Select IMPORT
- Click File and Save
- Prep your extra full color texture
[edit] If You Have More Than One Mesh Color
- After importing the original mesh click on it and then click the CTRL and F keys.
- This brings up the has generator which you need to create a new instance number for the second texture color.
- Type anything into the Text to Hash field, and click Calculate.
- What you want to copy is the Instance FNV64 value after the 0x part.
For the purposes of this tutorial - I faked up a recolor by painting a 50% pink opacity over the existing texture. Of course, in a real second color, you'd pick something better.

Hash generator
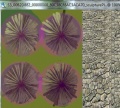
Fake Recolor


[edit] Changing the Instance value
- Select your 2 texture color and click File and Save As
- Before clicking Save copy the instance part of the filename with the new instance you got from the hash generator. (See picture.)
- You are only changing one small part of the file name. Overwrite the instance value in the image (highlighted)
- Save it as an interpolated DDS just like the other texture.
- In s3pe, import the new texture - Resource-Import-From File

Original Texture's Instance in original filename

Replaced instance in recolor's filename