Difference between revisions of "Tutorials:STF Conversion Tute Step 6"
From SimsWiki
(→Step 6: Extract the Sims 2 (TS2) Mesh and Textures) |
|||
| (24 intermediate revisions by 2 users not shown) | |||
| Line 1: | Line 1: | ||
| − | == | + | ==Step 6: Extract the Sims 2 (TS2) Mesh and Textures== |
| − | + | ||
<br clear="all" \> | <br clear="all" \> | ||
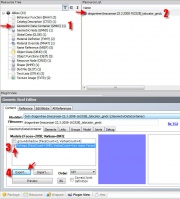
| − | [[File: | + | [[File:simpe-mesh-extraction.jpg|thumb|alt=Alt text|simpe mesh extraction]] |
| − | + | To start, extract the mesh and textures from your favorite TS2 object. | |
| − | * Open | + | * Open Simpe - click File, open |
| − | + | * Navigate to your TS2 package and open it. | |
| − | + | :1. In the Resource Tree, click on the Geometric Data Container (GMDC) | |
| − | * Navigate to your | + | :2. In the Resource List, click on the (meshname)_tslocator_gmdc |
| − | + | :3. At the bottom of SimPE select the Plugin View and make sure the TS2 mesh is checked, (In this case, it's called foilage | |
| − | + | :4. Click the Export button and save it to your new working folders. | |
| + | *Navigate to your TS2-original folder and save the extracted mesh.obj (see simpe mesh extraction) | ||
| + | <br clear="all" \> | ||
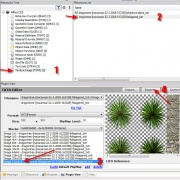
| + | [[File:ts2-texture.jpg|thumb|alt=Alt text|TS2 original texture]] | ||
| + | * Back in SImPE, extract the image files. You only need the texture files, not the alpha. | ||
| + | :1. In the resource Tree, select Texture Image (TXTR)(2) | ||
| + | :2. In the Resource List, select the foliaged_txtr (You don't need the TS2 alpha) | ||
| + | :3. In the Plugin View, select the largest size - in this case it is a '''512 x 512''' image - '''''remember this size.''''' You will need the size info later for the UV map and the texture conversions. | ||
| + | :4. Click Export | ||
| + | * Navigate to your TS2-original folder and save the extracted texture.png | ||
| + | * Close Simpe | ||
| − | = | + | <br style="clear:both" /> |
| − | |||
| − | |||
| − | |||
| − | |||
| + | * [[Tutorials:STF Conversion Tute Step 7]] | ||
| − | + | [[Category:Sims 3 Modding Tutorials]][[Category:Sims 3 Objects Tutorials]][[Category:Tutorials by porkypine]] | |
| − | + | ||
| − | [[ | + | |
| − | + | ||
| − | + | ||
| − | + | ||
| − | + | ||
| − | + | ||
| − | + | ||
| − | + | ||
| − | + | ||
| − | + | ||
| − | + | ||
Latest revision as of 00:48, 10 March 2013
[edit] Step 6: Extract the Sims 2 (TS2) Mesh and Textures
To start, extract the mesh and textures from your favorite TS2 object.
- Open Simpe - click File, open
- Navigate to your TS2 package and open it.
- 1. In the Resource Tree, click on the Geometric Data Container (GMDC)
- 2. In the Resource List, click on the (meshname)_tslocator_gmdc
- 3. At the bottom of SimPE select the Plugin View and make sure the TS2 mesh is checked, (In this case, it's called foilage
- 4. Click the Export button and save it to your new working folders.
- Navigate to your TS2-original folder and save the extracted mesh.obj (see simpe mesh extraction)
- Back in SImPE, extract the image files. You only need the texture files, not the alpha.
- 1. In the resource Tree, select Texture Image (TXTR)(2)
- 2. In the Resource List, select the foliaged_txtr (You don't need the TS2 alpha)
- 3. In the Plugin View, select the largest size - in this case it is a 512 x 512 image - remember this size. You will need the size info later for the UV map and the texture conversions.
- 4. Click Export
- Navigate to your TS2-original folder and save the extracted texture.png
- Close Simpe

