Difference between revisions of "Tutorials:Landscaping Mega Tutorial"
(→Plant Placement - Arranging your Garden) |
|||
| (19 intermediate revisions by 6 users not shown) | |||
| Line 1: | Line 1: | ||
| − | |||
| − | |||
=Introduction= | =Introduction= | ||
| − | + | Need help with landscaping and outdoor appeal of your gardens? This tiptorial is for you! These tips are not aimed at any specific level of skill - whether you've just installed the game or have been playing and building a long time, everyone can find something here to help improve their gardening skills. Because this tiptorial covers all aspects of the gardens you can apply this tiptorial to any type, style, or size of house. The tiptorial covers every aspect of landscaping, from terraforming to plant placement, so if there is a certain section you are weak on you can just read over the parts that would help you the most. | |
| − | |||
| − | + | ==Before you Begin== | |
| + | * '''TS2 Only:''' If you are using TS2, when refer to the softness and hardness intensity slider or something of similar nature, this is only available in TS3, you will have to make do as well as you can with the variation of TS2 tools. | ||
| − | + | * Make sure you plan out your lot before you begin, it is key to know where your building will be, whether you will include a pool etc... Everyone builds in a different order, so you should ensure you have a rough plan first to avoid having a hodge podge of a garden. This will also ensure you have enough room to build the garden you want, without having too much space to fill up that you may not know what to do with. | |
| + | * Get inspiration. If you're uninspired as a landscaper, you may find it helpful to go looking for pictures to inspire you. Landscaping or gardening magazines can be a great source, as can Google and Google Image Search - try terms like, "botanical garden" or "award-winning garden" for general inspiration, or "japanese garden" and the like for ideas on specific types and styles. Remember, if you find a good image on Google Image Search, you can always browse around the site it's on by clicking the image to see more of the same. | ||
| − | |||
| − | |||
=Terraforming - Forming the Terrain= | =Terraforming - Forming the Terrain= | ||
| − | [[Image:Terraforming.jpg|right|300x300px]] | + | [[Image:Terraforming.jpg|right|300x300px]]Terraforming is the editing of the land, this includes ponds, hills, rock faces etc. To the right is an image of the main 3 styles of terraforming; all of these can really help to enhance the look of a lot. |
| − | |||
| + | '''Rocky Hills:''' Rocks hills are not curved and smooth like normal hills but instead are are jagged and rough. When designing hills like this, it is best to try and use the small brush with a lot of hardness as this gives a jagged effect. When you have finished forming the terrain into this rocky shape, you need to make sure you use an appropriate type of terrain paint. Overall, you should use a stone terrain, but at the bottom, you can use a grass terrain and blend the rocks in with the ground. Don't put a rocky hill sticking up in the middle of your garden - try and blend it in with the landscape, or sink your house so you can have more natural rocks. | ||
| − | |||
| + | '''Smooth Hills:''' To create smooth hills, you need to turn the hardness down to very low and select the circular tool, then use a large size brush and make a few clicks. Try and vary where you click it to get it rounded all the way around instead of clicking on the same spot again and again. When painting a smooth hill, you can either make it a rocky hill or a more smooth rolling one covered in lush grass or flowers. Either way, use a low hardness on your terrain brush so the rocks, flowers, or grass terrains blend well. | ||
| − | |||
| − | + | '''Ponds:''' When placing a pond don't make the tool really hard because your pond will be too deep. But at the same time, don't make it too soft or you will be clicking a bunch before the water appears. Just make sure you keep it as a natural, irregular shape and add in terrain paints specific to the type of pond you are building.(see below) | |
| − | '''Ponds:''' | + | |
<br clear="all" \> | <br clear="all" \> | ||
| + | |||
=Ponds - Adding in Water Features= | =Ponds - Adding in Water Features= | ||
| Line 36: | Line 32: | ||
[[Image:Ponds&Waterfalls.jpg|right|300x300px]] | [[Image:Ponds&Waterfalls.jpg|right|300x300px]] | ||
| − | + | Ponds can give you great looks in your garden whether you want it to be natural looking or structed or even a gigantic waterfall. | |
| − | '''Constructed Ponds''' Constructed pools are pools that would be man made to go in your garden, | + | '''Constructed Ponds''' Constructed pools are pools that would be man made to go in your garden. As they are man-made, they will tend to be more rigid and geometric than natural ponds - usually a circle or "bean shaped" or another variation on a circle. Once you have a nice shape in place, you need to add in ''stone'' terrain paint to make it look like it has a solid base and has been constructed on purpose. You should then use a limited amount of planting for effect - not lots of overgrown shrubs. |
| − | '''Natural Ponds''' When creating a natural pond | + | '''Natural Ponds''' When creating a natural pond, it should look much less rigid. This can be a long stream that stretches across the lot, or irregularly shaped ponds. Make sure you vary the outline of the pond - natural ponds are not circular or with straight lines. Make an interesting and varied shape and then use a ''dirt'' terrain paint to give it an earthy and natural look. Then you can add a variety of different shrubs and plants all over the place in bunches to give it a maintaned but natural look. Don't put shrubs under the water, but you can add cattails and water lilies and other marshy water plants to the water itself. |
| − | '''Waterfalls''' | + | '''Waterfalls''' Waterfalls should be used sparingly, on grand expensive lots or extremely natural ones. Don't put a waterfall on every lot. It's best to put them on lots that already have hills built in (either naturally or as part of your terraforming) - otherwise you will end up with some huge ugly lump in the ground which somehow has water getting to the top of it! It is important to get a good curve at the top of it to make it look like it is rolling off the top like in the picture to the right. Cover the waterfall with a rock terrain paint and around the edges and make sure there is a pond at the bottom for water to collect in so it looks real. Ferns, mosses, and other water-loving plants are best around a waterfall - most "normal" plants would get overwatered from all the spray, so avoid sticking rosebushes at the base of the falls! |
<br clear="all" \> | <br clear="all" \> | ||
=Plant Placement - Arranging your Garden= | =Plant Placement - Arranging your Garden= | ||
| + | |||
| + | '''Tip:''' | ||
| + | |||
| + | * Use odd numbers for your amounts of plants - three clustered shrubs looks more natural than two. | ||
{|class="nicetable" | {|class="nicetable" | ||
| Line 61: | Line 61: | ||
| class="shaded" | '''Stairs | | class="shaded" | '''Stairs | ||
| | | | ||
| − | The most basic form of arranging! This | + | The most basic form of arranging! This method is applicable to all other styles and should always be used or considered while landscaping. You start with placing high plants in the back, dropping down to lowest plants in the front. The picture here shows it in a very rigid way to make it obvious, but it can look very natural if you vary the location, rotation, and type of plants in little stairstepped clumps. |
| − | method is applicable to all other styles | + | |
| − | and should always be used or considered | + | |
| − | while landscaping. | + | |
| − | + | ||
| − | + | ||
|[[Image:Stiars.jpg|right|300x300px]] | |[[Image:Stiars.jpg|right|300x300px]] | ||
| class="shaded" | '''Iwagumi - Rock Formation | | class="shaded" | '''Iwagumi - Rock Formation | ||
| | | | ||
| − | This style is all about balance and being | + | This style is all about balance and being minimalistic. A traditional Asian style takes patience and care to do well. Find some good pictures online for inspiration. |
| − | minimalistic. A traditional Asian style | + | |
| − | + | ||
| [[Image:iwagumi.jpg|right|300x300px]] | | [[Image:iwagumi.jpg|right|300x300px]] | ||
|- | |- | ||
| class="shaded" | '''Concave | | class="shaded" | '''Concave | ||
| | | | ||
| − | Concave is a simple arrangement | + | Concave is a simple arrangement. The outer edges are high and the further you make your way into the middle, the lower it gets. This can also be used on the ground in shape too, not just the vertical placement of plants, by creating garden areas that are wider at the outside and bow inward toward the middle. |
| − | + | ||
| − | edges are high and the | + | |
| − | your way into the middle, the lower it gets. | + | |
| [[Image:concave.jpg|right|300x300px]] | | [[Image:concave.jpg|right|300x300px]] | ||
| class="shaded" | '''Convex | | class="shaded" | '''Convex | ||
| | | | ||
| − | Convex is the exact opposite of concave. As | + | Convex is the exact opposite of concave. As you make your way into the middle, the height gets taller. Again, this can be used as a general shape on the ground as well - create a garden plot area that is thinner on the outside edges, and thicker in the middle, bowing outward. |
| − | you make your way into the middle, the | + | |
| − | + | ||
| [[Image:convex.jpg|right|300x300px]] | | [[Image:convex.jpg|right|300x300px]] | ||
|- | |- | ||
| class="shaded" | '''Rectangle | | class="shaded" | '''Rectangle | ||
| | | | ||
| − | Rectangle is a very simple set-up | + | Rectangle is a very simple set-up. All of the plants are the same height. Nice horizontal top and easy to do. But it should be used sparingly, as it can look very rigid. Best for well-manicured gardens. |
| − | + | ||
| − | height. Nice horizontal top and easy to do. | + | |
| [[Image:Rectangle.jpg|right|300x300px]] | | [[Image:Rectangle.jpg|right|300x300px]] | ||
| − | | class="shaded" | ''' | + | | class="shaded" | '''Island |
| | | | ||
| − | Island is a combination of a few other styles. | + | Island is a combination of a few other styles. Essentially, it is stairs and convex, except put into a flower bed standing on its own. In this example it's a circle, so the highest point would be in the middle, with steps following the shape the rest of the way down. The same principle applies when used for other shapes. It always follows the shape down. |
| − | Essentially, it is stairs and convex, except | + | |
| − | put into a flower bed standing on | + | |
| − | + | ||
| − | would be in the middle, with steps following the | + | |
| − | shape the rest of the way down. The same principle | + | |
| − | applies when used for other shapes. It always | + | |
| − | follows the shape down. | + | |
| [[Image:Island.jpg|right|300x300px]] | | [[Image:Island.jpg|right|300x300px]] | ||
|} | |} | ||
<br clear="all" \> | <br clear="all" \> | ||
| + | |||
=Terrain Painting - Where to put Dirt= | =Terrain Painting - Where to put Dirt= | ||
| − | [[Image:TerrainPaintin.jpg|right|300x300px]] | + | [[Image:TerrainPaintin.jpg|right|300x300px]]Terrain painting is a key element to get right when you are creating a house, and with TS3, it is easier than ever with the hardness intensity slider. |
| + | |||
| + | When you start the game you have the normal grass. Most people tend to cover this all over with a slightly richer grass because it is more appealing. However most people leave it at that - which can be pretty boring. It also tends to make the lot edges stand out too much since you can see exactly where the lot ends. | ||
| + | |||
| + | Instead of covering your lot with bright green, try turning the intensity down to very soft and using light clicks to add variation in different grass or other terrain types. Try to avoid the lot edges so there's a smooth blend. You can use various terrains together - flower terrains are great for country homes, and dirt and mud terrains when placed lightly also give a great effect! You generally don't want small dots of obviously different terrain here and there... You also don't want to use every terrain just for the sake of variation because you will turn out with a messy, unattractive terrain. Be clever and careful when placing terrain, and place it for effect. | ||
| + | |||
| + | Here are a few tips: | ||
| + | |||
| + | *Be careful when mixing styles or terrains: grass and sand aren't going to work well in most applications. | ||
| + | |||
| + | *Always put a little dirt terrain under your trees, '''always'''! Trees tend to have a damp patch underneath and sunlight can't reach the grass, so a bit of bare, damp dirt makes trees look much more realistic. | ||
| + | |||
| + | *Like trees, the foundation of a home tends to attract moisture. Add the tiniest border of dark dirt around the edge of a house to give it a realistic effect. | ||
| + | |||
| + | *No terrain is one colour! Even an expensive house with a garden trimmed with golden scissors by a team of gardeners on their hands and knees will have a bit of variation here and there in colour. Even a light few clicks with a big, soft brush will do a world of good. | ||
| + | |||
| + | *Ponds should be covered around the edges - dirt, grass, sand, rock, etc. | ||
| − | + | *Playgrounds and swings get trodden on a lot so the grass wears away. Use dirt or sand to make it look realistic. | |
| − | + | ||
| − | + | ||
| − | + | ||
| − | + | ||
| − | *Playgrounds and swings get trodden on a lot so the grass | + | |
| − | + | ||
| + | *High traffic areas of grass (like leading around the side of the house) will also get worn away. Make a light trail in the grass leading from your patio to your pool, etc. | ||
| − | |||
<br clear="all" \> | <br clear="all" \> | ||
=Fences - Containing your Garden= | =Fences - Containing your Garden= | ||
| − | [[Image:Fencetypes.jpg|right|300x300px]] | + | [[Image:Fencetypes.jpg|right|300x300px]]A fence is as much for decorative purposes as it is for keeping stuff penned in. |
| − | + | '''Borders:''' Borders are used to mark the edges of plant beds and pathways. They're not really suitable for the edges of a lot. Border fences are very low to the ground and in TS3 they are the first fences that appear in the catalog. When placing a border make sure if it is a flower border that you put the fence down before the plants otherwise you won't be able to place you fence even with moveobjects turned on. Borders can make a "finished" look on flowerbeds and paths, but avoid using them on old-fashioned or natural woodland style lots as they will look too rigid. | |
| − | |||
| + | '''Yard Fencing:''' This is the type of fencing that you use to surround larger areas of your house - front or back yard or back garden. Most people make the mistake of just fencing in all the edges of the lot - not only does that add a bunch of polys that can slow down the lot, but it's also boring! Typically these fences are stone, brick or shrub. You can see 2 yards fenced in the image to the right. When placing them try to start to the side of your house and go around in a square or rectangular shape extending to the back of the house. Remember, don't go right up against the lot edge - you can always place natural shrubs or trees outside the fence to create a nice look. You can also fence in an area in the front too. Just make sure to add a gate so your sims can get in and out! | ||
| − | |||
| − | + | '''Balcony Fencing''' Make sure to match the type of fencing to the type of house. Don't use a border fence unless it's an inaccessible decorative balcony - though your sims can't fall off, you don't want it to look like they could! You also don't want to use a high privacy fence either - generally a waist-high wood, stone, metal, or brick fence that matches your house style will look best. | |
| − | '''Balcony Fencing''' | + | |
<br clear="all" \> | <br clear="all" \> | ||
| + | |||
=Pools - Adding Some Fun= | =Pools - Adding Some Fun= | ||
| − | + | [[Image:Poolideassection.jpg|right|300x300px]] | |
Basic pools are a great addition to a yard. They offer fun and build muscle for your sims. This section is geared toward helping you incorporate a pool without killing space. Some ideas you can try to play around with are... | Basic pools are a great addition to a yard. They offer fun and build muscle for your sims. This section is geared toward helping you incorporate a pool without killing space. Some ideas you can try to play around with are... | ||
| Line 150: | Line 139: | ||
*[http://www.modthesims.info/showthread.php?t=352819 Pool in a pond - TS3 only] | *[http://www.modthesims.info/showthread.php?t=352819 Pool in a pond - TS3 only] | ||
*Using diagonals and the circular extensions - TS2 only | *Using diagonals and the circular extensions - TS2 only | ||
| − | *Painting the sides of the pool | + | *Painting the sides of the pool. By simply changing the color you can make it all look more polished. |
| + | *Adding in water lilies and reeds to make it look dirty or worn, or even grand. | ||
| + | |||
| + | Chairs and other assorted outdoor activities like a barbecue are excellent to have poolside. To fill in space around the patio itself, it is a nice idea to have raised flowerbeds, or some nice bushes and fencing, for privacy (and safety if it's a house meant for kids!) Again, look at real life pools for inspiration - you won't just see a pool stuck in a sea of grass. Instead, pools should have a border of stone or concrete flooring around them. | ||
| + | <br clear="all" \> | ||
| − | |||
=Construction - Gazebos, Decks, and Patios= | =Construction - Gazebos, Decks, and Patios= | ||
| + | [[Image:Gazebo.jpg|right|300x300px]] | ||
| + | Every house has to have a way in and out of it, so a thing that you might want to consider adding in is a patio. A back yard might be missing that certain place to gather and hang out. This could be a nice place and time to add in a gazebo! But what about the houses that are built on sloped or uneven terrain? They get to have awesome decks! | ||
| + | |||
| + | *'''Patios''' - A good place to put patios is in the front of your house. This is commonly referred to as a front porch. This give a sim a nice place to outside and sit, as well as enjoy the fresh air and spy on their neighbors. Patios in the back of the house create a personal feel, and give your sims something to break the habit of eating inside all the time. Patios are almost always concrete or brick, and can be bordered with a fence. | ||
| + | |||
| + | |||
| + | *'''Gazebos''' - Gazebos are a creative and beautiful way to make your garden more personal and decorative. They provide both shelter and add a lovely bit of interest to your landscaping. What would be more relaxing than sitting down with a nice and good book outside in the gentle rain? Or to house the grill for those perfect summer days. The possibilities are really endless depending on the size you make it!They are very easy to assemble as well, but if you don't know how, see: [[http://www.sims2wiki.info/wiki.php?title=Tutorials:Gazebo_Tutorials Gazebo Tutorials]] | ||
| + | |||
| + | |||
| + | *'''Decks or Porches''' - Porches are basically elevated patios. You can do everything a patio can, except decks make you look more official and a higher class. They also require stairs for sims to be able to access it. Benefits to decks are the fact that you can choose from two (TS3) or three (TS2) different types of decking, and they can be placed on sloped or uneven terrain. Some neat things to do with these in addition is you can change the terrain to have different heights in the decks! They can also be great places for the family to gather, and are good places for barbecues, hot tubs, benches, dartboards, etc. | ||
| + | |||
| + | |||
| + | *'''Balconies''' - The third and final form of a patio. These are patios that are completely detached from the ground. Using columns or other means of support, they allow access to the outside from the upper floors of a house. Make sure to use outdoor style furniture - wood or plastic recliners, loveseats, side tables, bars, and easels. | ||
| + | |||
| + | |||
| + | You can also add potted plants or small founatins to any of the above to add a little more interest. | ||
| + | <br clear="all" \> | ||
| + | |||
| + | =Choosing The Right Colors= | ||
| + | |||
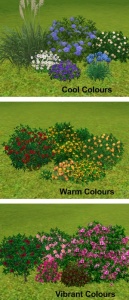
| + | [[Image:PlantColours.jpg|right|300x300px]]When it comes to choosing colours for your house you have to make sure they don't ''clash''! To the right you will see the 3 different catagories for colour. | ||
| + | |||
| + | There are the cool colours which consist of blues, purples, and whites; then you have the warm colours such as oranges, browns and reds; finally you have the vibrant colours, which can be a bright version of any colour. As far as landscaping is concerned, green is a neutral colour and works well with any of these. | ||
| + | |||
| + | When doing the colour schemes for a pre built house in the garden, you should always look to see what style of house it is and what will fit with it. For example you are not going to find a small cottage in the woods with bright pink flowers sprouting in every direction - warm colours would be more appropriate. If you had a modern white home, you could consider cool colours to fit in with the colour scheme, or warm colours for contrast. | ||
| + | |||
| + | Avoid mixing colour schemes around the garden - you can vary the type of plants used in different areas, but try to stick to one colour scheme.<br clear="all" \> | ||
=Finishing Touches - Fine details= | =Finishing Touches - Fine details= | ||
| − | Finishing touches are what make the house look complete and full. By adding in these tiny changes your landscaping looks much more professional and beautiful every time. In particular, people have a way of neglecting these things the most. | + | Finishing touches are what make the house look complete and full. By adding in these tiny changes your landscaping looks much more professional and beautiful every time. In particular, people have a way of neglecting these things the most. |
| + | |||
| + | '''Tips:''' | ||
| + | |||
| + | * Put dirt under plants - a little under trees, and all over under flowerbeds. | ||
| + | |||
| + | * Rotate plants and move them a bit off the grid for a more natural look. | ||
| + | |||
| + | * Make sure leaves on plants close to the house don't go through the walls. It's okay if they go through foundations, but you don't want greenery sticking through the wall into your living room. | ||
| + | |||
| + | * Vary the types of plants you use. Don't use all the same plant all over. | ||
| + | |||
| + | * Use a bit of different terrain paint over the lot. Don't use all the same terrain paint. | ||
| − | * | + | * Make sure not to block windows and doors with your landscaping. |
| − | + | ||
| − | + | ||
| − | + | ||
| − | + | ||
| − | + | ||
| − | |||
=Particular Styles - Themed Gardens!= | =Particular Styles - Themed Gardens!= | ||
| Line 234: | Line 259: | ||
| [[Image:Urban.jpg|right|300x300px]] | | [[Image:Urban.jpg|right|300x300px]] | ||
| − | | class="shaded" | '''Desert | + | | class="shaded" | '''Desert Oasis |
| | | | ||
*Small Occasional Pond | *Small Occasional Pond | ||
Latest revision as of 15:47, 12 December 2013
[edit] Introduction
Need help with landscaping and outdoor appeal of your gardens? This tiptorial is for you! These tips are not aimed at any specific level of skill - whether you've just installed the game or have been playing and building a long time, everyone can find something here to help improve their gardening skills. Because this tiptorial covers all aspects of the gardens you can apply this tiptorial to any type, style, or size of house. The tiptorial covers every aspect of landscaping, from terraforming to plant placement, so if there is a certain section you are weak on you can just read over the parts that would help you the most.
[edit] Before you Begin
- TS2 Only: If you are using TS2, when refer to the softness and hardness intensity slider or something of similar nature, this is only available in TS3, you will have to make do as well as you can with the variation of TS2 tools.
- Make sure you plan out your lot before you begin, it is key to know where your building will be, whether you will include a pool etc... Everyone builds in a different order, so you should ensure you have a rough plan first to avoid having a hodge podge of a garden. This will also ensure you have enough room to build the garden you want, without having too much space to fill up that you may not know what to do with.
- Get inspiration. If you're uninspired as a landscaper, you may find it helpful to go looking for pictures to inspire you. Landscaping or gardening magazines can be a great source, as can Google and Google Image Search - try terms like, "botanical garden" or "award-winning garden" for general inspiration, or "japanese garden" and the like for ideas on specific types and styles. Remember, if you find a good image on Google Image Search, you can always browse around the site it's on by clicking the image to see more of the same.
[edit] Terraforming - Forming the Terrain
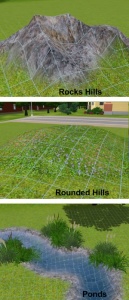
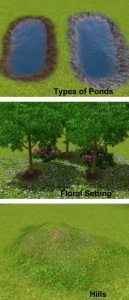
Terraforming is the editing of the land, this includes ponds, hills, rock faces etc. To the right is an image of the main 3 styles of terraforming; all of these can really help to enhance the look of a lot.
Rocky Hills: Rocks hills are not curved and smooth like normal hills but instead are are jagged and rough. When designing hills like this, it is best to try and use the small brush with a lot of hardness as this gives a jagged effect. When you have finished forming the terrain into this rocky shape, you need to make sure you use an appropriate type of terrain paint. Overall, you should use a stone terrain, but at the bottom, you can use a grass terrain and blend the rocks in with the ground. Don't put a rocky hill sticking up in the middle of your garden - try and blend it in with the landscape, or sink your house so you can have more natural rocks.
Smooth Hills: To create smooth hills, you need to turn the hardness down to very low and select the circular tool, then use a large size brush and make a few clicks. Try and vary where you click it to get it rounded all the way around instead of clicking on the same spot again and again. When painting a smooth hill, you can either make it a rocky hill or a more smooth rolling one covered in lush grass or flowers. Either way, use a low hardness on your terrain brush so the rocks, flowers, or grass terrains blend well.
Ponds: When placing a pond don't make the tool really hard because your pond will be too deep. But at the same time, don't make it too soft or you will be clicking a bunch before the water appears. Just make sure you keep it as a natural, irregular shape and add in terrain paints specific to the type of pond you are building.(see below)
[edit] Ponds - Adding in Water Features
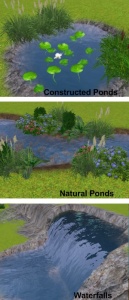
Ponds can give you great looks in your garden whether you want it to be natural looking or structed or even a gigantic waterfall.
Constructed Ponds Constructed pools are pools that would be man made to go in your garden. As they are man-made, they will tend to be more rigid and geometric than natural ponds - usually a circle or "bean shaped" or another variation on a circle. Once you have a nice shape in place, you need to add in stone terrain paint to make it look like it has a solid base and has been constructed on purpose. You should then use a limited amount of planting for effect - not lots of overgrown shrubs.
Natural Ponds When creating a natural pond, it should look much less rigid. This can be a long stream that stretches across the lot, or irregularly shaped ponds. Make sure you vary the outline of the pond - natural ponds are not circular or with straight lines. Make an interesting and varied shape and then use a dirt terrain paint to give it an earthy and natural look. Then you can add a variety of different shrubs and plants all over the place in bunches to give it a maintaned but natural look. Don't put shrubs under the water, but you can add cattails and water lilies and other marshy water plants to the water itself.
Waterfalls Waterfalls should be used sparingly, on grand expensive lots or extremely natural ones. Don't put a waterfall on every lot. It's best to put them on lots that already have hills built in (either naturally or as part of your terraforming) - otherwise you will end up with some huge ugly lump in the ground which somehow has water getting to the top of it! It is important to get a good curve at the top of it to make it look like it is rolling off the top like in the picture to the right. Cover the waterfall with a rock terrain paint and around the edges and make sure there is a pond at the bottom for water to collect in so it looks real. Ferns, mosses, and other water-loving plants are best around a waterfall - most "normal" plants would get overwatered from all the spray, so avoid sticking rosebushes at the base of the falls!
[edit] Plant Placement - Arranging your Garden
Tip:
- Use odd numbers for your amounts of plants - three clustered shrubs looks more natural than two.
| Name | Description | Picture | Name | Description | Picture |
|---|---|---|---|---|---|
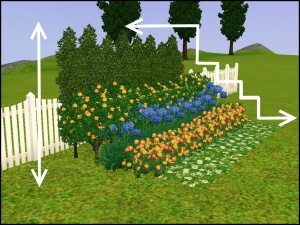
| Stairs |
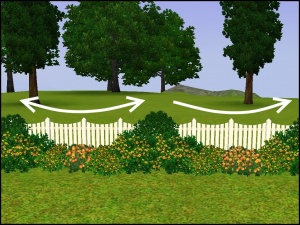
The most basic form of arranging! This method is applicable to all other styles and should always be used or considered while landscaping. You start with placing high plants in the back, dropping down to lowest plants in the front. The picture here shows it in a very rigid way to make it obvious, but it can look very natural if you vary the location, rotation, and type of plants in little stairstepped clumps. |
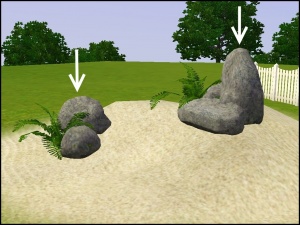
Iwagumi - Rock Formation |
This style is all about balance and being minimalistic. A traditional Asian style takes patience and care to do well. Find some good pictures online for inspiration. |
||
| Concave |
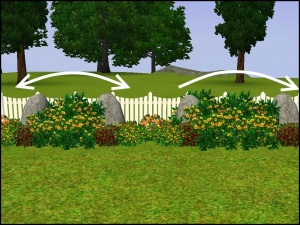
Concave is a simple arrangement. The outer edges are high and the further you make your way into the middle, the lower it gets. This can also be used on the ground in shape too, not just the vertical placement of plants, by creating garden areas that are wider at the outside and bow inward toward the middle. |
Convex |
Convex is the exact opposite of concave. As you make your way into the middle, the height gets taller. Again, this can be used as a general shape on the ground as well - create a garden plot area that is thinner on the outside edges, and thicker in the middle, bowing outward. |
||
| Rectangle |
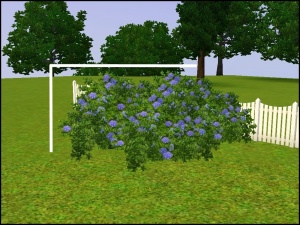
Rectangle is a very simple set-up. All of the plants are the same height. Nice horizontal top and easy to do. But it should be used sparingly, as it can look very rigid. Best for well-manicured gardens. |
Island |
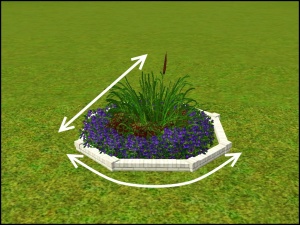
Island is a combination of a few other styles. Essentially, it is stairs and convex, except put into a flower bed standing on its own. In this example it's a circle, so the highest point would be in the middle, with steps following the shape the rest of the way down. The same principle applies when used for other shapes. It always follows the shape down. |
[edit] Terrain Painting - Where to put Dirt
Terrain painting is a key element to get right when you are creating a house, and with TS3, it is easier than ever with the hardness intensity slider.When you start the game you have the normal grass. Most people tend to cover this all over with a slightly richer grass because it is more appealing. However most people leave it at that - which can be pretty boring. It also tends to make the lot edges stand out too much since you can see exactly where the lot ends.
Instead of covering your lot with bright green, try turning the intensity down to very soft and using light clicks to add variation in different grass or other terrain types. Try to avoid the lot edges so there's a smooth blend. You can use various terrains together - flower terrains are great for country homes, and dirt and mud terrains when placed lightly also give a great effect! You generally don't want small dots of obviously different terrain here and there... You also don't want to use every terrain just for the sake of variation because you will turn out with a messy, unattractive terrain. Be clever and careful when placing terrain, and place it for effect.
Here are a few tips:
- Be careful when mixing styles or terrains: grass and sand aren't going to work well in most applications.
- Always put a little dirt terrain under your trees, always! Trees tend to have a damp patch underneath and sunlight can't reach the grass, so a bit of bare, damp dirt makes trees look much more realistic.
- Like trees, the foundation of a home tends to attract moisture. Add the tiniest border of dark dirt around the edge of a house to give it a realistic effect.
- No terrain is one colour! Even an expensive house with a garden trimmed with golden scissors by a team of gardeners on their hands and knees will have a bit of variation here and there in colour. Even a light few clicks with a big, soft brush will do a world of good.
- Ponds should be covered around the edges - dirt, grass, sand, rock, etc.
- Playgrounds and swings get trodden on a lot so the grass wears away. Use dirt or sand to make it look realistic.
- High traffic areas of grass (like leading around the side of the house) will also get worn away. Make a light trail in the grass leading from your patio to your pool, etc.
[edit] Fences - Containing your Garden
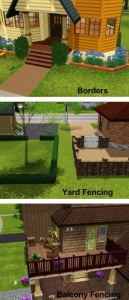
A fence is as much for decorative purposes as it is for keeping stuff penned in.Borders: Borders are used to mark the edges of plant beds and pathways. They're not really suitable for the edges of a lot. Border fences are very low to the ground and in TS3 they are the first fences that appear in the catalog. When placing a border make sure if it is a flower border that you put the fence down before the plants otherwise you won't be able to place you fence even with moveobjects turned on. Borders can make a "finished" look on flowerbeds and paths, but avoid using them on old-fashioned or natural woodland style lots as they will look too rigid.
Yard Fencing: This is the type of fencing that you use to surround larger areas of your house - front or back yard or back garden. Most people make the mistake of just fencing in all the edges of the lot - not only does that add a bunch of polys that can slow down the lot, but it's also boring! Typically these fences are stone, brick or shrub. You can see 2 yards fenced in the image to the right. When placing them try to start to the side of your house and go around in a square or rectangular shape extending to the back of the house. Remember, don't go right up against the lot edge - you can always place natural shrubs or trees outside the fence to create a nice look. You can also fence in an area in the front too. Just make sure to add a gate so your sims can get in and out!
Balcony Fencing Make sure to match the type of fencing to the type of house. Don't use a border fence unless it's an inaccessible decorative balcony - though your sims can't fall off, you don't want it to look like they could! You also don't want to use a high privacy fence either - generally a waist-high wood, stone, metal, or brick fence that matches your house style will look best.
[edit] Pools - Adding Some Fun
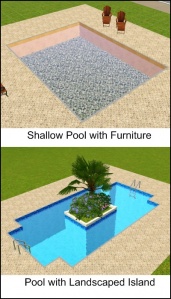
Basic pools are a great addition to a yard. They offer fun and build muscle for your sims. This section is geared toward helping you incorporate a pool without killing space. Some ideas you can try to play around with are...
- Adding in decorative stairs
- Adjusting the depth
- Creating Islands
- Pool in a pond - TS3 only
- Using diagonals and the circular extensions - TS2 only
- Painting the sides of the pool. By simply changing the color you can make it all look more polished.
- Adding in water lilies and reeds to make it look dirty or worn, or even grand.
Chairs and other assorted outdoor activities like a barbecue are excellent to have poolside. To fill in space around the patio itself, it is a nice idea to have raised flowerbeds, or some nice bushes and fencing, for privacy (and safety if it's a house meant for kids!) Again, look at real life pools for inspiration - you won't just see a pool stuck in a sea of grass. Instead, pools should have a border of stone or concrete flooring around them.
[edit] Construction - Gazebos, Decks, and Patios
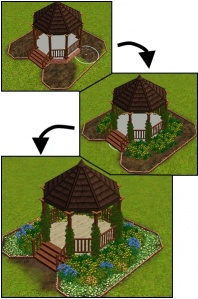
Every house has to have a way in and out of it, so a thing that you might want to consider adding in is a patio. A back yard might be missing that certain place to gather and hang out. This could be a nice place and time to add in a gazebo! But what about the houses that are built on sloped or uneven terrain? They get to have awesome decks!
- Patios - A good place to put patios is in the front of your house. This is commonly referred to as a front porch. This give a sim a nice place to outside and sit, as well as enjoy the fresh air and spy on their neighbors. Patios in the back of the house create a personal feel, and give your sims something to break the habit of eating inside all the time. Patios are almost always concrete or brick, and can be bordered with a fence.
- Gazebos - Gazebos are a creative and beautiful way to make your garden more personal and decorative. They provide both shelter and add a lovely bit of interest to your landscaping. What would be more relaxing than sitting down with a nice and good book outside in the gentle rain? Or to house the grill for those perfect summer days. The possibilities are really endless depending on the size you make it!They are very easy to assemble as well, but if you don't know how, see: [Gazebo Tutorials]
- Decks or Porches - Porches are basically elevated patios. You can do everything a patio can, except decks make you look more official and a higher class. They also require stairs for sims to be able to access it. Benefits to decks are the fact that you can choose from two (TS3) or three (TS2) different types of decking, and they can be placed on sloped or uneven terrain. Some neat things to do with these in addition is you can change the terrain to have different heights in the decks! They can also be great places for the family to gather, and are good places for barbecues, hot tubs, benches, dartboards, etc.
- Balconies - The third and final form of a patio. These are patios that are completely detached from the ground. Using columns or other means of support, they allow access to the outside from the upper floors of a house. Make sure to use outdoor style furniture - wood or plastic recliners, loveseats, side tables, bars, and easels.
You can also add potted plants or small founatins to any of the above to add a little more interest.
[edit] Choosing The Right Colors
When it comes to choosing colours for your house you have to make sure they don't clash! To the right you will see the 3 different catagories for colour.There are the cool colours which consist of blues, purples, and whites; then you have the warm colours such as oranges, browns and reds; finally you have the vibrant colours, which can be a bright version of any colour. As far as landscaping is concerned, green is a neutral colour and works well with any of these.
When doing the colour schemes for a pre built house in the garden, you should always look to see what style of house it is and what will fit with it. For example you are not going to find a small cottage in the woods with bright pink flowers sprouting in every direction - warm colours would be more appropriate. If you had a modern white home, you could consider cool colours to fit in with the colour scheme, or warm colours for contrast.
Avoid mixing colour schemes around the garden - you can vary the type of plants used in different areas, but try to stick to one colour scheme.
[edit] Finishing Touches - Fine details
Finishing touches are what make the house look complete and full. By adding in these tiny changes your landscaping looks much more professional and beautiful every time. In particular, people have a way of neglecting these things the most.
Tips:
- Put dirt under plants - a little under trees, and all over under flowerbeds.
- Rotate plants and move them a bit off the grid for a more natural look.
- Make sure leaves on plants close to the house don't go through the walls. It's okay if they go through foundations, but you don't want greenery sticking through the wall into your living room.
- Vary the types of plants you use. Don't use all the same plant all over.
- Use a bit of different terrain paint over the lot. Don't use all the same terrain paint.
- Make sure not to block windows and doors with your landscaping.
[edit] Particular Styles - Themed Gardens!
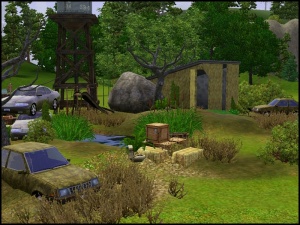
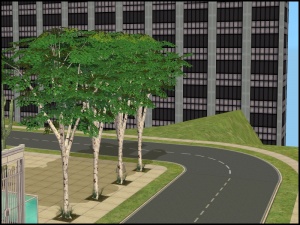
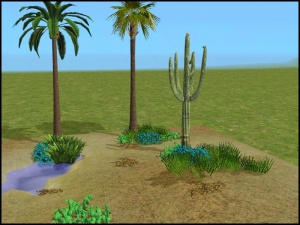
| Style | What it Includes | Picture | Style | What it Includes | Picture |
|---|---|---|---|---|---|
| Japanese Gardens |
|
Seaside Landscapes |
|
||
| Evergreen Set-ups |
|
Apocalyptic Debris |
|
||
| Urban Decoration |
|
Desert Oasis |
|
