Difference between revisions of "Tutorials:TSM Creating a game compatible Visual Studio project"
From SimsWiki
m (→Step 1: Getting Started: Forgot to add clearfix) |
(→Download Project Template: Updated link to new version of the project template, removed repeated text, and added new points) |
||
| (6 intermediate revisions by one user not shown) | |||
| Line 19: | Line 19: | ||
====Step 2: Create a New Project==== | ====Step 2: Create a New Project==== | ||
| − | * | + | [[File:Tsm_vs_step2.jpg|320px|thumb|right]] |
| − | * | + | *Make sure that '''.NET Framework 4''' is selected. |
| + | *Open the <code>Templates > Visual C#</code> tree and select '''Class Library'''. | ||
| + | *You may name your project and solution and change the location as you see fit. | ||
| + | <div style="clear:both"></div> | ||
| + | |||
====Step 3: Remove All Existing References==== | ====Step 3: Remove All Existing References==== | ||
| − | *Mark all references, which usually will be: | + | [[File:Tsm_vs_step3.jpg|thumb|right]] |
| + | *Mark all existing references, which usually will be: | ||
**<code>Microsoft.CSharp</code> | **<code>Microsoft.CSharp</code> | ||
**<code>System</code> | **<code>System</code> | ||
| Line 30: | Line 35: | ||
**<code>System.Xml</code> | **<code>System.Xml</code> | ||
**<code>System.Xml.Linq</code> | **<code>System.Xml.Linq</code> | ||
| − | *Right-click and | + | *Right-click and click '''Remove'''. |
| + | <div style="clear:both"></div> | ||
| + | |||
====Step 4: Additional Configuration==== | ====Step 4: Additional Configuration==== | ||
| − | *Save | + | [[File:Tsm_vs_step4-1.jpg|320px|thumb|right]] |
| − | *Now locate the '''.csproj''' file in your solution folder, and open it with | + | *Save all and close Visual Studio. |
| − | *Inside the first '''PropertyGroup''' tag, you should be able to find the following line:<pre><TargetFrameworkVersion>v4. | + | *Now locate the '''.csproj''' file in your solution folder, and open it with your text editor of choice - but just not Visual Studio itself. If you don't see any extensions on your files, you may need to change your folder settings in Windows, which is beyond the scope of this tutorial. |
| + | <div style="clear:both"></div> | ||
| + | [[File:Tsm_vs_step4-2.jpg|thumb|right]] | ||
| + | *Inside the first '''PropertyGroup''' tag, you should be able to find the following line:<pre><TargetFrameworkVersion>v4.0</TargetFrameworkVersion></pre> | ||
*Now add the following right below that line:<pre><TargetCompactFramework>true</TargetCompactFramework> <TargetingClr2Framework>true</TargetingClr2Framework></pre> | *Now add the following right below that line:<pre><TargetCompactFramework>true</TargetCompactFramework> <TargetingClr2Framework>true</TargetingClr2Framework></pre> | ||
*Close the text editor as you won't be needing it anymore. | *Close the text editor as you won't be needing it anymore. | ||
| + | <div style="clear:both"></div> | ||
| + | |||
====Step 5: Change .NET profile==== | ====Step 5: Change .NET profile==== | ||
| − | *Open up | + | [[File:Tsm_vs_step5-1.jpg|thumb|right]] |
| − | * | + | *Open up Visual Studio again and load your project. |
| − | *Change the target framework to the .NET profile you installed earlier, '''.NET Framework 4 TheSimsMedieval Profile''', and | + | *Right-click on your project and click '''Properties'''. |
| + | <div style="clear:both"></div> | ||
| + | [[File:Tsm_vs_step5-2.jpg|thumb|right]] | ||
| + | [[File:Tsm_vs_step5-3.jpg|320px|thumb|right]] | ||
| + | *Change the target framework to the .NET profile you installed earlier, '''.NET Framework 4 TheSimsMedieval Profile''', and click '''Yes''' on the dialog that'll pop-up. | ||
| + | <div style="clear:both"></div> | ||
| + | |||
====Step 6: Add References To the Sims Medieval Assemblies==== | ====Step 6: Add References To the Sims Medieval Assemblies==== | ||
| − | *Right-click references and | + | [[File:Tsm_vs_step6-1.jpg|thumb|right]] |
| + | *Right-click references and click '''Add Reference...'''. | ||
| + | <div style="clear:both"></div> | ||
| + | [[File:Tsm_vs_step6-2.jpg|320px|thumb|right]] | ||
*You'll find the assemblies at the following locations: | *You'll find the assemblies at the following locations: | ||
**VS2010: At the top under the '''.NET''' tab. | **VS2010: At the top under the '''.NET''' tab. | ||
| Line 53: | Line 74: | ||
**<code>System.Xml</code> | **<code>System.Xml</code> | ||
**<code>UI</code> | **<code>UI</code> | ||
| + | <div style="clear:both"></div> | ||
| − | ====Step 7: All Done==== | + | ====Step 7: Make the assembly tunable==== |
| + | [[File:Tsm_vs_step7-1.jpg|thumb|right]] | ||
| + | *Open the properties tree inside your project and open the file '''AssemblyInfo.cs'''. | ||
| + | <div style="clear:both"></div> | ||
| + | [[File:Tsm_vs_step7-2.jpg|thumb|right]] | ||
| + | *Import the <code>Sims3.SimIFace</code> namespace by adding the following statement to the top of the file: | ||
| + | <pre>using Sims3.SimIFace;</pre> | ||
| + | <div style="clear:both"></div> | ||
| + | [[File:Tsm_vs_step7-3.jpg|thumb|right]] | ||
| + | *Add the following statement to the bottom of the file: | ||
| + | <pre>[assembly: Tunable]</pre> | ||
| + | *Save the file and close it again. | ||
| + | <div style="clear:both"></div> | ||
| + | ====Step 8: All Done==== | ||
Happy coding. :) | Happy coding. :) | ||
| − | |||
==Download Project Template== | ==Download Project Template== | ||
This process can become quite trivial if you intend to create more than one mod. That's why I've created a project template, and here's how to use it: | This process can become quite trivial if you intend to create more than one mod. That's why I've created a project template, and here's how to use it: | ||
| − | *Download the [http://chii.modthesims.info/getfile.php?file= | + | *Download the [http://chii.modthesims.info/getfile.php?file=1626670 project template]. |
| − | * | + | *Move the whole ZIP-archive to (create the folders that doesn't already exist): |
| − | **VS2012: | + | **VS2010: <code>C:\<your user folder>\Documents\Visual Studio 2010\Templates\ProjectTemplates\Visual C#\The Sims Medieval</code>. |
| − | **VS2015: | + | **VS2012: <code>C:\<your user folder>\Documents\Visual Studio 2012\Templates\ProjectTemplates\Visual C#\The Sims Medieval</code>. |
| − | *When you create a new project, | + | **VS2015: <code>C:\<your user folder>\Documents\Visual Studio 2015\Templates\ProjectTemplates\Visual C#\The Sims Medieval</code>. |
| + | *When you create a new project, you can find it by: | ||
| + | **Opening the <code>Templates > Visual C# > The Sims Medieval</code> tree. | ||
| + | **Selecting '''TSMClassLibrary'''. | ||
Latest revision as of 14:33, 16 June 2016
Contents |
[edit] Introduction
Unfortunately, you can't just go right ahead and begin crafting a mod for TSM in Visual Studio. There is a couple of things that you need to setup beforehand. Now you can either choose to follow this tutorial and do it yourself, or skip to the end where you can download the project template I've created.
[edit] Requirements
- Microsoft Visual Studio
Visual C# 2008 Express(The Sims Medieval is a .NETv4 build which means that VS2008, and any prior versions, can't be used to craft mods for TSM)- Visual C# 2010 Express
- Visual Studio Express 2012 for Windows Desktop
- Visual Studio Community 2015
- Any text editor, but I'd recommend using an editor with syntax highlighting like Notepad++ or Sublime Text (shareware).
[edit] Tutorial
[edit] Step 1: Getting Started
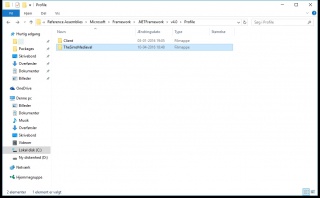
- Download the customized The Sims Medieval .NET profile.
- Extract the folder into:
- 32-bit Windows:
C:\Program Files\Reference Assemblies\Microsoft\Framework\.NETFramework\v4.0\Profile. - 64-bit Windows:
C:\Program Files (x86)\Reference Assemblies\Microsoft\Framework\.NETFramework\v4.0\Profile.
- 32-bit Windows:
[edit] Step 2: Create a New Project
- Make sure that .NET Framework 4 is selected.
- Open the
Templates > Visual C#tree and select Class Library. - You may name your project and solution and change the location as you see fit.
[edit] Step 3: Remove All Existing References
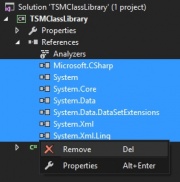
- Mark all existing references, which usually will be:
Microsoft.CSharpSystemSystem.CoreSystem.DataSystem.Data.DataSetExtensionsSystem.XmlSystem.Xml.Linq
- Right-click and click Remove.
[edit] Step 4: Additional Configuration
- Save all and close Visual Studio.
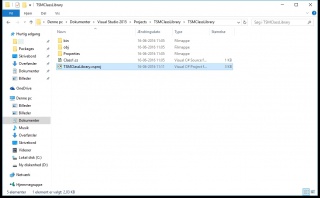
- Now locate the .csproj file in your solution folder, and open it with your text editor of choice - but just not Visual Studio itself. If you don't see any extensions on your files, you may need to change your folder settings in Windows, which is beyond the scope of this tutorial.
- Inside the first PropertyGroup tag, you should be able to find the following line:
<TargetFrameworkVersion>v4.0</TargetFrameworkVersion>
- Now add the following right below that line:
<TargetCompactFramework>true</TargetCompactFramework>
<TargetingClr2Framework>true</TargetingClr2Framework>
- Close the text editor as you won't be needing it anymore.
[edit] Step 5: Change .NET profile
- Open up Visual Studio again and load your project.
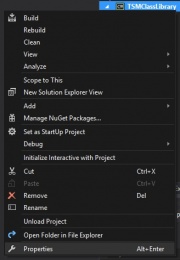
- Right-click on your project and click Properties.
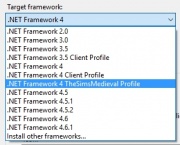
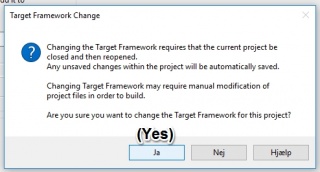
- Change the target framework to the .NET profile you installed earlier, .NET Framework 4 TheSimsMedieval Profile, and click Yes on the dialog that'll pop-up.
[edit] Step 6: Add References To the Sims Medieval Assemblies
- Right-click references and click Add Reference....
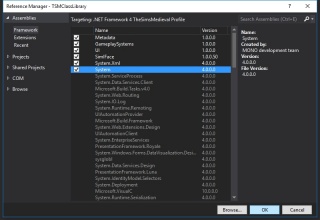
- You'll find the assemblies at the following locations:
- VS2010: At the top under the .NET tab.
- VS2012/15: Under
Assemblies > Frameworkhighlighted in white.
- Add references to the following assemblies:
GameplaySystemsMetadataSimIFaceSystemSystem.XmlUI
[edit] Step 7: Make the assembly tunable
- Open the properties tree inside your project and open the file AssemblyInfo.cs.
- Import the
Sims3.SimIFacenamespace by adding the following statement to the top of the file:
using Sims3.SimIFace;
- Add the following statement to the bottom of the file:
[assembly: Tunable]
- Save the file and close it again.
[edit] Step 8: All Done
Happy coding. :)
[edit] Download Project Template
This process can become quite trivial if you intend to create more than one mod. That's why I've created a project template, and here's how to use it:
- Download the project template.
- Move the whole ZIP-archive to (create the folders that doesn't already exist):
- VS2010:
C:\<your user folder>\Documents\Visual Studio 2010\Templates\ProjectTemplates\Visual C#\The Sims Medieval. - VS2012:
C:\<your user folder>\Documents\Visual Studio 2012\Templates\ProjectTemplates\Visual C#\The Sims Medieval. - VS2015:
C:\<your user folder>\Documents\Visual Studio 2015\Templates\ProjectTemplates\Visual C#\The Sims Medieval.
- VS2010:
- When you create a new project, you can find it by:
- Opening the
Templates > Visual C# > The Sims Medievaltree. - Selecting TSMClassLibrary.
- Opening the
