Difference between revisions of "Game Help:System Specs"
EllaCharm3d (Talk | contribs) (→How to) |
|||
| (19 intermediate revisions by 6 users not shown) | |||
| Line 16: | Line 16: | ||
===Explanation=== | ===Explanation=== | ||
| − | When asking questions of a technical nature to do with | + | When asking questions of a technical nature to do with any game, one of the most common replies is "What are your system specs?", which is usually quite a necessary question to help try and diagnose the problem. |
The problem is, not many people know how to get their system specs, and those that do generally supply a full rundown including a lot of unnecessary stuff. This document helps you find just the relevant stuff. | The problem is, not many people know how to get their system specs, and those that do generally supply a full rundown including a lot of unnecessary stuff. This document helps you find just the relevant stuff. | ||
| Line 23: | Line 23: | ||
===How to=== | ===How to=== | ||
| − | + | '''OS X:''' Click on the Apple icon (top left corner of your screen) > About This Mac > More Info, and then copy + paste what it says there in Hardware Overview and Graphics. You can ignore the Sample Form below for Windows. | |
| + | '''XP:''' Click the Start Menu... Run and type "dxdiag", then click '''OK''' | ||
| + | |||
| + | '''Vista/7:''' Open the Start menu, and type "dxdiag" into the ''Search programs and files'' box. When it shows up, click dxdiag.exe. | ||
| + | |||
| + | [[Image:RightArrow.gif]]'''XP:''' [[Image:Specs1.png]] [[Image:RightArrow.gif]]'''Vista/7:''' [[Image:Specs-7.jpg]] | ||
| − | |||
| Line 43: | Line 47: | ||
Just below where it says "Check for WHQL..." in the bottom left, a blue or green bar will show while it's gathering information. This process will take a few seconds. | Just below where it says "Check for WHQL..." in the bottom left, a blue or green bar will show while it's gathering information. This process will take a few seconds. | ||
| − | + | Click on the <b>Save All Information</b> button and saved the .txt report onto your Desktop and then copy+paste the lines we require into the form template below. You need to do this step to include the Drives information we requested for below. | |
| − | Operating System, | + | From the saved DxDiag.txt report on your Desktop, |
| + | # copy ''from'' the <b>System Information</b> Header ''up to'' the <b>DxDiag Version:</b> line | ||
| + | # copy ''from'' the <b>Display Devices</b> Header ''up to'' the <b>Driver Date/Size:</b> line | ||
| + | # copy ''from'' the <b>Sound Devices</b> Header ''up to'' the <b>Date and Size:</b> line (select one that says Output, not Speakers) | ||
| + | # copy ''from'' the <b>Disk & DVD/CD-ROM Drives</b> Header ''up to'' the <b>Model:</b> line | ||
| + | #* for your <b>C: drive</b> where your Operating System is installed to, | ||
| + | #* the <b>drive your game is installed to</b> (if not in the default C:\ drive) and | ||
| + | #* <b>the DVD drive</b> where you pop-in the game disc (not necessary if you have a digital disc version). | ||
| − | |||
| + | Below is a sample 'form' you can use to help you out. You'll need to copy and paste the <b>entire</b> template below, and fill it in. | ||
| − | + | ------------------ < ''copy+pasted info'' > | |
| − | + | System Information < ''starts from'' > | |
| − | + | ------------------ < ''here'' > | |
| − | + | ||
| − | + | * Time of this report: < ''and'' > | |
| − | + | : | |
| − | + | : | |
| − | + | * DxDiag Version: < ''ends here!'' > | |
| − | + | ||
| − | + | ||
| − | + | --------------- < ''copy+pasted info'' > | |
| − | + | Display Devices < ''starts from'' > | |
| − | + | --------------- < ''here'' > | |
| − | + | ||
| − | + | * Card name: < ''and'' > | |
| − | + | : | |
| − | + | : | |
| − | + | * Driver Date/Size: < ''ends here!'' > | |
| − | + | ||
| − | < | + | |
| − | + | ------------- < ''copy+pasted info'' > | |
| − | + | Sound Devices < ''starts from'' > | |
| − | * | + | ------------- < ''here'' > |
| − | + | ||
| − | + | * Description: < ''and'' > | |
| − | * | + | : |
| − | + | : | |
| − | + | * Date and Size: < ''ends here!'' > | |
| − | < | + | |
| − | + | ||
| − | + | ------------------------ < ''copy+pasted info'' > | |
| − | * | + | Disk & DVD/CD-ROM Drives < ''starts from'' > |
| − | * | + | ------------------------ < ''here'' > |
| − | * | + | |
| − | + | * Drive: < ''and'' > | |
| − | * | + | * Free Space: |
| − | * | + | * Total Space: |
| − | + | * File System: | |
| − | < | + | * Model: < ''ends here!'' > |
| − | + | ||
| − | + | ||
==Detailed Summary== | ==Detailed Summary== | ||
| Line 189: | Line 198: | ||
[http://www.softpedia.com/progDownload/Everest-Home-Edition-Download-16369.html everesthome200.rar] | [http://www.softpedia.com/progDownload/Everest-Home-Edition-Download-16369.html everesthome200.rar] | ||
| − | + | =Related Pages= | |
| + | * [[Game_Help:System_Requirements/MTS2_Recommendations]] | ||
| + | * [[Game Help:TS3 System Requirements]] | ||
{{GameHelpHeader}} | {{GameHelpHeader}} | ||
[[Category:Game Help]] | [[Category:Game Help]] | ||
| + | [[Category:Sims 2]] | ||
| + | [[Category:Sims 3]] | ||
Latest revision as of 12:03, 28 August 2012
Contents |
[edit] How do I find out my system specifications?
There are two parts to this.
- The first is a quick summary of your system.
This is often enough information to supply when asking fairly simple questions.
- The second is a very very detailed probe of your hardware.
This is useful for when you're asking about upgrade options.
[edit] Quick Summary
[edit] Explanation
When asking questions of a technical nature to do with any game, one of the most common replies is "What are your system specs?", which is usually quite a necessary question to help try and diagnose the problem.
The problem is, not many people know how to get their system specs, and those that do generally supply a full rundown including a lot of unnecessary stuff. This document helps you find just the relevant stuff.
[edit] How to
OS X: Click on the Apple icon (top left corner of your screen) > About This Mac > More Info, and then copy + paste what it says there in Hardware Overview and Graphics. You can ignore the Sample Form below for Windows.
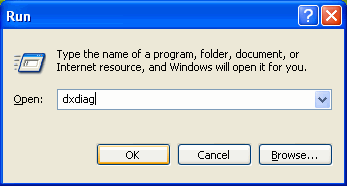
XP: Click the Start Menu... Run and type "dxdiag", then click OK
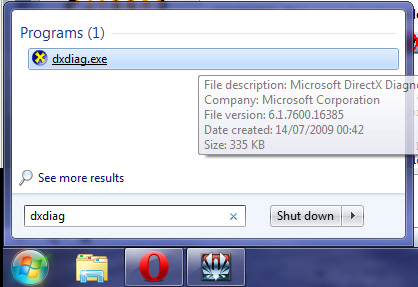
Vista/7: Open the Start menu, and type "dxdiag" into the Search programs and files box. When it shows up, click dxdiag.exe.
If the following message comes up, click Yes:
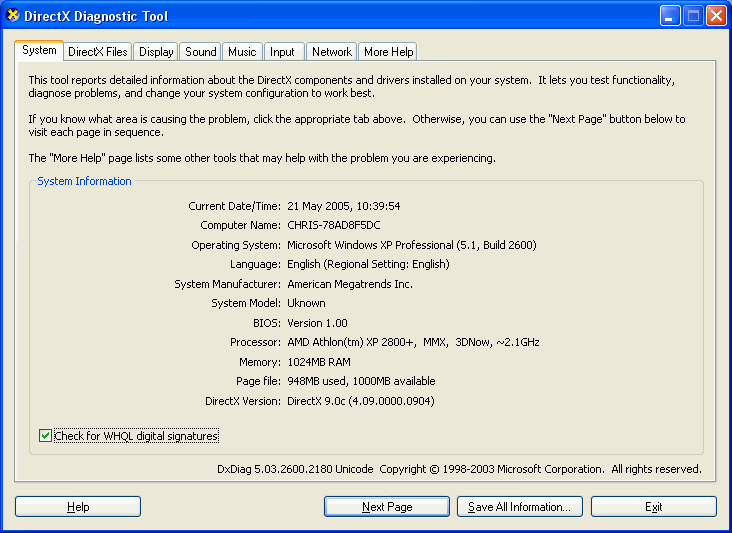
You will be shown a window that look similar to this:
Just below where it says "Check for WHQL..." in the bottom left, a blue or green bar will show while it's gathering information. This process will take a few seconds.
Click on the Save All Information button and saved the .txt report onto your Desktop and then copy+paste the lines we require into the form template below. You need to do this step to include the Drives information we requested for below.
From the saved DxDiag.txt report on your Desktop,
- copy from the System Information Header up to the DxDiag Version: line
- copy from the Display Devices Header up to the Driver Date/Size: line
- copy from the Sound Devices Header up to the Date and Size: line (select one that says Output, not Speakers)
- copy from the Disk & DVD/CD-ROM Drives Header up to the Model: line
- for your C: drive where your Operating System is installed to,
- the drive your game is installed to (if not in the default C:\ drive) and
- the DVD drive where you pop-in the game disc (not necessary if you have a digital disc version).
Below is a sample 'form' you can use to help you out. You'll need to copy and paste the entire template below, and fill it in.
------------------       < copy+pasted info >
System Information       < starts from >
------------------       < here >

* Time of this report:   < and >
:
:
* DxDiag Version:        < ends here! >


---------------          < copy+pasted info >
Display Devices          < starts from >
---------------          < here >

* Card name:             < and >
:
:
* Driver Date/Size:      < ends here! >


-------------            < copy+pasted info >
Sound Devices            < starts from >
-------------            < here >

* Description:           < and >
:
:
* Date and Size:         < ends here! >


------------------------ < copy+pasted info >
Disk & DVD/CD-ROM Drives < starts from >
------------------------ < here >

* Drive:                 < and >
* Free Space:
* Total Space:
* File System:
* Model:                 < ends here! >
[edit] Detailed Summary
[edit] Explanation
Occasionally you may need to provide much more detailed specs. This is especially true if you're planning to upgrade your system. In order to advise on what you can do upgrade-wise, we need to know what your PC has in it, and what it would be able to handle.
For that, a much more detailed application is needed...
[edit] How to
- Step 1:
Download, unrar and install this application (it's the attachment). It's called Everest Home and it will delve into your PCs hardware specs.
After you've installed Everest Home Edition, load it up, which will take a few seconds.
- Step 2:
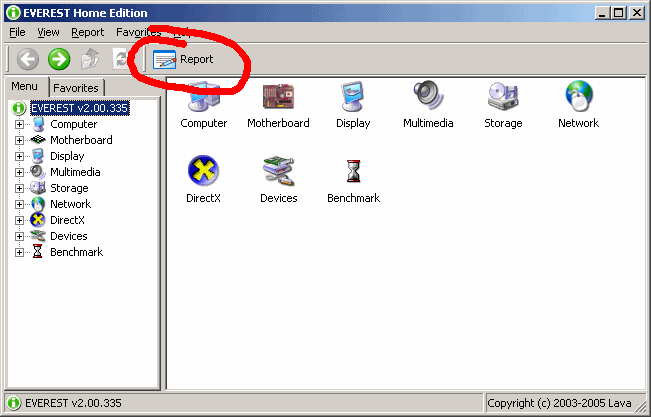
Rather than make you fill in lots and lots of fields which would take ages, I'm going to make it really easy. Click on Report which is circled below:
Click Next, then click Custom selection, then Next.
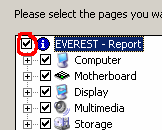
Now, if the box circled below is ticked, click to untick it. This will untick all the boxes:
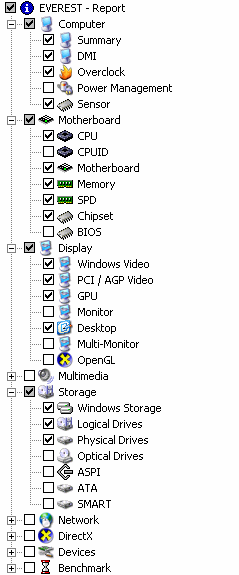
You'll need to tick the following:
- Under Computer:
- Summary
- DMI
- Overclock
- Sensor
- Under Motherboard:
- CPU
- Motherboard
- Memory
- SPD
- Chipset
- Under Display:
- Windows Display
- PCI / AGP Video
- GPU
- Desktop
- Click to tick the Multimedia box
- Under Storage:
- Windows Storage
- Logical Storage
- Physical Storage (this one may not show on some computers)
In reality that kind of report is generally overkill and will provide masses of info. But it's a lot better to have too much you don't need than to keep coming back to pick up scraps.
What you should see now will look like this (I've shown it as a long list, you'll still have the scrollbar):
Click Next, select HTML, click Next.
It will take between 5 and 20 secs to complete. Once it's finished you'll be shown the report, which will be rather long. Click Save To File, which is circled below:
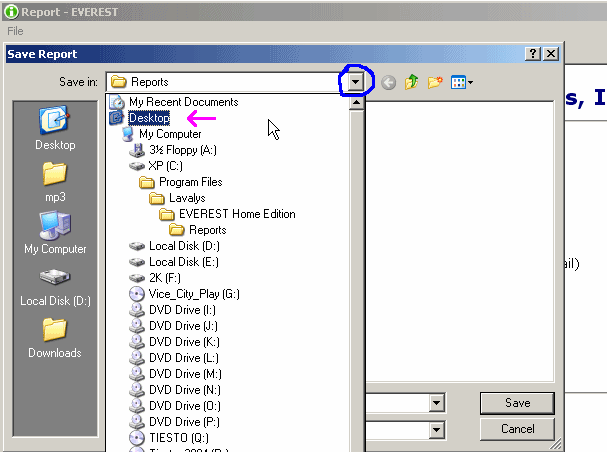
Click the arrow at the top, that's circled in blue. Then click Desktop. Then click Save:
- Step 3:
You can now attach that file to forums, or wherever you're asking. Please don't copy paste the entire file into a post, that's just rude. Instead, attach the file if you can. You will probably need to rar or zip the html file.
Download - please read all instructions before downloading any files!
everesthome200.rar
