Difference between revisions of "Tutorials:TS3 HTMG ChapJ Recompiling"
From SimsWiki
EllaCharm3d (Talk | contribs) (→Questions? Problems?) |
|||
| (One intermediate revision by one user not shown) | |||
| Line 193: | Line 193: | ||
| + | |||
| + | {{MTS2ThankThread|2901305}} | ||
== Questions? Problems? == | == Questions? Problems? == | ||
| Line 206: | Line 208: | ||
{{Navigator|Tutorials:TS3_Basic_HowTo_Mesh_Guide|Tutorials:TS3_HTMG_ChapI_UVMappingLithUnwrap|Tutorials:TS3_HTMG_ChapK_Packaging|}} | {{Navigator|Tutorials:TS3_Basic_HowTo_Mesh_Guide|Tutorials:TS3_HTMG_ChapI_UVMappingLithUnwrap|Tutorials:TS3_HTMG_ChapK_Packaging|}} | ||
| − | [[Category:Sims 3]] | + | [[Category:Sims 3 Modding Tutorials]] |
| − | [[Category:Sims 3 Tutorials]] | + | [[Category:Sims 3 Meshing Tutorials]] |
| + | [[Category:Tutorials by ellacharm3d]] | ||
Latest revision as of 15:57, 17 September 2012
[edit] J. Export and Recompile
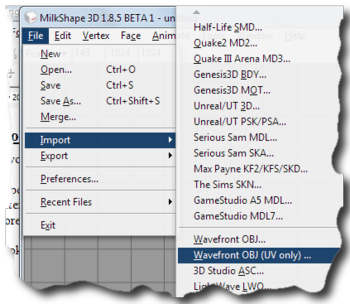
J1. If you’d saved as an .obj format in previous section, open your mesh and import UV map- Select Wavefront OBJ (UV only) and your mesh setting would be retained, other than the UV co-ordinates which will be replaced by the file you imported. Choosing the other one will import the materials as well (add on to your current list in Materials tab – e.g.: if we had the checkers or the labeled .jpg)
- Select all the groups and verify the UV mapping are the same as they were in LithUnwrap: go to Window menu → Texture Coordinate Editor.
- Verify also the joints are still assigned: go to Joints tab, check Draw Vertices with bone colors.
- Select Wavefront OBJ (UV only) and your mesh setting would be retained, other than the UV co-ordinates which will be replaced by the file you imported. Choosing the other one will import the materials as well (add on to your current list in Materials tab – e.g.: if we had the checkers or the labeled .jpg)
J2. Regroup
- After we’ve verified and before we regroup, might want to save first? All done?
Checklist before export:
|
J3. Export from Milkshape
- Ok, let’s begin:
- If you want to keep a grouped version of your work, save it now under a different name. This can be used to do the low-poly versions for the other MLODs/MODL
- Export:
- File → Export → Sims3 Object Export v1.00 – by Wesley Howe
- File → Export → Sims3 Object Export v1.00 – by Wesley Howe
- Recompile in ObjTool:
- If you haven’t taken down the vertices and polygon info in ms3d, we can do it in ObjTool’s

- When you’re ready, click
 , make sure you are in the correct MLOD 00000 folder, accept the file recognized by ObjTool (which is a .mcfg file if you’re interested), then click
  . That button is not an error, it is meant that way as it will open that file and put all the resources back together into an .lod file that s3pe can recognize.
- When we recompile, the ObjTool will rename the original .lod file with a .bak00 extension and pack all the files back to a new .lod file. You should also take note the *_group??.s3ascg and some *.bnry files have been overwritten, depending on what was changed. Compare to the original settings we had captured at the Import stage.
- If you haven’t taken down the vertices and polygon info in ms3d, we can do it in ObjTool’s
- If you want to keep a grouped version of your work, save it now under a different name. This can be used to do the low-poly versions for the other MLODs/MODL
| If you get errors at the export stage, something about no bone assignments? Did you forget to assign the Joints? Wes explained in this thread in post#12 |
J4. Lather, rinse, repeat for all the other MODL/MLOD files that were, decompiled, imported, modified and exported. Quick guide on how I created low poly mesh versions:
- from MLOD 00000 → MLOD 10000, load the grouped version of our MLOD 00000 mesh file
- delete the groundshadow "group00"
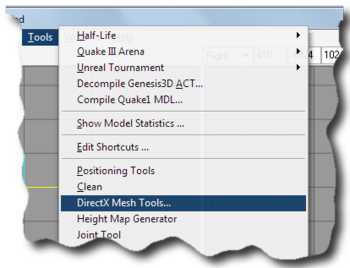
- go to Tools menu → DirectX Mesh Tool
- drag the slider until we have a model that has around half the vertices taken off or one that has enough faces to retain the shape of our model, then click the diskette button

- Scale the dimensions according to the original’s ratio (in our case, longer in x-axis, double the y- & z-axes)
- Move the model off center using Absolute in the dropdown
- delete the groundshadow "group00"
- from MLOD 00000 → MODL 00001, load the ungrouped version of our MLOD 00000 mesh file
- delete the groundshadow "group00"
- delete the wedges and beam groups ie "legs.base" and "iBeam"
- reduce the face & vertices count as above using DirectX Mesh Tool
- Scale and Move as above
- delete the groundshadow "group00"
- from MLOD 00000 → MLOD 10001, load the ungrouped version of our MLOD 00000 mesh file
- delete the groundshadow "group00"
- delete the base, wedges and beam groups ie "base", "legs.base" and "iBeam"
- reduce the face & vertices count as above using DirectX Mesh Tool
- Scale and Move as above
- delete the groundshadow "group00"
- from MLOD 00000 → MLOD 10000, load the grouped version of our MLOD 00000 mesh file
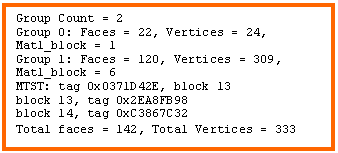
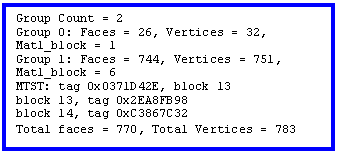
J5. Table below shows the compilation of values recorded for my before and after excersie. YMMV (your mileage may vary) ie your values will differ from mine
| dimensions | center | vertices | polygon | groups | materials | joints | |
|---|---|---|---|---|---|---|---|
| MLOD 00000 |
1.82 0.80 0.82 - 1.92 0.00 0.91 - 1.82 0.80 0.82 |
0.00 0.40 0.00 - 0.01 0.01 0.01 - 0.00 0.40 0.00 |
783 26 601 |
770 32 744 |
2 - group00 - group01 |
0 | 1 |
| MLOD 10000 | 2.00 1.59 1.65 | 0.00 -0.20 -0.28 | 404 | 744 | 1 | 0 | 1 |
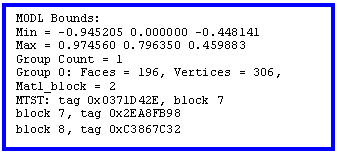
| MODL 00001 | 1.81 0.79 0.81 | 0.00 0.39 0.00 | 306 | 196 | 1 | 0 | 1 |
| MLOD 10001 | 2.00 1.58 1.63 | 0.00 -0.21 -0.19 | 128 | 196 | 1 | 0 | 1 |
| dimensions | center | vertices | polygon | groups | materials | joints | |
|---|---|---|---|---|---|---|---|
| MLOD 00000 |
2.08 0.80 0.84 - 1.92 0.00 0.91 - 1.81 0.80 0.80 |
0.00 0.40 0.00 - 0.01 0.01 0.01 - 0.00 0.40 0.00 |
333 24 309 |
142 22 120 |
2 - group00 - group01 |
0 | 1 |
| MLOD 10000 | 2.08 1.59 1.56 | 0.00 -0.20 -0.28 | 205 | 104 | 1 | 0 | 1 |
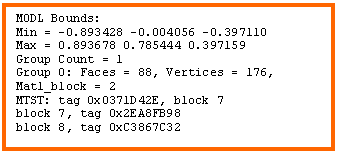
| MODL 00001 | 1.70 0.79 0.89 | 0.00 0.39 0.00 | 176 | 88 | 1 | 0 | 1 |
| MLOD 10001 | 1.97 1.56 1.55 | 0.00 -0.21 -0.19 | 120 | 60 | 1 | 0 | 1 |
[edit] Questions? Problems?
- If you encounter any problems with the steps outlined in this tutorial and need help, head on over to the Step-by-step Start-to-Finish HowTo mesh guide for TS3 thread to post your questions or
- If you need help in fixing your mesh, you may want to browse through our TS3 Meshing FAQs for some of the more common Meshing issues and their fixes or
- If none of the above links provided any help, you may want to browse through the threads in MTS' Meshing Forum or even start your own thread.
| |
|
TS3 HTMG ChapJ Recompiling | |
|
