Difference between revisions of "Create a Pattern - Wallpaper Borders"
(→Patterns) |
|||
| Line 87: | Line 87: | ||
This is an example of the Seamless Texture tutorial...a photograph of a rose was used, cut out of the picture and placed repeatedly on the background in different sizes. See the tutorial for more info but the main idea is that there are no seams on the adjoining squares. | This is an example of the Seamless Texture tutorial...a photograph of a rose was used, cut out of the picture and placed repeatedly on the background in different sizes. See the tutorial for more info but the main idea is that there are no seams on the adjoining squares. | ||
| + | |||
| + | Sticker Size: | ||
| + | |||
| + | w = 256 | ||
| + | h = 256 | ||
| + | |||
| + | Sticker Placement | ||
| + | |||
| + | x = 128 | ||
| + | y = 128 | ||
[[File:RealRose.jpg]] | [[File:RealRose.jpg]] | ||
| − | A more complicated pattern occurs when you rotate some patterns such as in the Violet and Swirls pattern. Notice the | + | A more complicated pattern occurs when you rotate some patterns such as in the Violet and Swirls pattern. Notice the outlined sticker. |
| + | |||
| + | Sticker Size: | ||
| + | |||
| + | w = 128 | ||
| + | h = 128 | ||
| + | |||
| + | 1st Sticker Placement in the top left hand corner: | ||
| + | |||
| + | x = 64 | ||
| + | y = 64 | ||
| + | |||
| + | Place the other stickers in rotation in equal quarters using the sticker placement coordinates to make sure they are lined up. | ||
| + | |||
[[File:Quarter_Rotating_Placement.jpg]] | [[File:Quarter_Rotating_Placement.jpg]] | ||
| − | + | See how they came out on the wall?...very interesting! | |
[[File:Full_wall.jpg]] | [[File:Full_wall.jpg]] | ||
| Line 102: | Line 125: | ||
| − | This one is good for a photo, painting or single image. | + | This one is good for a photo, painting or single image just to use an example. To create this effect you will need a background colour or sticker. For this one I used an image search for a square frame and another of a swan. If you are using a sticker for the background resize it to fill the entire middle square on the first layer as follows: |
Revision as of 04:46, 29 July 2011
Work in Progress
Contents |
Sims 3 Create a Pattern: Pattern Placement for Wallpaper Borders
Level - Beginners/Intermediate/ Expert
The purpose of this tutorial is to create picturesque borders for your Sims wallpapers with the Create a Pattern program from Electronic Arts (CAP). It will give you a more in depth knowledge on how the placement of the "stickers" work. Most of the patterns/pictures will look great on other Sims items as well. Some will be suitable for the particular wallpaper. In this tutorial a pattern will be created for border types of wallpaper in Sims 3. Most of the materials used are images downloaded from the internet. The variations within the border are endless so what I will do here is give you the boundries for the borders along with a few simple ideas to get you started.
So let's begin and I hope you have fun.
Requirements:
Create a Pattern [1] Available free for registered Sims 3 game owners. The basic interface is explained in the help documentation found in the upper left hand corner under the "?"
A Graphics program
Adobe Photo Shop (pay)
or
Paint Net [2] (free)
or
Gimp [3] (free)
Tutorial(s)
These tutorials may be of interest:
Seamless Textures [4](recommended)
TS3 Patterns[5]...Indepth tutorials for working with channels and layers that will take your creativity to new heights. (Optional)
The Workspace and Measurements
The inner middle square is your work area and measures 256 X 256 pixels. The wall repeat area depends on your pattern and its placement on the work area. The sticker sizes are 58 X 58 pixels and can be resized from the smallest 1 x 1 to 256 X 256. The top (?to follow) pixels across the top of the wall is the ceiling area. This does not show in CAP but when in the game it does cut off the pattern at the top of the wall .
Placement specification is important in borders and can be achieved my using the w,h,x and y entries as follows:
w = width of the sticker h = height of the sticker
x = horizontal placement of the sticker on the worksheet y = vertical placement of the sticker on the worksheet
An imported sticker is recommended at 256 x 256 pixels. You can use a photo, graphic, clipart, windows wallpaper, actual wallpaper border images basically any type of image. You will need to down size to maintain image quality in some cases. Create a Pattern will resize the image automatically and it is quite a nice feature if you don't want or need to make any changes.
Always test your patterns to make sure they are seamless. This is easily seen in the preview panel of CAP...zoom right as close to the wall to get a good look for any gaps or unmatched patterns.
Pattern Recognition and Placement on Walls
Once you have completed your pattern you will want to be able to identify it. Heres' how - first of all take a look at the four corners of the worksheet. Each corner is a different colour and they are all the same size.

This is how that same pattern looks in the Create a Style sample of your catalogue:

Note the placement of the tiles...The tile on the bottom right is on the upper left!! But at least now we know where to look for a paticular pattern. You can put an identifier such as a small square of your border in the lower right hand corner (62x62). Only do this if you are not using the border for anything else or needless to say it could look a little odd.
Wallpaper
These are the wallpapers we will be working with. The full flat wall has been included in order to show the pattern repeat on the full wall. You cannot make a one pattern that will fill the whole wall. Lengthwise the 256 square pattern you create is repeated three times but is the cutoff on the ceiling. Widthwise I have a pattern that is two walls wide which be illustrated.

Patterns
Full Wall
Working with a basic pattern illustrates the seamless pattern and how it fits on the wall...It is a repeat of the full 256 x 256 three times lenthwise and as you can see by the purple and green pattern it covers two wall panels.
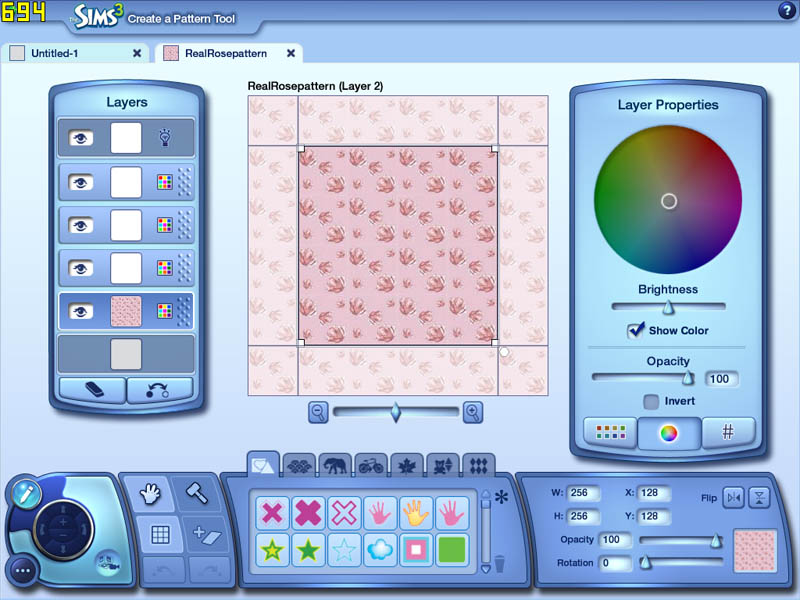
This is an example of the Seamless Texture tutorial...a photograph of a rose was used, cut out of the picture and placed repeatedly on the background in different sizes. See the tutorial for more info but the main idea is that there are no seams on the adjoining squares.
Sticker Size:
w = 256 h = 256
Sticker Placement
x = 128 y = 128

A more complicated pattern occurs when you rotate some patterns such as in the Violet and Swirls pattern. Notice the outlined sticker.
Sticker Size:
w = 128 h = 128
1st Sticker Placement in the top left hand corner:
x = 64 y = 64
Place the other stickers in rotation in equal quarters using the sticker placement coordinates to make sure they are lined up.

See how they came out on the wall?...very interesting!

Paint and Wallpaper - Flat Wall with Dado
This one is good for a photo, painting or single image just to use an example. To create this effect you will need a background colour or sticker. For this one I used an image search for a square frame and another of a swan. If you are using a sticker for the background resize it to fill the entire middle square on the first layer as follows:
Sticker Size:
w = 256 h = 256
Sticker Placement
x = 128 y = 128
Center your picture sticker on the first sticker or background colour using the next layer:
Sticker Size
w = 128 h = 128
Sticker Placement x = 128 y = 128

Here is the finished pattern and a second example using just a background colour:

Paint: Wall with Dado,Border,Chair Rail & Baseboard Moulding
Wallpaper: Wall with Dado,Chair Rail,Trim & Baseboard moulding.
Here is a good demonstration of the measurements and the sticker placement. This image is a actually a quilt pattern. In photoshop I put a line at the top and on the bottom, resized it to 256 x 256.
In order to get the exact placement of the stickers start with the first sticker in the upper left hand corner. The specifications are:
Sticker size w = 64 h = 64
Sticker Placement x = 32 y = 32
To place the next stickers perfectly:
Sticker #2: add 32 to x = 64 and y remains 32. Sticker #3: add 32 to x to equal 96 and y remains the same. Sticker #4: add 32 to equal 128 and y remains the same.
The next row the y changes to 64 and next row 96 etc.

Once complete your pattern is like this and fits beautifully within the constraints of the wall:

Border Frieze
A full picture is used again in this one but it is sized to be smaller to fit within the border. Distortion is the watchword here. There are plenty of images or patterns that will look quite nice. Three stripes in separate layers were done to fill in the part of the pattern that does not show up on the wall.
Sticker Size:
w = 256 h = 192
Sticker Placement
x = 128 y = 160

And here is the finished product:

Border 1 - In both paint and wallpaper
Two stickers are used in this wallpaper because it keeps the image well in proportion. These are Windows wallpapers that cap automatically resized from 1024 x 768...amazing! An identifier on the bottom right would be helpful on this one or you can fill in the surrounding area to make it look nice on other items.
Thank you to Leroysgirl for the specifications:
Sticker size:
w = 128 h = 96
Next: Border 2
Sticker placement:
x = 128
y = 145
2nd sticker:
x = 96 y = 145

And the finished product plus a another of the sunflower border:
