Difference between revisions of "Tutorial:Creating a Bone-Based Custom Slider"
| Line 125: | Line 125: | ||
{{TS3ModdingHeader}} | {{TS3ModdingHeader}} | ||
| − | [[Category:Sims 3 Tutorials]][[Category:Tutorials by whiterider]][[Category:Sims 3 Modding Tutorials]] | + | [[Category:Sims 3 Modding Tutorials]][[Category:Tutorials by whiterider]][[Category:Sims 3 Modding Tutorials]] |
Revision as of 16:06, 17 September 2012
| Tutorials by Category | |
|---|---|
|
CAS | Patterns | Objects | Building | Worlds | Modding | Modding Reference |
Contents |
Introduction
This tutorial will teach you how to create custom sliders by manipulating the sim skeleton. Such sliders can be used to manipulate the sim's body or face, and can be made for only one gender or for both. The process is very easy from a technical standpoint, but involves a lot of trial and error to fine-tune the slider values in order to get a good effect in-game, so be prepared to spend a lot of time loading up your game to test.
Bone-based and GEOM-based
There are two types of sliders: bone-based sliders and GEOM-based sliders. They each work in a different way.
Bone-based sliders work by moving, rotating, or scaling a bone in the sim's skeleton. All of the vertices attached to that bone then move, rotate or scale with the bone. Bone-based sliders can be used on the face or body, although GEOM-based sliders are often preferred for the face - see below for why. However, bone-based sliders can sometimes be unpredictable, especially as the vertices on CC clothing may be assigned to bones you wouldn't expect them to be.
GEOM-based sliders work by picking out specific vertices, and moving those vertices. This means that you can achieve much more subtle results with GEOM-based sliders: there is, after all, no "cleft chin bone", but you can select just the vertices on the chin and make a cleft chin using a GEOM-based slider. GEOM-based sliders can only be used on the sim's face, since there is only one sim face mesh, so the vertices are always the same - and, crucially, always have the same vertex IDs in the same places - whereas clothing is not uniform, so a GEOM-based slider would only work correctly on the specific outfit it was built for.
If you want to learn how to make GEOM-based sliders, I recommend CmarNYC's tutorial, Making a geom-based slider.
Before You Start
Before we start work, there's some preparation that needs to be done.
Firstly, download and install (or, in the case of Delphy's tools, unzip) the following programs:
- CASSliderTemplate Creator and BoneDelta Editor by Delphy.
- S3PE by Inge and Peter Jones.
If you already have Milkshape or Blender, you will find it useful to download the sim body meshes and skeletons, so you can easily pick out which bone you need to manipulate. If you don't have Milkshape or Blender, you can make a slider without, but it will be a more difficult process, as you'll have to guess which bone you want based on its name.
You can download the bodies here, courtesy of orangemittens. If the jaue.com links just give you a page of Japanese, try right-clicking the link instead and choosing "Save Content As", or similar.
Now for a very important step: remove any slider multiplier hacks you are using! You will need to determine the maximum and minimum values for your slider based on where the line is between "looks good" and "looks like an alien", and if you do that with a slider multiplier installed, you will end up with a slider whose real values are very restricted indeed. If you need a slider limit hack which can be used without a multiplier, try Twallan's MasterController @Nraas Industries.
You may also want to temporarily remove your other CC, to make loading times a little less painful.
Making the Slider
Step 1: Picking a Bone
If you want to create your slider without using Milkshape or Blender, skip this step and go straight to #Step 2: Creating the Package
If you are using Milkshape and you haven't worked with bones or skeletons before, open Milkshape and go to File -> Preferences. On the Misc tab, set Joint Size to 0.008000. Click Ok, and close and restart Milkshape.
Open one of the sim bodies you downloaded in either Milkshape or Blender. It doesn't make a huge difference which age/gender you use, although bear in mind that if you use the child, you'll be working on a smaller scale than you would with the adult. In Milkshape, go to the Joints tab and tick Show Skeleton.
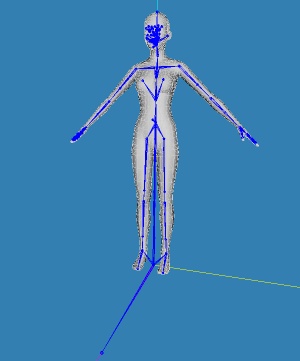
Depending on which file you used, you should now see something like this:
The grey, of course, is the sim, while the blue is the skeleton. Each little circle is a joint, and you can select these by, in Milkshape, going to the Model tab and picking Select and Joint. Depending on the type of slider you're making, you might find it useful to click the Anim button on the bottom right corner of the window, then select joints and move and rotate them, to see what the eventual effect will be. For the purposes of this tutorial, though, I want to scale a joint to alter the thickness of the sim's neck, and unfortunately it's not possible to preview joint scaling in Milkshape this way.
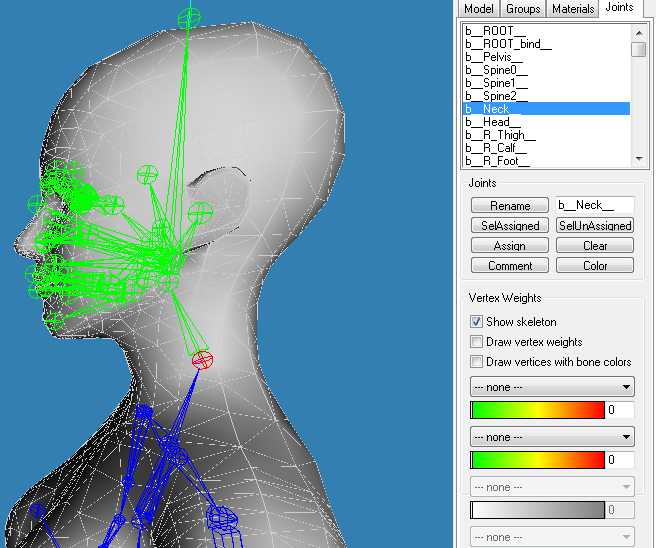
Using this skeleton, you can figure out which joint(s) you need to be working with. In the Joints tab is a list of all the sim's joints; double-click a joint to highlight it on the model. I'm going to scale the neck joint, so here it is selected:
You can see that the neck joint, the one I've selected, is highlighted in red. The joints which are highlighted in green are children of the neck joint, and remember that whatever you do to the neck joint, you do to its children too. This means that when I scale the neck, the whole head will also be scaled along with it. We'll compensate for that later.
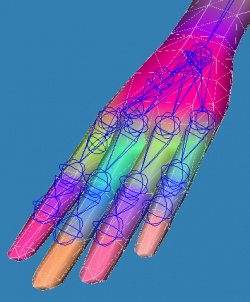
If you want to work on a joint in one of the areas which has a lot of joints packed into a very small space, such as the hands or face, you can tick "Draw vertices with bone colours" in the Joints tab. This will make it much easier for you to see which joint corresponds to which bit of the sim's body, as the body will be colour-coded based on which joint that part is attached to:
Once you've picked your joint, note down its name, and also note down the names of its closest child joints - any green joints which are directly connected to it.
Step 2: Creating the Package
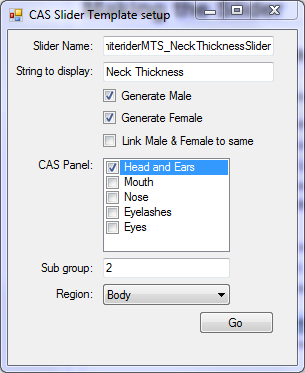
Next, open up the CAS Slider Template Creator program. This is a pretty simple program, which will generate a basic slider for you to edit. Fill out the various boxes.- Slider name: This is the "code name" for your slider, and is what the game will call it. You may want to include your name in there, or you may not care - it's up to you, really.
- String to display: This is how your slider will be labelled in CAS.
- Generate Male & Female, and Link Male & Female: As said before, you can make a slider just for males, just for females, or for both. You can also link them together so that the male and female sliders use the same values, or keep them unlinked so you can set the values differently. Whether or not you should link them depends on the specific slider you're making: in some cases, linking will work fine, and in others you will need different values to accommodate the differences between the male and female bodies. I keep them unlinked, just in case - this only adds about 0.5KB to the filesize, and avoids any problems later on.
- CAS Panel: The section of the "Looks" tab which your slider will be shown in.
- Subgroup: The subsection, or dot, in the Looks tab. I don't know of any list of which numbers correspond to what; however, Subgroup 2 is global (the dot in the bottom right corner of the face section).
- Region: Dunno. Pick one that looks appropriate.
Once you've filled out all the fields, click Go, and select a folder to save your new slider file to.
Step 3: Extracting the BoneDeltas
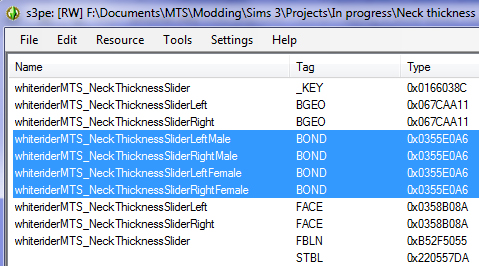
Now, find your .package file and open it in S3PE. If this is your first time using S3PE, go to the bottom of the window and make sure "Names" and Tags" are ticked. You should now see a list of resources.
There will be two BOND (short for BoneDelta) resources for each gender, unless you ticked Link Male and Female. The default value for your slider - that is, essentially, 0 - will be right in the middle of the slider in CAS. The <YourSliderName><Gender>Right BOND file controls what happens when the slider is dragged to the right, and the <YourSliderName><Gender>Left BOND controls what happens when the slider is dragged left. You can be quite creative in how you use this, but for now, we're going to stick to Right scales up and Left scales down.
Select all the BOND resources, right-click them, and Export -> To file.
Step 4: Editing the BoneDeltas
Pick a gender to start with - I'll pick female - and a direction - I'll pick Right, since scaling up is easier than scaling down. To begin with, you'll be making very rough changes, narrowing down the values you want to use largely by trial and error and guesswork. Open the relevant .bonedelta file in Delphy's BoneDelta Editor.
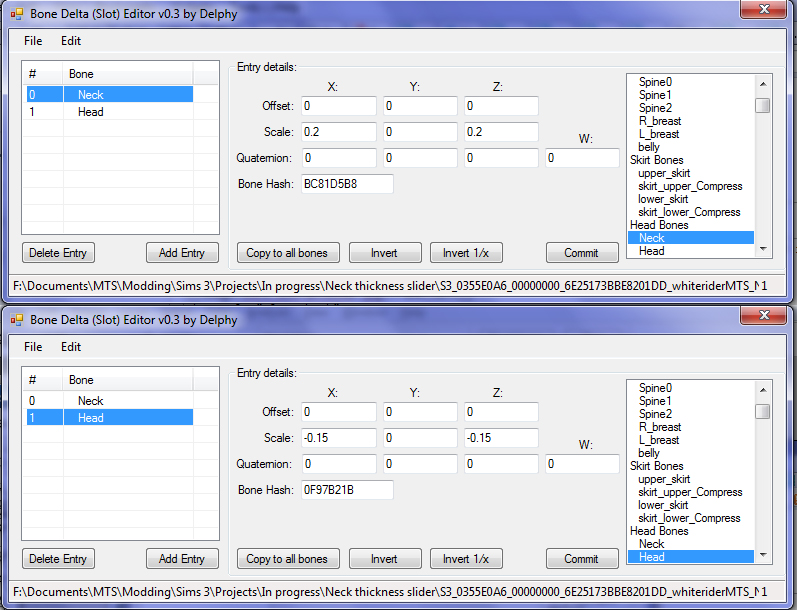
The first thing to do is to select the Head entry, and change it to the joint we want to work with - you noted down the name earlier. Select that joint in the list, and set the various numbers: Offset is movement, Scale is scale, and for an explanation of Quaternion, see the "Advanced stuff" section of CMarNYC's Pet body slider tutorial. As a guide, you will probably want all your numbers to be between -1 and 1, as higher or lower numbers will create very extreme transformations in-game.
Next, remember the green joints? We said that altering a joint alters all its children, and ordinarily, we don't want that - I've set my bonedelta to scale the neck by a factor of 0.2 in the X and Z axis, I certainly don't want the whole head to do that. So, click Add Entry at the bottom of the list, and create a new entry for each of your direct child joints: we need to scale the head down when we scale the neck up (or vice versa), so that the two changes cancel each other out for the head.
Unfortunately, there's no quick and easy way to work out what your child joints' values should be: but halving your original values and then inverting them (so that +2 on the neck becomes -1 on the head, or -0.4 on the neck becomes +0.2 on the head) is a good place to start.
My values end up looking like this, for FemaleRight:
Remember that every time you change the numbers for one joint, you need to click Commit - if you switch to a different joint without clicking Commit, your changes to the previous joint will be lost!
Do the same for the Left version of whichever gender you're currently working with, remembering to invert everything, and save both .bonedeltas.
Step 5: Importing the BoneDeltas
Once you've finished messing with the .bonedelta files, go back into S3PE, and select the BOND resources which correspond to the .bonedeltas you've edited. Right click them and hit Replace - make sure you replace them with the right .bonedelta, or you'll end up with some very broken results! Save your .package file.
Step 6: Test
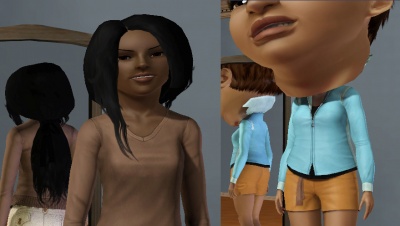
You're now ready to pop the .package file in Mods/Packages, and go in-game to see what happens. Your first few attempts will probably end up like this:
Don't worry. ;) Just repeat steps 4 and 5, tweaking the values as you go, until you end up with what you want - a slider whose maximum and minimum values make sense, and which doesn't cause any other body parts to change size or shape when it's used. Then, repeat the process for the other gender.
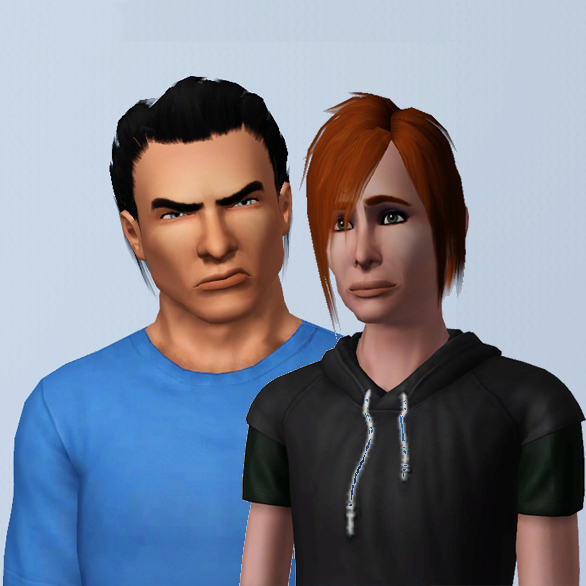
Eventually, you'll end up with something more like this:
...and a shiny new sticker on your profile!
Questions? Comments? Suggestions?
Post here! MTS thread
| Tutorials by Category | |
|---|---|
|
CAS | Patterns | Objects | Building | Worlds | Modding | Modding Reference |
