Tutorial:Sims 3 Object Modding
Introduction
|
Object Modding is not a very well defined category. Usually an object mod is one that will clone an object and give it new interactions for it to be able to run. This tutorial will show you how to set up and create an object mod and add an interaction to it. By all means interactions are not all you can do with it. With coddeng experience you tell it to do a lot of things.
What You Need
- Microsoft Visual C# Express - simply called VS later in this tutorial
- Sims3 Package Editor - simply called S3PE later in this tutorial
- redgate .NET Reflector - simply called Reflector later in this tutorial
- A basic understanding of the C# syntax or at least any C-like language.
- A game that is properly set up to support scripting mods. If you fail to accomplish that, you can’t hope to successfully write scripting mods.
Getting Started
- Extract the core libraries with S3PE if you haven’t already. Here’s how to do that:
- Open S3PE and click on File -> Open…
- Navigate to the installation folder of The Sims 3 and from there to the sub-folder where the executable is located.
In this folder are three packages: gameplay.package, scripts.package, and simcore.package - Open one of these packages.
- Click on an S3SA resource. Note that S3PE shows some information about that resource in the preview area. Locate where it says ManifestModule. Remember what comes after the colon, e.g. Sims3GameplaySystems.dll.
- Click on Grid at the bottom of the S3PE window, and then click on the Assembly row and the little drop-down arrow on the right. Click on Export…
- Choose a sensible folder for the library and save it under the name you remembered from the ManifestModule entry.
- Repeat steps 4 to 6 for every S3SA resource in the package.
- Repeat steps 3 to 7 for every package listed under step 2.
- Close S3PE.
- Create a game-compatible Visual Studio project as explained here: Sims_3:Creating_a_game_compatible_Visual_Studio_project
- Start Reflector and load the core libraries with it.
Cloning your Object
The next step in this process is to make your new cloned object.
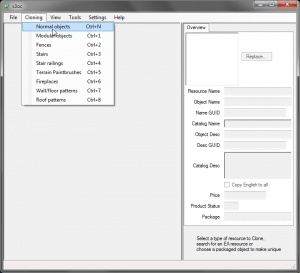
- Open s3oc, Clone -> Normal Objects
- Scroll to the object to clone, select Clone or Fix button
- Enter unique username and leave all default options checked
- Change any catalog options such as name, description, price or category
- Select Start, browse to save location and give package a name
Finding the Original Object's Class
This next step is important because it will later be used to make your script be derived from the previous object making it the same so it will work in game.
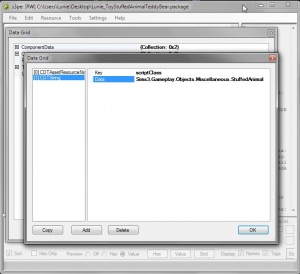
- Open object in s3pe
- Select OBJK resource
- Select Grid
- Expand Component Data
- Select CDTString (The class is in the data row - Sims3.Gameplay.Objects.Miscellaneous.StuffedAnimal)
Starting Your Code
We are going to start off by changing the namespace and the class. The namespace is what contains classes and separates out two of the same classes. You want to choose a namespace unique to you, one that won't clash with another modder or with an EAxian namespace.
namespace Sims3.Gameplay.Objects.Miscellaneous.KolipokiMod
Next we need to change the class name. Its needs to be something that will tell you what you are doing. Since we are adding a simple interaction I'm going to make it:
public class TalkingTeddy : StuffedAnimal
Now you may notice in my class name that I have what functions as a deriver. What it does is it takes the code with the StuffedAnimal and assigns the TalkingTeddy to it. The deriver should be what was in your co-string. You may be wondering why your co-string was way longer then it was. MVSC# will add the things before it for you. If it does, not right click on it and hit resolve and then it should work. What it is doing is that on the top of the code it is adding a Using qualifier which makes it so you don't have to say that name space over and over again when calling something within it.
Adding the interaction
Through this step we will be using Reflector so make sure you have it opened and that you have opened the .dll's that we extracted in the first step. If you do not know how the game calls an interaction it is best to see how they do it. Because all we are doing is telling the interaction to tell us Hi, we need an immediate interaction. In the Sims 3 immediate interactions have those orange circle things next to their name. We are going to be exploring the Stereo TurnOnOff function.
- Expand Sims3GameplayObjects/Sims3GameplayObjects.dll/Sims3.Gameplay.Objects.Electronics/Stero/TurnOnOff
- Open the dissasembler by hitting the spacebar
- Select TurnOnOff to see what it does. Be sure to hit the expand method at the bottom of the dissasembler so you can see the whole code. Look through the disassembler and see how the code works.
When you have finished exploring we are going to need most of the code of the TurnOnOff Method so select the code in the disassembler and copy it. Paste it within your class definition in MVSC#. Because this is for the stero we will need to change it.
Change the private sealed class name of TurnOnOff to what you want the name of it to be, make it something that describes the interaction. I'll be naming mine TalktoMe. Also make note that the class is derived from an immediateInteraction class. Be sure to change the Stereo to the name of your object (the first class). In my case it will say TalkingTeddy instead of stereo.
A lot of this stuff we took we will not be needing and we will have to change. You will also need to change the code so that where it says stereo you refer to your object and where it says TurnOnOff you refer to your interaction name.
private sealed class TalktoMe : ImmediateInteraction<Sim, TalkingTeddy>
{
    // Fields
    public static readonly InteractionDefinition Singleton = new Definition();
    private const string sLocalizationKey = "Gameplay/Objects/Miscellaneous/TalkingTeddy/TalktoMe";

    // Methods
    private static string LocalizeString(string name, params object[] parameters)
    {
        return Localization.LocalizeString("Gameplay/Objects/Miscellaneous/TalkingTeddy/TalktoMe:" + name, parameters);
    }

    protected override bool Run()
    {
        //do interaction here
        return true;
    }

    // Nested Types
    private sealed class Definition : ImmediateInteractionDefinition<Sim, TalkingTeddy, TalkingTeddy.TalktoMe>
 {
                      // Methods
                      protected override string GetInteractionName(Sim a, TalkingTeddy target, InteractionObjectPair interaction)
                      {
                          return TalkingTeddy.TalktoMe.LocalizeString("TalktoMe", new object[0]);
                      }
                      protected override bool Test(Sim a, TalkingTeddy target, bool isAutonomous, ref GreyedOutTooltipCallback greyedOutTooltipCallback)
                      {
                          return !isAutonomous;
                      }
                  }
}
Making the Interaction Do Something
With the right code, interactions could do anything. They could start a fire to a whole lot like in the ChaosMagePainting. They could lock doors such as in the Lockable door.
For this tutorial i will simply make it say "Hi". The Sims 3 has a nice way of setting up a notification. It's simply:
base.Actor.ShowTNSIfSelectable("Hello", StyledNotification.NotificationStyle.kTip, ObjectGuid.InvalidObjectGuid, base.Actor.ObjectId);
base.Target.mRevealingSim = base.Actor;
The first line in this code is calling the ShowTNSIfSelectable, which is a nice method of telling things through notifications. If you search in the relfector for the ShowTNSIfSelectable you will find that the parameters are 1)what you want it to say, 2)the theme of the notification is this case kTip(there are i believe 5 different themes, so go look them up and choose one you like), 3)thumbnail 1 and 4) thumbnail 2. This code will going into the "protected override bool Run" inside your interaction class.
Congratulations! now your code will add the interaction and tell you hello. Here is what the final product should look like:
using System;
using System.Collections.Generic;
using System.Text;
using Sims3.Gameplay.Objects.Miscellaneous;
using Sims3.Gameplay.Utilities;
using Sims3.Gameplay.Interactions;
using Sims3.Gameplay.Actors;
using Sims3.Gameplay.Autonomy;
using Sims3.SimIFace;
using Sims3.Gameplay.Skills;
using Sims3.UI;
using Sims3.Gameplay.Objects;

      namespace Sims3.Gameplay.Objects.Miscellaneous.KolipokiMod
      {
          public class TalkingTeddy : StuffedAnimal
          {
              protected Sim mRevealingSim;

              public override void OnStartup()
              {
                  base.OnStartup();
                  base.AddInteraction(TalktoMe.Singleton);
              }
              private sealed class TalktoMe : ImmediateInteraction<Sim, TalkingTeddy>
              {
                 // Fields
                   public static readonly InteractionDefinition Singleton = new Definition();
                    private const string sLocalizationKey = "Gameplay/Objects/Miscellaneous/TalkingTeddy/TalktoMe";
                // Methods
                   private static string LocalizeString(string name, params object[] parameters)
                  {
                   return Localization.LocalizeString("Gameplay/Objects/Miscellaneous/TalkingTeddy/TalktoMe:" + name, parameters);
                  }
                  protected override bool Run()
                  {
                      //Do the interaction here.
                      base.Actor.ShowTNSIfSelectable("Hello", StyledNotification.NotificationStyle.kGameMessagePositive, ObjectGuid.InvalidObjectGuid, base.Actor.ObjectId);
                      base.Target.mRevealingSim = base.Actor;
                      return true;
                  }
                  // Nested Types
                  private sealed class Definition : ImmediateInteractionDefinition<Sim, TalkingTeddy, TalkingTeddy.TalktoMe>
                  {
                      // Methods

                      protected override string GetInteractionName(Sim a, TalkingTeddy target, InteractionObjectPair interaction)
                      {
                          return TalkingTeddy.TalktoMe.LocalizeString("TalktoMe", new object[0]);
                      }
                      protected override bool Test(Sim a, TalkingTeddy target, bool isAutonomous, ref GreyedOutTooltipCallback greyedOutTooltipCallback)
                      {
                          return !isAutonomous;
                      }
                  }
              }
          }
      }
Save your project (again) and click on Build -> Build Solution. This will build the project and see if it has any errors, if it doesn't it will create a nice .dll for you. You will find it in Documents\Visual Studio xxxx\Projects\{YourProjectName}\{YourProjectName}\bin\Release. That file will be used to add your script to your cloned object and make it work. If you ever change the code be sure to click on Build -> Build Solution again.
Adding your script to your package
The next step in this process is to add the script to the package. We are going to be making a new resource that will have the tag S3SA. Before we go making a new resource we need to FNV Hash and get an instance name.
- Tools -> FNV Hash. Inside the box that says Text to Hash write the class name of your object. For me I would write "TalkingTeddy". Copy the FNV64 number, that will become the new instance.
- Close the FNV Hash tool and back in the S3PE main window, click on Resource -> Add…
- As type choose S3SA. Enter 0 for the Group and paste the FNV64 value into the Instance field. For convenience, tick the “Use resource name” field and enter the name of the resource in the Name field. Once you’re done, click on Ok.
S3PE will now show the S3SA resource and a _KEY resource. You can just ignore the latter one. Select the S3SA resource and on the bottom of the S3PE window, click on Grid.
- Select Import/Export/Edit…, click on the drop-down button on the right and click on Import…
- Navigate to the .dll file MVSC# created. It will be in Documents\Visual Studio xxxx\Projects\{YourProjectName}\{YourProjectName}\bin\Release. Select the file; click on the Open button and back in S3PE’s Data Grid window click on Commit
Language Localization
When your testing your object in game after finishing the last step you may have noticed that the interaction would say Something like KolipokiMod.TalkingTeddy.TalktoMe. If you would like to change that you will need to edit the STBL resource.
- Open your package in s3pe
- Tools -> FNV Hash
- Enter the namespace you saw in game in the Text to Hash box -> Click Calculate and copy the value in the FNV64 field. That value will be the instance of your STBl resource.
FNV Hash the name that shows up in game and copy the instance in the FNV64. Find the file with an STBL file type (make sure its your language) and hit editor. A STBL Resource Editor will appear. Change the instance in the bottom to the FNV64 Hash and hit add. A new string will appear. Click on it and in the box to the right write out what you want it to say.
Congratulations
You have now finished your object and should have an understanding of how to make your own object mod. I cannot wait to see what you guys create.
Special Thanks goes specially to Wito who helped me start out in object modding. I'd also like to thank Rick, Tiger, and ChaosMage for there help answering questions that I had come across. Thanks to Sri for telling me to try Object Modding.
Video Version
This tutorial is now on video and can be found at The Sims Supply, [URL=http://thesimsupply.com/showthread.php?tid=231]here[/URL].

