MTS2:Creator Guidelines/Sims 3 CAS
Contents |
Create-A-Sim
Introduction
Uploading custom sim content? This guide will walk you through every step of what we require on MTS. Please make sure you read these guidelines carefully, as our standards have changed over the years, and there may be some items you weren't aware of before.
If you've uploaded TS2 Bodyshop content, then many of these standards are the same; however please pay particular attention to requirements regarding recolourable channels.
Quality/General
This is by far the most important factor in pose uploads, but also the hardest to quantify.
| Time and effort |
|---|
| Most good creators spend hours upon hours on even simple creations. We understand that not everything has to be that difficult, but we do expect you to not just slap together something in 15 minutes and upload it and expect it to get accepted. Really try to put some serious effort into what you create, and it will show through in the quality.
This is probably the hardest one to quantify, but it's something that is obvious whenever upload moderators look at an upload: have you really expended some serious time and effort on a creation? You can't just crank out a bunch of stuff in a short amount of time and expect it to be good. Nor can you spend a while just fiddling with something but not really trying and expect a good result either. |
| Logos (*) |
|---|
| Uploads based around clothes with logos on them should demonstrate a reasonable amount of planning and effort. As a general rule, logo items should be sets - don't just slap a nike logo on a shirt; do a hoodie, some shoes, maybe a hat or bag etc; or, upload a set of shirts with related logos. Stencils should be used as little as is reasonable - stencils are useful if you are using an image which is complex and has too many colours to be done using mask channels, however if your logo is just one or two blocks of solid colour, then it should be recolourable.
Always remember to state, if applicable, the brand or band your logo is for in the title or keywords of your upload - otherwise downloaders can't find it by searching.
|
| Not Too Bright (*) |
|---|
When creating an item that is brightly-coloured or neon, or clothing with a bright default colour, you need to keep in mind the way the game renders colour... Creating something with a colour that you'd generally consider to be "bright" can be blinding in-game. Try making the colour a little lighter, to keep the brightness but without the blinding effect.
|
| Blacks And Whites (*) |
|---|
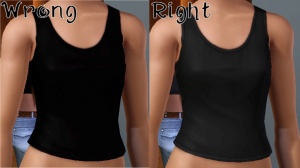
When making something that's black or white, or has black or white as its default colour, you never use -actual- true black or white. For black you use dark grey, and for white you use light grey. That way you can still see lighter or darker for shadows and highlights, and your item will look right in the game - true black just looks like a dark hole, and true white is far too bright. If you're making a male tshirt, a good indicator is to look at the armpits - there should be a bunch of little folds there; if you have to squint to see them, your default colour is too dark.
|
| Crisp/Unpixelated (*) |
|---|
You need to make sure, also, that your textures are crisp and clear. There shouldn't be any blurriness or pixellation to your textures. They should look as clear and crisp as Maxis textures. If you're using an image for texturing (photoskinning or otherwise), make sure you're not scaling up your image - if it's a logo or design, you should have to shrink it to fit on your texture, not make it bigger.
|
| No Simple Slider Changes (*) |
|---|
If you're going to make something for sims, don't just grab a Maxis item and change the colour on it - making a slightly paler Maxis skin, for instance, or making a blue shirt green, or inverting the colours on a texture. This is something that anyone can do, especially with TS3's Create-A-Style tools, and really isn't worth uploading. Take the time to create a unique texture, add some new details, and make it something worth uploading (and downloading).
|
Screenshots
People want to see what they're downloading! Your screenshots sell your upload - if people don't like the look of your screenshots, they're not going to download - and if your screenshots are too bad, you won't get your upload approved.
| Big Enough |
|---|
The larger your pics, the better! Tiny pics won't show enough detail to see what you've made.
Please don't just take a small pic and size it up in your graphics program to get bigger pics - this only makes the dimensions larger but doesn't add any detail and just gives you a blurry, pixellated larger pic, not a nice clear one. |
| No Over-Photoshopping (*) |
|---|
| While it can be tempting to get artistic with your screenshots in Photoshop, please don't. Screenshots need to be just as things look in the game, with no extra filtering such as contrast, sharpen, blur, saturation, etc.
|
| In-Game (*) |
|---|
| In order to see what your creation looks like in-game, we require in-game screenshots. You must actually load the game and take your screenshots there. We do not accept texture pics, CTU, 3D program pics, etc., without the required in-game pics too. Please don't try to cut out backgrounds or fake in-game pics. We can definitely tell the difference.
For best results, put your item on a sim on a lot. Create-a-Sim screenshots are acceptable, but the lighting in CAS is pretty bright and you may not be able to get detail pics and that sort of thing, too.
|
| Show All Items In the Set (*) |
|---|
| If you are uploading a set of items with multiple colours or styles, you must include in-game screenshots of every item in the set! You can't just upload a single in-game pic and then show the other colours it comes in, or texture swatches - you need to have actual in-game pics of everything! It may be time-consuming to take pictures of a large set, but it gives downloaders a much better idea of what they're getting.
|
| Poses (*) |
|---|
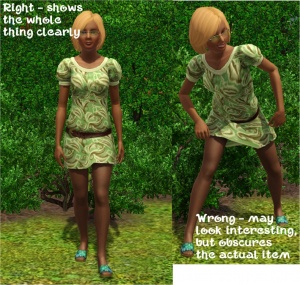
| If you are uploading clothing, your sims need to be in a pose that shows off your clothing properly. The best way to do this is simply to have your sim stand there, doing nothing, arms at their sides. You can also just have your sim walk normally - click "go here" and have them walk.
It may be tempting to have your sim doing something amusing or silly, or to show your bathingsuit-ed sim jumping into a pool, and that's fine - but make sure that whatever pose you choose, it shows off your creation first and foremost.
|
| Show the Whole Thing (*) |
|---|
| Make sure that your screenshots show the whole item - for clothing or skins, this usually needs to be a head-to-toe shot. Don't crop or leave out important details like hands, feet, etc., even if you haven't done anything with them - people want to know that the cute vest top they're downloading doesn't have armbands, for example.
You CAN use cropped or closer pictures to show detail and/or for your thumbnail shot, but make sure you have at least one pic that shows everything.
|
| Take Detailed Pictures (*) |
|---|
For an upload with special details that cannot be clearly seen from a full-body shot, it's a good idea to show detail pics. You can get some nice close-up shots this way that really show the interesting bits. Make sure these are in addition to (not instead of) your full body shot.
|
| Close Enough (*) |
|---|
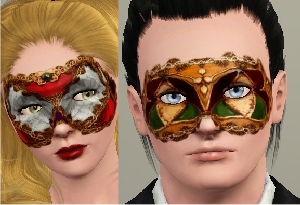
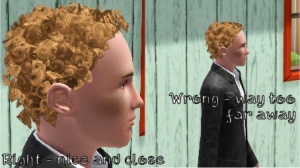
| Take your pics from close up! Don't take your pics from across the lot or far away - this won't show what you've made. Get nice and close, on the same level as the sim.
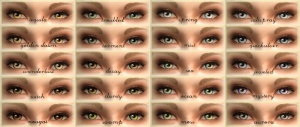
For things like makeup and eyes, this is especially important! You want to make sure people have a very clear idea of what they're getting, so you can't take your pics from too far away or your creation simply won't be visible.
|
| Multiple Angles (*) |
|---|
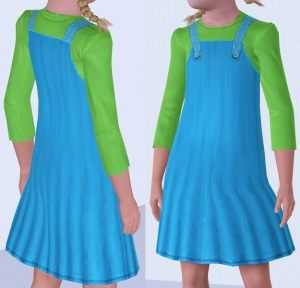
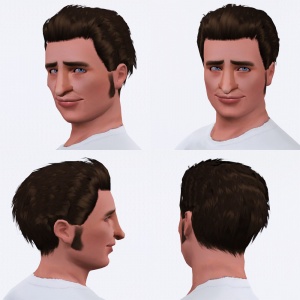
| Especially with things like clothing, skintones, or hair, it can be very helpful to not only show the item from the front, but also the sides and the back. People downloading want to know that what they're downloading doesn't just look good from one angle, but from all sides.
|
| Enough Light (*) |
|---|
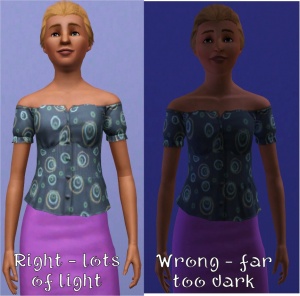
| Don't take your pics at night or in a dark room! Take your sim outside in the sunlight (make sure they're facing the sun - light comes from a certain direction on the lot!) or put them in a well-lit room. At the same time, make sure you don't use too much light: Create-a-Sim screenshots can sometimes be too bright to show things like freckles on a light skintone, or if you put a sim in something light-coloured under a bright light, it can wash out and lose a lot of the detail of what you've made.
If your screenshots are consistently coming out dark and you don't know why, then you are probably using an external screenshot program (such as FRAPS) while playing in fullscreen mode. This always causes dark pics, for no apparent reason. To get round this, either use the ingame camera (C key), or use windowed mode (Options -> Graphics options).
|
| Cut That Hair (*) |
|---|
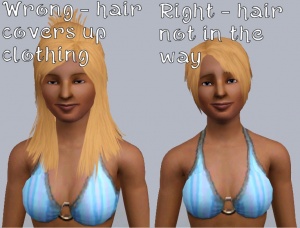
| Remember to put your sim in a hairstyle that doesn't cover up the content you're uploading. You don't want the hairstyle your sim is wearing to cover up substantial amounts of your clothing, for instance. Choose a hairstyle that doesn't get in the way and allows you to show off what you've made without a bunch of hair covering it.
|
| Show the Recolorable Channels (*) |
|---|
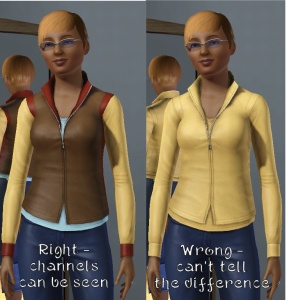
| If your upload has recolourable channels, show them in at least one of the screenshots - and preferably, label them too (or at least point them out in the post). An upload with four recolourable channels, which are all the same colour in the screenshots, looks rather like an upload with one recolourable channel; which makes your upload appear less awesome than it actually is. If you must provide screenshots with no differentiation between the channels, at least describe clearly where the channels are in your upload text.
|
| Obscured Skintones (*) |
|---|
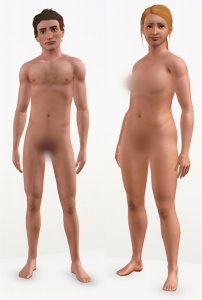
| Because MTS is not an adult site, you need to take special care when uploading skintone files. Not only must your skintones not have too much "adult" detail on the actual skins themselves (please see the special note below under "Adult Content/Nudity" regarding skintones) but you must obscure your screenshots. We normally don't want you to cover up your texturing, but in this case, we do...
This means you need to cover the female breasts, the crotches on both genders, and the butt crack of both genders. You may do this by putting your sims in skimpy underwear, by covering those areas in a black bar, or, probably the best way to do so without your obscuring getting in the way of your texturing, selecting those areas in your graphics program of choice and applying a blur or pixellation filter to them.
|
| Try Neutral Backgrounds (*) |
|---|
| For best results, use a simple plain backdrop for your screenshots. While it may be tempting to do a really complex set, what you're showing in your screenshots is what you're uploading, and something simple and plain is the best way to show off what you've made. If you're uploading something mostly dark-coloured, make sure to use a light backdrop (and vice versa - darker backdrop for light stuff) so it doesn't get lost in the background.
This is not an absolute -requirement- and for some things like historical clothing and the like you may do better with a simple basic set that matches your theme, and a nice garden scene can look nice too - just make sure that what you're doing in the background doesn't detract or distract from what you're actually uploading. |
| In-Line/Attached Screenshots (*) |
|---|
| Please do not post more than 4 inline screenshots (images that appear in the text of the thread). Having a lot of images that have to load on the thread makes browsing downloads very slow and can make the thread jump around as they keep loading.
You may host your inline screenshots elsewhere like Photobucket.com - however, these screenshots hosted elsewhere must be additional screenshots, and you must make sure to actually attach your required screenshots to the thread itself. If your Photobucket account runs out of bandwidth or you delete the pics, people still need to be able to get the required screenshots on your thread. You can attach up to 12 screenshots to the thread itself, with the 4 additional inline screenshots hosted elsewhere (or attached) for a total of 16 possible screenshots. This should be plenty to show what you've made, even for fairly large sets. Remember, you can always collage several different images together into one image if you have a bunch of stuff to show off, or want to show multiple angles of an outfit, or the like. |
| Screenshot tips |
|---|
| Camera Controls:
Take some time to just play around with the camera. It can take a while to get used to the camera controls, and even once you are experienced in their use, it may be challenging to get the shot you want with the constraints on the controls. If you haven't taken many sim pictures before, here is a list of camera controls:
Using Print Screen: If you have enough RAM to run Photoshop or another graphics editing program at the same time as TS2/TS3, you may want to take screenshots yourself, without the use of a program to store them for you. To do that, simply press the Print Screen or PrntScn key on your keyboard - it's usually off toward the right, over the arrow keys, above Insert and Delete. This will copy your current screen to your Windows clipboard, as if you had selected and copied it as an image. Then open any graphics editing program, create a new document the size of your monitor's resolution, and paste into that document. Your screenshot should appear in the document.
There are many programs available, free and pay, that will take screenshots for you by using a hotkey, and save them to a folder - just like The Sims 2 with the C key, but with options for much better quality settings. A quick Google search for 'free screenshot program' will also bring up many other options, which may have other features that are of interest to you.
Many simmers struggle with getting their images to be clear, crisp and under the maximum file size while keeping the image size larger than 800px by 600px. After getting your images from the in game camera or using a print screen program you will need to resize them and compress them into a jpeg image. Many graphics programs have a built in optimizing feature. Here are a few common ones: |
Pay Content
| Do not use pay content in your screenshots! Do not use pay hair in your screenshots! (*) |
|---|
| You MUST use free or EA hair in your screenshots! MTS promotes and supports free content, and using pay content in screenshots is basically like free advertisement for paysites. This includes pay content you found elsewhere for free - if it was pay originally, it's still promoting pay content.
As of 21 July 2007, MTS no longer allows the use of pay content in screenshots. For sim content uploads, this includes (but is not limited to) hairstyles. You must use free or EA hairstyles on your models! Do not use pay or donation hairstyles on your models when uploading here. For more information, please see the Site News article on the subject. MTS has an extensive collection of free hairstyles in our Downloads section and Finds. You'll be able to find something you like. We STRONGLY recommend that you credit the hair (and other content) used in your screenshots in the text of your upload post. With hundreds of hairstyles out there, it's very difficult for our upload moderators to know every hairstyle on sight, and if we have to hunt down where the hair is from to see if it's pay or free, it may take longer for your upload to be approved. Make it easy on us and at least say something like, "Hair from XM Sims (free)" in the text of your post under a little section for model credits. |
| No TSR Featured Artist Content (*) |
|---|
| Prior to November 28, 2010, here at MTS, we have had policies restricting the use of content from The Sims Resource in uploads, due to items pay/free status there changing often.
However, after a lot of consideration and time to review the frequency of the changes in pay/free status, we have decided to lift this restriction. While creators at TSR do sometimes go pay after being a regular/select artist, this happens fairly rarely... and likely no more often than free creators from other sites suddenly going pay. As a result, you can now use free items at TSR in MTS uploads. Any pay items - that is, ANY items by "Featured Artists" (FAs) at TSR cannot be used as their pay/free status does still change. Items by regular creators and "Select Artists" (SAs) CAN be used. |
| Store Content (*) |
|---|
| You may use Sims 3 Store items in your screenshots, or required for your uploads. If your upload requires a Store mesh, you must state what specific Store item(s) you have used and link directly to the item on the Sims 3 Store so users may choose to buy it if they like. While we realize this may seem a contradiction to the "what you see is what you can get without having to pay for it" concept, Store content is not considered "pay" because it is official content, similar to what you get as part of expansion/stuff packs (after all, you have to pay for those, too). You may NOT include the actual Store item in your upload as this is a violation of intellectual property laws, nor can you link to where it can be downloaded elsewhere for free. |
Uploading
Once you have your creation made and screenshots taken, you need to make sure you have all the information and file types in order when uploading.
| Zip, Rar, or 7z |
|---|
| To upload your file(s) to MTS, you will need to compress them into an archive file, which makes them smaller and allows you to include many files in one download. The archive file formats we currently accept are .zip, .rar, and .7z.
For instructions on compressing your files into an archive, please see: Creator Guidelines: Creating Archive Files.
|
| Good title |
|---|
| You'll need a good title for your upload which describes what it is, and interests people in downloading it.
Good titles:
Bad titles:
|
| Package Files Only (*) |
|---|
| extract] the .package file from the .sims3pack. |
| Upload In Sets (*) |
|---|
| If you have created several items in a set, or similar items in the same sort of theme at the same time, please upload these together in a single set, all on one thread (instead of all separately, one by one, on different threads). This is easier for everyone: on our upload moderators, as they only have one thread to review rather than several... on you, as submitting a single thread is much quicker and easier than several... and on downloaders, as they can get everything they want all in one place rather than having to hunt around. |
| Good Description (*) |
|---|
| You'll need to write up a little basic description of what your upload is... you don't have to get too fancy, but you do need to write something to get people interested.
For instance, "These patterns are suitable for all manner of fabric items - bedspreads, upholstery, and clothing. Some are bold, and some are subtle, but all will look lovely in your homes or on your sims," is a good description. "This is my first upload! I don't know what to say here. My English is not good" is NOT a good description. |
| Number of Palettes/In-Game Category (*) |
|---|
| Make sure to mention the number of colour palette options (1-4) your pattern(s) have, and what category or categories they show up under in-game! |
| In-Game Picture as Main Thumbnail (*) |
|---|
| If you include pictures of just the texture you used for the pattern, please make sure to pick an in-game picture as your default thumbnail in the upload wizard. |
| Credit custom hair |
|---|
| If sims in your screenshots are shown with custom hair, then you will need to provide links and credit. This is not optional!
A link and credit means writing something like: "Everyday hair by Anubis360: http://www.modthesims.info/d/402962" - it states the item, the creator's name, and gives a direct link to where it can be found. Just linking to a site is not sufficient! You may use content from the EA Store on your sims, but again, you need to link and credit it as such, so people can get it. |
Additional Stuff
- If your upload is rejected or marked as changes required and you're not sure why, ask in Creator Issues.
- If you're not sure whether your patterns are ready for uploading, use the Creator Feedback Forum to get feedback on it.
