Tutorials:Simple Meshing for 3D Studio Max Part 1
| Tutorials by Category | |
|---|---|
|
CAS | Patterns | Objects | Building | Worlds | Modding | Modding Reference |
|
Simple Meshing 3D Studio Max.
Learning Curve:
- Creating simple objects in 3D Studio Max.
- Mapping simple objects in 3D Studio Max.
- Importing from and Exporting to MilkShape 3D.
Things you need to read:
- Guides on how to use s3oc/s3pe and/or TSRW, located around various The Sims modding sites (wiki's).
- Few basic tutorials from 3D Studio Max would not hurt either, even though I explain almost everything these tutorials can learn you even more.
Overview:
I wanted to write this guide to show you how much you can do with 3D Studio Max, this program you can easily get lost in the nearly limitless options. This guide will cover a few simple ways of creating an object, these are the simple ground layers used to creating more complex Meshes and Textures. Since this is a guide on Simple meshing, UV mapping and textures are also in this format. For more detailed guides on this move on to part 2 or even 3 of this guide.
+ Part 2 & 3 are still in the making and will be posted as soon as they are done +
The way an object is created in this guide is similar to other guides i found on other modeling programs, even in more complex 3D art scenes this is still a very much used way to shape and mold object into 3D scene's. 3D Studio Max is capable of much more then this as you may notice during this guide, and these will be explained on simple object in the next guides.
For the duration of these guides I am using 3D Studio Max 2013, but can also apply for the larger parts to lower version of 3Ds Max.
Creating a reference Scene.
The Sims uses objects in a certain scale, in order to make sure our objects are in the same scale we want to get an exported object into our 3Ds Max. In order to do so you must have read up on the guides from the programs you downloaded to export and import objects into The Sims 3. All you need to do is get an object that is more or less similar to what you want to model, we are going to use the same table as most starting tutorials, the infamous "TableEndClub".
Importing from MilkShape 3D:
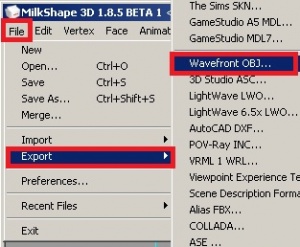
The settings are rather simple for this, first of all you don’t need any extra tools for this to work all export option are already included in Milkshape 3D and 3Ds Max. When you have the object loaded into Milkshape 3D you simple do the following: “File -> Export -> Wavefront OBJ…” and save it to your work folder named something like “Cloned_low_Detail_Mesh”.
- Hint you can also export\import other formats exporting from and to Milkshape, I suggest playing around with it a little bit. I found .OBJ to be the cleanest format though, some other formats may export more scene related things.
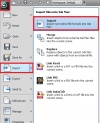
Now for the import part to create our reference scene, this is very easy in 3Ds Max go to the top left button with the 3Ds max sign on it (it’s the same menu as file in Milkshape). There select “Import -> Import”, now in the next menu navigate to the work folder and select you exported files (this file should just show up as “All Formats” is on by default, if not select the drop down menu of “Files of Type:” and select either the “.OBJ” format or “All Formats” option).
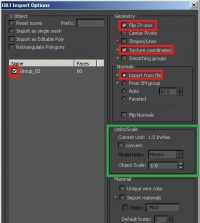
When proceeding you get a new screen with all kind of options you can select, these settings make up what you import to 3Ds Max. We need to pay attention to this screen for a minute to make sure we select all the right options.
On the picture I highlighted all options that need to be checked, keep in mind that leaving other switches on might create another end result than we have in this guide.
We want to flip ZY-axis, this is a common setting used for exporting/importing to/from Poser like programs, not checking this may result in a flipped object that you need to rotated to get correct again.
We also want to import Texture coordinates and Normals (Import from file).
- Hint A small word of warning though before we move on, this concerns scaling in 3Ds Max, and can make things very complicated if you don’t know how to scale. We are not going to scale the imported objects as I know what I am doing, and I don’t always need to see the end result in 3D up close. The unit conversion from The Sims 3 to 3Ds Max is rather harsh by default, and if not scaled the object can’t be viewed up close in 3D very well. If you want to use scaled objects try playing around with the “Unit/Scale” settings on the “OBJ Import Options”, and keep checking in Milkshape how it turns out against the reference size object there.
Now we are basically done already, you can look around a little bit now to make sure your import has worked out correctly.
You need to see a solid object now in your perspective viewport (bottom right by default).


