Tutorial:Sims 3 Pure Scripting Modding
Introduction
|
This tutorial will explain how to make a pure scripting mod, i.e. a mod that isn’t tied to an object.
While getting started is a bit more complicated than for an object mod, the actual coding can be as simple or complicated as you want. For today we will make a handy little mod that pauses the game after loading a save game.
What You Need
- Microsoft Visual C# Express - simply called VS later in this tutorial
- Sims3 Package Editor - simply called S3PE later in this tutorial
- redgate .NET Reflector - simply called Reflector later in this tutorial
- A basic understanding of the C# syntax or at least any C-like language.
- A game that is properly set up to support scripting mods. If you fail to accomplish that, you can’t hope to successfully write scripting mods.
Getting Started
- Extract the core libraries with S3PE if you haven’t already. Here’s how to do that:
- Open S3PE and click on File -> Open…
- Navigate to the installation folder of The Sims 3 and from there to the sub-folder where the executable is located.
In this folder are three packages: gameplay.package, scripts.package, and simcore.package - Open one of these packages.
- Click on an S3SA resource. Note that S3PE shows some information about that resource in the preview area. Locate where it says ManifestModule. Remember what comes after the colon, e.g. Sims3GameplaySystems.dll.
- Click on Grid at the bottom of the S3PE window, and then click on the Assembly row and the little drop-down arrow on the right. Click on Export…
- Choose a sensible folder for the library and save it under the name you remembered from the ManifestModule entry.
- Repeat steps 4 to 6 for every S3SA resource in the package.
- Repeat steps 3 to 7 for every package listed under step 2.
- Close S3PE.
- Create a game-compatible Visual Studio project as explained here: Sims_3:Creating_a_game_compatible_Visual_Studio_project
- Start Reflector and load the core libraries with it.
Additional Preparations In Visual Studio
Before we look at the actual code, we need to set up the VS project to support tunable values. I’ll explain why we need to do that later in this tutorial.
- Open the Solution Explorer for your project.
- Expand the Properties folder.
- Double-click on AssemblyInfo.cs to open it.
When VS first opens AssemblyInfo.cs, it will probably throw lots of errors at you. Just ignore that for now. Add using Sims3.SimIFace; and [assembly: Tunable] to it and save. It should now look like that:
using System.Reflection;
using System.Runtime.CompilerServices;
using System.Runtime.InteropServices;
using Sims3.SimIFace;

// General Information about an assembly is controlled through the following
// set of attributes. Change these attribute values to modify the information
// associated with an assembly.
[assembly: AssemblyTitle("Pausinator")]
[assembly: AssemblyDescription("")]
[assembly: AssemblyConfiguration("")]
[assembly: AssemblyCompany("Microsoft")]
[assembly: AssemblyProduct("Pausinator")]
[assembly: AssemblyCopyright("Copyright © Microsoft 2010")]
[assembly: AssemblyTrademark("")]
[assembly: AssemblyCulture("")]
[assembly: Tunable]
(only partly shown)To get VS to stop whining about some ostensible errors, close and re-load the project in VS.
The Actual Script
The First Steps
Now bring up the actual code file of your project again. The bare code skeleton VS created should still look like this:
using System;
using System.Collections.Generic;
using System.Linq;
using System.Text;

namespace Pausinator
{
    public class Class1
    {
    }
}
- Remove using System.Linq;
- Add using Sims3.SimIFace;
- Change the namespace and class name to something more sensible.
Choose wisely when it comes to your namespace and pick something that hopefully will be unique. You don’t want your namespace to clash with an EAxian namespace or with another modder’s namespace. Afterwards, the code should look like this:
using System;
using System.Collections.Generic;
using System.Text;
using Sims3.SimIFace;

namespace TwoBTech
{
    public class Pausinator
    {
    }
}
I am using TwoBTech for my mods, but you must use something else! Don’t use someone else’s namespace just like that!
What Makes It Pure - Part One
Now add the static constructor and a static field with the Tunable attribute to your class. The “nature” of that field isn’t really important. You can use a float or int just as well as a bool. I always use a boolean variable called kInstantiator which is a hidden homage to twallan. The class will now look like this:
public class Pausinator
{
    [Tunable]
    protected static bool kInstantiator = false;

    static Pausinator()
    {
    }
}
Why We Do This
Now might be a good moment to explain why we do this. C# or better the .NET framework has some concrete rules. We will “exploit” one of these rules to get our script up and running in TS3. This rule goes as follows: The first time a static field, property or method of a class gets accessed, the static constructor of that class will be called. That is to make sure that everything is in decent shape before the class has to interact with the rest of the world.
TS3 on the other hand parses all XML resources, and assigns the tunable values it finds in there to the related variables in the related classes. So. TS3 assigns a value to our static variable, the static constructor of our class will be called, and badda bing we have a foot in the door to get our code running. We will make sure TS3 actually finds an XML resource for our tunable variable later when it comes to building the package.
What Makes It Pure - Part Two
The parsing XML and calling static constructor stuff will be happen really soon, long before the main menu will show for the first time. At that time, our mod can’t do anything fancy, because almost none of the interesting stuff is running yet. In Reflector, you’ll find a delegate handler called OnWorldLoadFinishedEventHandler in Sims3.SimIFace.World. I trust you know that a delegate is a reference type variable that, instead of referencing an object, references a function. This specific delegate handler, like its name implies, calls all its delegates once a world has been loaded. That will be after you started a new neighborhood, the loading of a savegame, the transition to a vacation world or the transition back from a vacation world. Good time for us to strike, isn’t it?
To use OnWorldLoadFinishedEventHandler, add a callback method to your class and, in the static constructor, instantiate a new delegate pointing to that method and add it to OnWorldLoadFinishedEventHandler. It’s all right if you’re confused now. I know delegates confused the hell outta me. Sometimes they still do. Your class should now look like this:
public class Pausinator
{
    [Tunable]
    protected static bool kInstantiator = false;

    static Pausinator()
    {
        World.OnWorldLoadFinishedEventHandler += new EventHandler(OnWorldLoadFinished);
    }

    private static void OnWorldLoadFinished(object sender, EventArgs e)
    {
    }
}
We now have the basis for our pure scripting mod. All pure scripting mods work that way. In our OnWorldLoadFinished() method, we can begin to invoke our code.
Making It Do Something
We will keep it simple and make a mod that makes sure the game stays paused after loading a savegame. In Sims3.Gameplay.Gameflow (look that up in Reflector), you’ll find find a method to affect the game speed: SetGameSpeed(Gameflow.GameSpeed, GameSpeedContext). That’s the method our OnWorldFinished() method will call.
If you look at the code of SetGameSpeed(), you’ll see that it does some fancy checks if the setGameSpeedContext parameter is anything but SetGameSpeedContext.GameStates. We don’t want any fancy checks or anything. We just want it to set the game speed to pause. I suggest we use SetGameSpeedContext.GameStates as second parameter to avoid the checks. Now add the call of SetGameSpeed() to your OnWorldLoadFinished() method. It will look like this:
private static void OnWorldLoadFinished(object sender, EventArgs e)
{
    Sims3.Gameplay.Gameflow.SetGameSpeed(Gameflow.GameSpeed.Pause, Sims3.Gameplay.Gameflow.SetGameSpeedContext.GameStates);
}
The Final Code
The code is now finished and should look like this:
using System;
using System.Collections.Generic;
using System.Text;
using Sims3.SimIFace;

namespace TwoBTech
{
    public class Pausinator
    {
        [Tunable]
        protected static bool kInstantiator = false;

        static Pausinator()
        {
            World.OnWorldLoadFinishedEventHandler += new EventHandler(OnWorldLoadFinished);
        }

        private static void OnWorldLoadFinished(object sender, EventArgs e)
        {
            Sims3.Gameplay.Gameflow.SetGameSpeed(Gameflow.GameSpeed.Pause, Sims3.Gameplay.Gameflow.SetGameSpeedContext.GameStates);
        }
    }
}
Save your project (again) and click on Build -> Build Solution.
Leave VS open for now.
Writing The XML File
Open a text editor and paste the following:
<?xml version="1.0" encoding="utf-8"?>
<base>
  <Current_Tuning>
    <kInstantiator value="True" />
  </Current_Tuning>
</base>
Of course you have noticed the kInstantiator variable from the code. Save the file. You can close the text editor now as you won’t need it again.
Building The Package
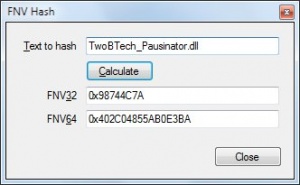
Open S3PE and click on File -> New. Now click on Tools -> FNV Hash…
- Enter a name for your script resource. The exact name isn’t important, but it should be something that is unique for you.
- Click on Calculate and copy the value in the FNV64 field. That value will be the instance of your script resource.
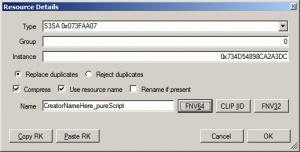
- Now close the FNV Hash tool and back in the S3PE main window, click on Resource -> Add…
- As type choose S3SA. Enter 0 for the Group and paste the FNV64 value into the Instance field. For convenience, tick the “Use resource name” field and enter the name of the resource in the Name field. Once you’re done, click on Ok.
S3PE will now show the S3SA resource and a _KEY resource. You can just ignore the latter one. Select the S3SA resource and on the bottom of the S3PE window, click on Grid.
- Select Import/Export/Edit…, click on the drop-down button on the right and click on Import…
- Navigate to the .dll file VS created. It will be in Documents\Visual Studio xxxx\Projects\{YourProjectName}\{YourProjectName}\bin\Release. Select the file; click on the Open button and back in S3PE’s Data Grid window click on Commit.
It’s time to save your package. Usually, it’s a good idea to begin the filename with your username or something that will identify all your mods.
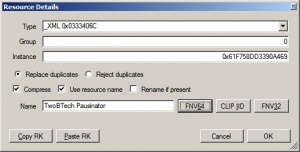
- Start the FNV Hash tool again. This time FNV hash the namespace plus class name of the class where the tunable variable is located. In the case of this tutorial that’s TwoBTech.Pausinator.
- Add another resource. The type is _XML 0x0333406C. This time the Instance value IS important.
Click on Ok, and then just like for the .dll file click on Grid and this time import the XML text file you created. S3PE will show the content of the XML resource in its preview window. Make sure that the content begins with an angle bracket and not with some unintelligible characters. That is a common error.
Save the package.
Rinse And Repeat
Give the package a test run in the game. If you followed this tutorial, it will work. Basically. It doesn’t pause the game after the transition to a vacation world. Let’s see if we can do something about that. The easiest way should be to delay the call of SetGameSpeed() a little until we know that the game clock is actually running. We will do that by adding an alarm that fires one second after setting it.
- Add a new static method without parameters to your class. Name it OnPauseAlarm.
- Move the call of SetGameSpeed() to that method.
- Add using Sims3.Gameplay.Utilities; to your code.
- In OnWorldLoadFinished(), add an alarm by writing
AlarmManager.Global.AddAlarm(1f, TimeUnit.Seconds, new AlarmTimerCallback(OnPauseAlarm), "Pause Alarm", AlarmType.NeverPersisted, null);
Of course you assume that you’ll find the AlarmManager class in Sims3.Gameplay.Utilities, and you are right. Please note that AlarmTimerCallback is a delegate, too. Your code should now look like this:
using System;
using System.Collections.Generic;
using System.Text;
using Sims3.SimIFace;
using Sims3.Gameplay.Utilities;

namespace TwoBTech
{
    public class Pausinator
    {
        [Tunable]
        protected static bool kInstantiator = false;

        static Pausinator()
        {
            World.OnWorldLoadFinishedEventHandler += new EventHandler(OnWorldLoadFinished);
        }

        private static void OnWorldLoadFinished(object sender, EventArgs e)
        {
            AlarmManager.Global.AddAlarm(1f, TimeUnit.Seconds, new AlarmTimerCallback(OnPauseAlarm), "Pause Alarm", AlarmType.NeverPersisted, null);
        }

        private static void OnPauseAlarm()
        {
            Sims3.Gameplay.Gameflow.SetGameSpeed(Gameflow.GameSpeed.Pause, Sims3.Gameplay.Gameflow.SetGameSpeedContext.GameStates);
        }
    }
}
Save the project and build the solution again. In S3PE import the updated .dll file. Save the package and again test it in the game.
Rinse And Repeat Once More
That’s better. The game will now definitely be paused, but now there’s a new glitch: If the game was actually automatically paused post load, then the mod will pause it again immediately after you un-pause it. That’s not the end of the world, but let us see if we can do something about it nevertheless.
Hint: The quick&dirty but fully functional solution would be to set the game speed to normal in OnWorldLoadFinished() and then pause it again in OnPauseAlarm(). I want to show you something, though.
EventTracker.SendEvent(new GuidEvent<WorldName>(EventTypeId.kSimEnteredVacationWorld, sim2, GameUtils.GetCurrentWorld()));
Now might be a good idea to fire up your browser and learn what events are in programming. That is if you didn’t already. In a nutshell, an event is some occurrence of interest, a listener or client is something that expresses the wish to be informed of that occurrence, and the handler is responsible for notifying the listeners, i.e. raising the events. The notifying happens by calling a method that is called callback. And yes, this is delegate stuff again. It’s not necessary to fully understand the quoted call right now. It’s just important to understand that OnArrivalAtVacationWorld() makes a class named EventTracker raise an event and not just any event but an event that is specified as EventTypeId.kSimEnteredVacationWorld. Look up the EventTypeId enum in Sims3.Gameplay.EventSystem.
Now what will we do about that event stuff?
- Add using Sims3.Gameplay.EventSystem; to your code.
- Add a static callback method to your code. The return type needs to be ListenerAction the parameter needs to be Event. Move the method call to set the game speed into that method, and make the callback return ListenerAction.Keep.
- In OnWorldLoaded(), comment out the AlarmManager stuff. Then add an EventListener by writing
EventTracker.AddListener(EventTypeId.kSimEnteredVacationWorld, new ProcessEventDelegate(OnSimEnteredVacationWorld));
The code should now look like this:
using System;
using System.Collections.Generic;
using System.Text;
using Sims3.SimIFace;
using Sims3.Gameplay.Utilities;
using Sims3.Gameplay.EventSystem;

namespace TwoBTech
{
    public class Pausinator
    {
        [Tunable]
        protected static bool kInstantiator = false;

        static Pausinator()
        {
            World.OnWorldLoadFinishedEventHandler += new EventHandler(OnWorldLoadFinished);
        }

        private static void OnWorldLoadFinished(object sender, EventArgs e)
        {
            Sims3.Gameplay.Gameflow.SetGameSpeed(Gameflow.GameSpeed.Pause, Sims3.Gameplay.Gameflow.SetGameSpeedContext.GameStates);
            //AlarmManager.Global.AddAlarm(1f, TimeUnit.Seconds, new AlarmTimerCallback(OnPauseAlarm), "Pause Alarm", AlarmType.NeverPersisted, null);
            EventTracker.AddListener(EventTypeId.kSimEnteredVacationWorld, new ProcessEventDelegate(OnSimEnteredVacationWorld));
        }

        private static ListenerAction OnSimEnteredVacationWorld(Event e)
        {
            Sims3.Gameplay.Gameflow.SetGameSpeed(Gameflow.GameSpeed.Pause, Sims3.Gameplay.Gameflow.SetGameSpeedContext.GameStates);
            return ListenerAction.Keep;
        }

        private static void OnPauseAlarm()
        {
            Sims3.Gameplay.Gameflow.SetGameSpeed(Gameflow.GameSpeed.Pause, Sims3.Gameplay.Gameflow.SetGameSpeedContext.GameStates);
        }
    }
}
Save the project and build the solution again. In S3PE import the updated .dll file. Save the package and again test it in the game.
The End
If you followed this tutorial, you should now have a mod that allows you to take a quick leak after sending your sims to a vacation or get some cookies after telling TS3 to load your save game. You know you deserve a cookie now.
You learned how to set up a VS project for a pure scripting mod, and got to know two things that are extremely handy when it comes to modding TS3: alarms and events.
It's perfectly all right if you don't fully understand all this delegate stuff and the syntax right away. You can just copy&paste the relevant parts to your new projects for the time being. Your understanding of C# and the TS3 code base will advance if you just keep going.
Where Does The Newborn Go From Here?
The mod we made in this tutorial is as simple as it gets. What you can do with a pure scripting mod is somewhat limited, but there are still lots and lots of things you CAN do. That is if you know how. How do you learn how? For the beginning, I suggest to look at other modders’ code in Reflector to see what they did and how they did it. Follow their calls in Reflector and look what the EAxian code they’re calling does. Start with simple mods. You can’t expect to get accustomed to the whole TS3 code base in an instant.
That’s why I lead you to first versions of the mod that didn’t do exactly what they were supposed to do, beside showing you alarms and events. That is just how scripting modding goes. Sometimes things work right away, but that will be an absolute exception. I suggest keeping that in mind to avoid getting frustrated.
Questions?
Ask them here: Q&A Thread for Sims 3 Pure Scripting Modding Tutorial


