MTS2:Creator Guidelines/Sims
Contents |
Introduction
So you've made a Sim that you want to share! Here are the guidelines you must follow in order to share your Sim at MTS. Please take the time to read through all of these guidelines as some key items have changed and may affect your upload. Pay close attention to what is required, and your upload will spend less time in the moderation queue and be more likely to get approved. Thanks!
This page is split into separate sections for easier readability. Please make sure to review ALL sections before submitting your sim!
Types of Sims
General Quality
| Quality of Your Custom Content |
|---|
|
If you have made your own content for your sims (for any category), please make sure you have thoroughly reviewed the Body Shop Creator Guidelines as the included custom content you have made is expected to follow the same guidelines and be up to the same quality standards as if you had uploaded it separately, not on a sim. |
| Creator Feedback |
|---|
|
Please utilize our Creator Feedback Forum for great tips on how to get your sim looking perfect. Note that using the Creator Feedback Forum is not a guarantee of acceptance, but it is helpful to have other people offer tips and suggestions. |
Required Screenshots
Certain screenshots are required when you upload your sim - and they must be big and clear enough to see what you've made!
| Neutral Face Closeup |
|---|
|
Show a close-up of your sim's face with a neutral expression. While it may look a little boring, sims' faces distort quite a lot when they make expressions so having a good idea of what your sim actually looks like normally is necessary. Extreme facial expressions like big smiles, open mouthed animated talking, laughter, etc., can distort the face and can make an interesting sim just look like another goofy sim. If your sim normally wears a mask, veil, or other item that covers their face, please remove it for the required face closeup shot. |
| Body Shot |
|---|
|
Show a further-away shot of your sim from a distance. This can be from at least their hips and up or you can show the sim from head to toe. If you have made the sim's outfit, make sure to show them head to toe, to show off the outfit you've made. |
| Comparison Picture (If Based on Other Characters) |
|---|
|
If your sim is based on a celebrity, anime character, cartoon character, game character, etc., then you need to include at least one picture of the original person or character for comparison purposes. Please provide at least one plain basic comparison pic of the character or celebrity - just a photo of them. Simmerized (combining the sim's face with a photo in Photoshop) or divided pics (left side is sim face, right side is real face split down the nose) provided for comparison are not acceptable. You can, however, put two pics side-by-side like the below example with similar poses and expressions as this will best show how close your likeness is. |
| Adult Comparison (Required for Child Sims!) |
|---|
|
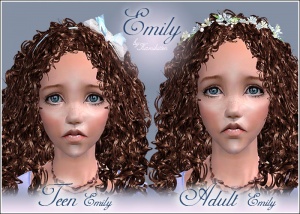
If your sim is younger than a teen (that is, a child or toddler) please include one picture of your child sim as an adult. This is simply so downloaders know what to expect when the child sim grows up - sometimes adorable children and toddlers become hideous adults. A child sim that becomes a hideous adult is not a disqualification for approval - it merely lets people know that they probably shouldn't let your child sim age. :) |
| In-game Picture |
|---|
|
In order to see what your creation looks like in-game, we require in-game screenshots. You must actually load the game and take your screenshots there. We do not accept Body Shop pics, texture pics, SimPose, 3D program pics, etc., without the required in-game pics too. Please don't try to cut out backgrounds or fake in-game pics. We can definitely tell the difference. For best results, put your sim on a lot. Create-a-Sim screenshots are acceptable, but the lighting in CAS is pretty bright and you may not be able to get detail pics and that sort of thing, too. |
| Close enough |
|---|
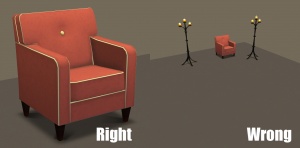
| Take your pics from close up! Don't take your pics from across the lot or far away - this won't show what you've made. Get nice and close, on the same level as a sim.
|
| Well-lit |
|---|
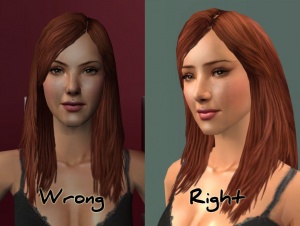
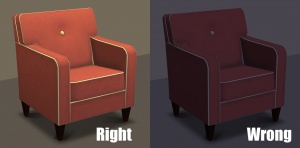
| Make sure you take your pictures during the daytime in bright sunlight, in a well-lit room, etc., - make sure your screenshots are nice and bright enough that people can see what you've made. Nighttime shots or those in a dark room really don't show off your creation very much.
At the same time, make sure you don't use too much light: if you put light-coloured item under a bright light, it can wash out and lose a lot of the detail of what you've made.
|
| Big Enough |
|---|
The larger your pics, the better! Tiny pics won't show enough detail to see what you've made.
Please don't just take a small pic and size it up in your graphics program to get bigger pics - this only makes the dimensions larger but doesn't add any detail and just gives you a blurry, pixellated larger pic, not a nice clear one. |
| Maximum Number of Inline/attached screenshots |
|---|
You may now upload up to 100 pics! Of course, please keep it to a reasonable quantity... only things like huge sets, full worlds, etc. should have that many pics! Remember, you can always collage several different images together into one image if you have a bunch of stuff to show off, or want to show multiple angles of an item. For the bonus photos, we recommend you use a spoiler tag to hide the images, then people can click on it to see them. Their pages will load faster if all the images aren't downloading at once. [spoiler=interior rooms]http:// wheveremypictureis/picture.jpg[/spoiler] The 'interior rooms' can be replaced by whatever grouping you want to present, 'hidden garden', 'pool views', 'master suite', 'kids room', etc. You may place as many photos within a spoiler grouping as you'd like.
|
| No pay content in screenshots |
|---|
| Do not use pay content in your screenshots! Do not use pay hair in your screenshots!
You MUST use free or EA/Maxis items in your screenshots! MTS promotes and supports free content, and using pay content in screenshots is basically like free advertisement for paysites. This includes pay content you found elsewhere for free - if it was pay originally, it's still promoting pay content. We strongly recommend taking pics with neutral backgrounds, just showing off what you've made and nothing more. Not only does this look nicer for uploads, it also eliminates any possibility that you may inadvertently include pay items in your screenshots. As per the news item of November 2010, do not use pay items in your upload. A pay item is an item that you'd have to donate money to access if you went to the original creator's website. It doesn't matter if you can get it for free through a file sharing site - it's still a pay item. Don't use pay items in your screenshots either, even if they are not included. Links for "optional" or "recommended" content may be included as long as they are free sites only. If you need free hair for a model in your pics, MTS has an extensive collection of free hairstyles in our Downloads section. You can also look in the TS2 Hair Gallery or TS3 Hair Gallery for more free hairstyles to find something you'll like. We STRONGLY recommend that you credit the hair (and other content) used in your screenshots in the text of your upload post. With hundreds of hairstyles out there, it's very difficult for our upload moderators to know every hairstyle on sight, and if we have to hunt down where the hair is from to see if it's pay or free, it may take longer for your upload to be approved. Make it easy on us and at least say something like, "Hair from XM Sims (free)" in the text of your post under a little section for model credits.
|
| Screenshot tips |
|---|
| Camera Controls:
Take some time to just play around with the camera. It can take a while to get used to the camera controls, and even once you are experienced in their use, it may be challenging to get the shot you want with the constraints on the controls. If you haven't taken many sim pictures before, here is a list of camera controls:
Using Print Screen: If you have enough RAM to run Photoshop or another graphics editing program at the same time as TS2/TS3, you may want to take screenshots yourself, without the use of a program to store them for you. To do that, simply press the Print Screen or PrntScn key on your keyboard - it's usually off toward the right, over the arrow keys, above Insert and Delete. This will copy your current screen to your Windows clipboard, as if you had selected and copied it as an image. Then open any graphics editing program, create a new document the size of your monitor's resolution, and paste into that document. Your screenshot should appear in the document.
There are many programs available, free and pay, that will take screenshots for you by using a hotkey, and save them to a folder - just like The Sims 2 with the C key, but with options for much better quality settings. A quick Google search for 'free screenshot program' will also bring up many other options, which may have other features that are of interest to you.
Many simmers struggle with getting their images to be clear, crisp and under the maximum file size while keeping the image size larger than 800px by 600px. After getting your images from the in game camera or using a print screen program you will need to resize them and compress them into a jpeg image. Many graphics programs have a built in optimizing feature. Here are a few common ones: |
Packaging Your Sim
| Born in Game Sims |
|---|
|
If you have created your sim in Create a Sim or if your sim was born in-game you will need to follow these instructions on how to extract your sim using SimPE, so they are accessible to you in Body Shop. Do that before you go any further, then come back to these instructions. |
| How to Package your Sims |
|---|
Body Shop is a utility that comes with your game, used for creating and packaging sims (among other things). You already have Body Shop on your computer. To run Body Shop, click Start - Programs - EA Games - The Sims 2 (or the newest expansion you have installed) - The Sims 2 Body Shop. If you are having trouble with Body Shop not loading, crashing when loading, or other related issues, please see: Game Help:Body Shop
If you have created your sim in Body Shop, you do not need to clone the sim. Just click Done Building Sim to save the sim how you want them.
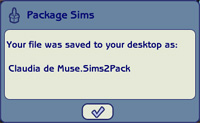
When you have your filename and text written in, click the checkbox at the bottom to Accept and save your sim as a sims2pack file. |
Credits for Included or Pictured Content
You are responsible for providing accurate descriptions, links, and credits for all pieces of custom content included with or pictured on your sim.
| Credits, Policies, and Removing Content |
|---|
|
You've got your sim packaged as a .sims2pack file, but now you need to take a look inside that .sims2pack file to see what is included. You will need to remove any content that the creator says you can't share. You will also need to collect credits and links for any content you have included in your screenshots. This is usually the most labor-intensive part of uploading sims, but if you ensure that the content you use on your sims is shareable and identifiable before you ever make the sims, it helps a lot. |
| Looking Inside the Sims2Pack |
|---|
|
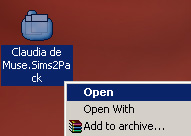
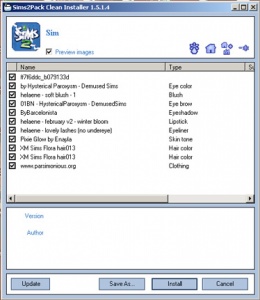
To see what's inside the sims2pack file, you'll need Clean Installer. Click here to go to the Clean Installer website, where you can download it for free. There is also a Quick Start Guide, FAQ, and Manual at the Clean Installer site to help you get started using it. Once you install Clean Installer, it should associate itself with .sims2pack files, so when you double-click on any one of them to open it, Clean Installer will come up and tell you what is inside. Go to your Desktop. You should find a new file there, with the same name that you gave your sim in Body Shop when packaging. It should have an icon like the one shown. Right-click on this file and choose Open.Clean Installer will open and you will see a list of the contents of the sims2pack file, including what tooltips are used. |
| Credits, Policies, and Removing Content |
|---|
|
You've got your sim packaged as a .sims2pack file, but now you need to take a look inside that .sims2pack file to see what is included. You will need to remove any content that the creator says you can't share. You will also need to collect credits and links for any content you have included in your screenshots. This is usually the most labor-intensive part of uploading sims, but if you ensure that the content you use on your sims is shareable and identifiable before you ever make the sims, it helps a lot. |
| Custom Content Links/Credits |
|---|
|
Now you need to:
You will be asked to provide this information in the MTS upload wizard. While the wizard does save links entered previously by other creators, some of those links may not be correct. It is your responsibility to make sure that all of the links for your upload are working and correct. Start a text file on your Desktop where you can type everything out as you locate the parts. This can be the hardest part, depending on how descriptive the original creators were in their tooltips and filenames. They are generally good clues, though. Generally it's good to start your text file by organizing it by item, so you know when you have a credit and link for each item, and then a section for any required meshes and the links to those. Then you can begin filling in each item as you find out where it came from. You can check the filename for a particular item by floating your cursor over it:
Tracking Down Custom ContentUse the tooltips and filenames to track down where you found the items originally to check the policies and provide credits and links, and in some cases, to see whether a mesh is needed. There are several ways to do this:
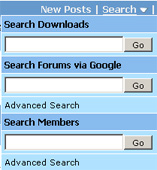
Search MTSMTS has four different search types that may be of use to you:
Content ListThe Table of Custom Contents, the Content List on the Sims2Wiki, can be extremely useful in finding content, especially if it's in a particular theme.
Where Can I Find?If all your searching fails and you can't find the item on your own, try the Where Can I Find Forums at MTS. You can search these forums, which are great resources of previously asked-for content, and if you can't find what you're looking for, you can post asking if someone knows where it came from. Give as much information as possible, like a screenshot, the tooltip, filename, and any more info you can to help people help you track it down. |
Adult Content/Nudity
We do not allow adult content at MTS - please read the following to know what constitutes adult content.
Right Info/Right Files
All the fiddly bits - description, title, putting your file into a rar or zip, etc.
Additional Stuff
- If your upload is rejected or marked as changes required and you're not sure why, ask in Creator Issues.
- If you're not sure whether your neighborhood is ready for uploading, use the Creator Feedback Forum to get feedback on it.


