Tutorials:CAS Creation From Start-To-Finish - Texturing
| CAS Creation With Daluved1: From Start-To-Finish | |
|---|---|
|
Planning | Meshing | Creating A New Package | Texturing | Finishing Up | Glossary | |
Contents |
Texturing
Now here comes the part that separates the mice from the men, and the okay creators from the awesome ones! No matter how detailed and intricate your mesh is, if your texture is lackluster, then your whole project is a bust.
Throughout this part of the guide, you will encounter various textures that need to be edited. I suggest you read through this List of Texture Types to get a feel for what each of them do.
At this time, open up CTU again. Go to File -> Open and navigate to the package you just created. If you had saved it right, when your package loads you should see *Custom next to the mesh field, and the Mesh Name as whatever you named your mesh.
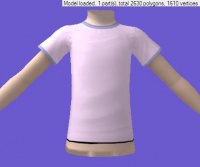
To get the 3D preview of your mesh to load, simply click on the Designs tab. You'll most likely be greeted with something like this when it first loads. Because of the adjustments we made to the mesh and UV map, part of our mesh will be missing textures. But this is easily fixed with the alpha channel of our base texture. Which is why that is naturally our next step in the creation process.
Setting the Alpha
Under the texture tab, we want to double click on the Base Texture key value. When the preview window pops up, click export on the bottom right. Give this texture a good name, and save it with your working files. This is the texture for your entire project.
Open up the file in your paint program. I'm using Photoshop's nVidia plugin, so it's just as simple as going to File -> Open to get the image into Photoshop. If you are using a different program, the import process might be slightly different.
|
If prompted, click load default sizes and do not generate MIPmaps. MIPmaps are essentially increasingly smaller versions of your texture that the game caches in order to more quickly render your object at different distances. When we get ready to save our final texture, our paint program will automatically generate these for us. |
Cover Me Up!
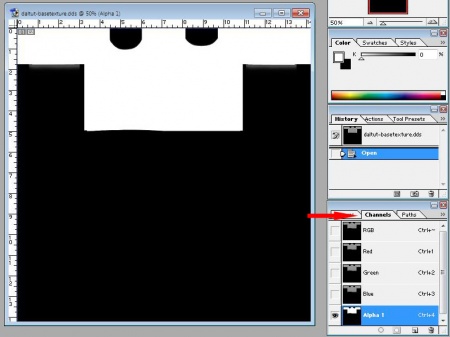
In your paint program, make the channels visible for editing. In Photoshop, you simply click on the channels tab and select the alpha channel at the bottom.The alpha channel of our DDS texture controls the visibility of the texture on our mesh. The parts that are black denote areas that are without texture. Generally, these areas are where skin is supposed to show.
It is vice versa for white areas; they block out the areas where our texture will show up. Since the bottom of our shirt mesh is lacking texture, we will have to pull down the bottom of our alpha channel a bit.
It's really as easy as it sounds, simply fuzzy select (with the marquee tool) the bottom of the alpha channel and move it down a few notches with the arrow key. Be sure to go back and fill in any gaps created by moving the bottom down.
To test and see if we pulled our alpha down enough, we can save our changes and preview them in CTU.
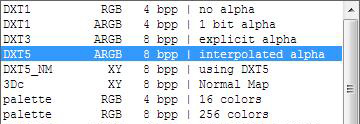
Go to File -> Save and select DDS from the file types list. You may be presented with a long list of compression types. With base textures, we want to save them as DXT5 (interpolated alpha). Once you select this compression, hit okay.
In CTU, right click on the Base Texture key and replace the image it with you new texture. Press commit at the bottom of the window, and you should see your textures reload on the 3D model.
If you nailed it the first time, the stomach of the mesh should be covered. If not, play around with this step until it is. However, be careful not to but the bottom of the alpha down too far because you might have issues with overlapping textures later.
I also want to change up the collar of the shirt to something a little more girly. So, I'm going to alter that part of the alpha a bit.
Setting Transparency
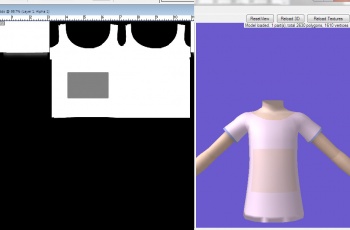
You are not limited to just solid chunks of black and white on your alpha, you can also add transparency to your clothing. I'm not going to incorporate this element into the design of my shirt, but I can show you how it is done.Shades of grey between RGB values 151/151/151 - 149/149/149 will add a translucent affect to the texture. That is, the darker the grey the more transparent, and vice versa. Notice how the large square of grey on the alpha channel creates a transparent splotch on my shirt. In game, the whatever skin (default or non-default) you have set for the sim will show underneath.
Keep in mind that making something transparent does not mean that the mesh is transparent. What is meant by that is, you can't take a meshed on sleeve and make it transparent. The sleeve will still be meshed on, and you will be left with a 3D sleeve covered with skin.
Of course, if you're working with alpha meshes then you would handle those differently. But, there is only one of those out there for TS3 and it's rarely used.
|
151/151/151 is more opaque whereas 149/149/149 is the most transparent. |
Base Texturing
This step is really up to you and how you wish to texture your mesh. To add details to your texture, you simply hide your alpha channel and work on the combined RGB channel. For a more in depth look at base texturing, read Creating A New Base Texture. Unfortunately, there is no one guide to truly tell you how to texture, you just have to sort of learn on your own.Never fear, here is a list of some "tool box tutorials" that can be used to guide you. These tutorial relate to clothing, but are specific techniques, tools, and tips helpful to beginners and more experienced skinners alike, for trying something specific. Some of these tutorials may be written for Sims 2; however the same techniques can be used in Sims 3.
This is just a small sample of the tutorials available for creators. The Sims 3 fansite My Sims 3 Blog has a nice list of tutorials on their left sidebar.
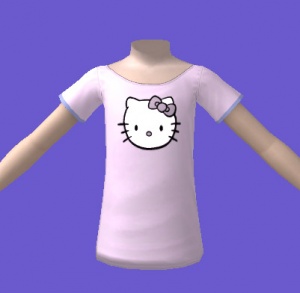
After a little fiddling in Photoshop, this is what I've come up with so far. Notice I have my cleaned Hello Kitty image on the shirt, and that it has been desaturated of color.
|
As a word to the wise, keep each element of your texture as a different layer. For example, the collar hem of the shirt is on it's own channel in Photoshop, as well as the Hello Kitty image. Having everything separated will make it much easier to quickly tweak parts of the texture without affecting others. It'll also make mask and overly/stencil creations much less painless. You should also save all of your work as an editable .psd file (if using Photoshop), or the equivalent save file format for Gimp or Paint.NET. Saving your progress in these "workable" formats preserves your layers, possible opacity changes and sometimes edit histories even after you close the file. |
Overlays
The next step is to set up my overlay. But, wait! What's the difference between these and stencils?
Stencils vs. Overlays
The CTU has the capacity to use both stencils and overlays. Both of these CAS files create a non-recolorable design on your clothing. Stencils conform to the alpha of the base texture, whereas overlays don't. This means, that you can add a necklace over a shirt with an overlay, but not with a stencil.
You'll find that creators use stencils for designs that need to easily be mix-n-matched. For example, Soccer Jerseys, that require multiple decals, are a good candidate for stencils because you can create a "stencil pool" for easy application combinations.
Even though they serve a purpose, stencils are hardly ever used; overlays are really the way to go. I'm going to make some of the elements of Hello Kitty into an overlay, but if you are interested in how to make stencils, read this tutorial.
Show me how!
First and foremost, save your progress! We are about to make changes to the alpha channel of our base texture, so it may be best to go ahead and Save As a copy of your .psd file (or however your working file is currently saved).
After you have saved your files, delete the current alpha channel on the shirt. Once again, be sure that you have saved your previous progress somewhere before.Return to the layer containing Hello Kitty and delete any parts of her that will not be part of the overlay. Since we only want the black outline of Hello Kitty and her nose as the overlay, I'm going to remove her face coloring and the insides of the bow. This is most easily done with the Magic Wand (fuzzy select tool). Set the tolerance (threshold) between 20 - 50, and turn Anti-Aliasing on as well as Contiguous.
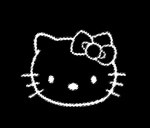
When done, hold down the CTRL key and then click on the layer containing the outline. You should see a fuzzy marquee around the outline. Next simply go to channels tab and create a new alpha channel. Make sure that your fill color is set to pure white, and then hit ALT + Delete. This should fill in the selection with white.
If all goes right, then your alpha channel should look like the one to the left.
Go back and fill in the color of Hello Kitty and export this as a new DDS file in DXT3 or DXT5 compression. Give it a good name, such as shirtoverlay.dds for easy retrieval.
Import your new overlay into CTU and check out your progress!
Mask
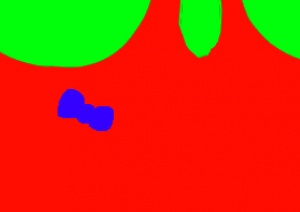
Next up is creating the RGB Mask for the shirt. Our goal is to have the shirt recolor, along with Hello Kitty's bow and the sleeve/collar trim. But, what is a mask? A RGB mask is what maps out what pieces of the CAS item recolor together, and also in some cases, how they recolor (transparency/overlapping).How do I make one?
In order to preserve my poor fingers - and because I've already written this tutorial - I'm going to direct you to Basic Mask Editing to explain how to create your mask. You can use the techniques presented there to create your mask. Also, using the "cut out" method demonstrated with creating the overlay, creating your mask should take a few seconds tops.
RYMA vs. RGBA
The tutorial that was linked to uses Red, Yellow and Magenta (plus the alpha channel if needed) to create the mask. However, you may also use pure Red, Green and Blue to map out your channels as well.
RYMA layouts are best left for most clothing because the channels will overlap, insuring full coverage of the texture. However, if you are creating something that has separate definitive parts (like a full body outfit with pants and a shirt) or a small object or detail, the RGBA layout is a little better.
I have personally found that using pure RGBA to create masks preserves the texture better when in game. The texture tends to be less blurry, and there is a lot less bleeding in game. Test out both ways to decide which one you like best.
Proper Specular
Part Mask
Linking Textures
Separate tutorial!!
