Tutorial:Creating Default Replacements with CTU
| Tutorials by Category | |
|---|---|
|
CAS | Patterns | Objects | Building | Worlds | Modding | Modding Reference |
Contents |
Overview
Natively - that is, on its own - CTU doesn't support the creation of default replacement items. However, it's quite simple (although maybe not always easy) to work around this, and obviously the ability to create default replacements unlocks a lot of options in modding.
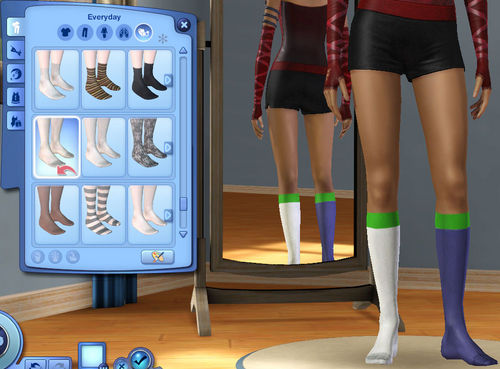
For the purposes of this example, I am going to replace the mask of the EA kneehigh socks for women, to give them three channels (one for each sock plus one for the cuffs) rather than two (one for both socks and one for both cuffs).
This is not a tutorial on creating clothing, accessories, or anything else. This tutorial assumes you have a basic understanding of how to use CTU already. If you're totally new to CTU, then I suggest you check out the CAS beginner tutorials.
What You Will Need
Creating Default Replacements
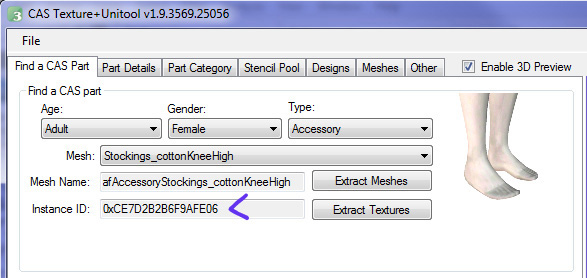
1. Open CTU, and find the item you want to replace. For this example, I am using afAccessoryStockings_cottonKneeHigh. Once you've found your item, take note of the Instance ID - we'll need this shortly.
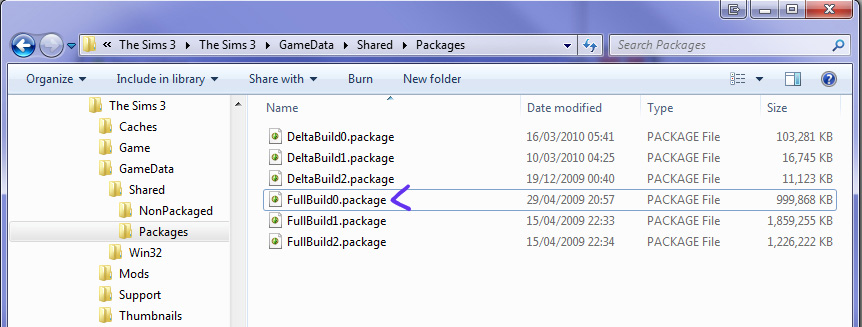
2. Navigate to your Sims 3 install directory, and open GameData/Shared/Packages. You should see three files named FullBuildx.package; and, depending on your patch version, three called DeltaBuildx.package. FullBuild0.package is the one we're interested in.
Make a backup copy of FullBuild0.package. If you accidentally change something in S3PE, as unlikely as that is, you will need to restore the backup copy of FullBuild0.package.
Now open FullBuild0.package in S3PE. It will probably take a while to load, and S3PE may look like it's crashed - just be patient; FullBuild0 is a big file. Once S3PE has finished loading, you'll see a huge list of resources. This is where the Instance ID from CTU comes in handy.
3. At the bottom of the S3PE window, you should see a variety of boxes and buttons. These will allow us to filter what S3PE shows us, so we can find the resource we need much more quickly than otherwise.
- I. Copy and paste the Instance ID from CTU into the Instance box, and tick the checkbox beside it.
- II. Click Set - this should copy the Instance from the box to the one underneath it.
- III. Tick the Filter Active box.
4. Again, it may take S3PE a little while to sort through everything - just be patient. When it's done, you should see only a handful of resources left. For the socks, these are a CASP resource and an _XML resource. If you see more resources, that's fine - just find the CASP resource with the same name as the mesh (you can see the mesh name in CTU, above the instance).
The CASP resource is the "core" of a CASPart file - it tells the game where to look for meshes, textures, morphs, and everything else. The reason we can make a file with just a CASP resource in this case is that the game already has all the textures and meshes and so on stored in FullBuild0.package and DeltaBuild0.package, so the CASP resource just has to point to the right place.
Our default replacement works by changing which files the CASP points to. In my example, the CASP resource will still point to the original game base texture, mesh, overlay, and everything else; except for the mask, which we'll replace with our own. Because we haven't changed the Instance ID of the CASP, it will override the game's CASP for the socks, and so the game will use our mask instead of its own.
Right-click the CASP resource, and pick Export -> To package. Save your package somewhere.
5. Now open your newly created package file in CTU, and edit as you would normally. In my case, I'll replace the mask for each design with my own - remembering to enable pattern C for all designs as I go.
If you just want to follow this tutorial as a test or a proof of concept, you can download and use my mask, here.
Once you've finished editing, save the file. It's time to test.
Et voila:
If all has gone well, you now have a working default replacement package. Remember that the thumbnails in CAS won't update until you delete the CASThumbnails.package in My Documents/Electronic Arts/The Sims 3/Thumbnails; and if you've made a texture change, the change won't show up on existing sims until you delete the simCompositorCache.package in My Docs/Electronic Arts/The Sims 3. This goes for anyone who downloads your replacement too.
Questions? Problems?
Feel free to post questions, problems, and suggestions here
| Tutorials by Category | |
|---|---|
|
CAS | Patterns | Objects | Building | Worlds | Modding | Modding Reference |


