Tutorials:Simple Meshing for 3D Studio Max Part 1
| Tutorials by Category | |
|---|---|
|
CAS | Patterns | Objects | Building | Worlds | Modding | Modding Reference |
|
Simple Meshing 3D Studio Max.
Learning Curve:
- Creating simple objects in 3D Studio Max.
- Mapping simple objects in 3D Studio Max.
- Importing from and Exporting to MilkShape 3D.
Things you need to read:
- Guides on how to use s3oc/s3pe and/or TSRW, located around various The Sims modding sites (wiki's).
- Few basic tutorials from 3D Studio Max would not hurt either, even though I explain almost everything these tutorials can learn you even more.
Overview:
I wanted to write this guide to show you how much you can do with 3D Studio Max, this program you can easily get lost in the nearly limitless options. This guide will cover a few simple ways of creating an object, these are the simple ground layers used to creating more complex Meshes and Textures. Since this is a guide on Simple meshing, UV mapping and textures are also in this format. For more detailed guides on this move on to part 2 or even 3 of this guide.
+ Part 2 & 3 are still in the making and will be posted as soon as they are done +
The way an object is created in this guide is similar to other guides i found on other modeling programs, even in more complex 3D art scenes this is still a very much used way to shape and mold object into 3D scene's. 3D Studio Max is capable of much more then this as you may notice during this guide, and these will be explained on simple object in the next guides.
For the duration of these guides I am using 3D Studio Max 2013, but can also apply for the larger parts to lower version of 3Ds Max.
Creating a reference Scene.
The Sims uses objects in a certain scale, in order to make sure our objects are in the same scale we want to get an exported object into our 3Ds Max. In order to do so you must have read up on the guides from the programs you downloaded to export and import objects into The Sims 3. All you need to do is get an object that is more or less similar to what you want to model, we are going to use the same table as most starting tutorials, the infamous "TableEndClub".
Importing from MilkShape 3D:
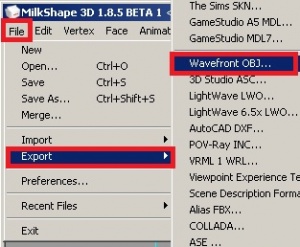
The settings are rather simple for this, first of all you don’t need any extra tools for this to work all export option are already included in Milkshape 3D and 3Ds Max. When you have the object loaded into Milkshape 3D you simple do the following: “File -> Export -> Wavefront OBJ…” and save it to your work folder named something like “Cloned_low_Detail_Mesh”.
- Hint you can also export\import other formats exporting from and to Milkshape, I suggest playing around with it a little bit. I found .OBJ to be the cleanest format though, some other formats may export more scene related things.
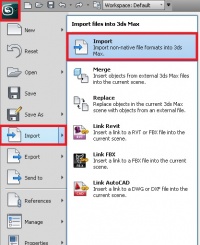
Now for the import part to create our reference scene, this is very easy in 3Ds Max go to the top left button with the 3Ds max sign on it (it’s the same menu as file in Milkshape). There select “Import -> Import”, now in the next menu navigate to the work folder and select you exported files (this file should just show up as “All Formats” is on by default, if not select the drop down menu of “Files of Type:” and select either the “.OBJ” format or “All Formats” option).
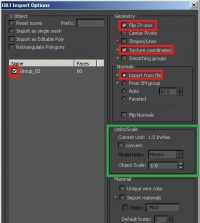
When proceeding you get a new screen with all kind of options you can select, these settings make up what you import to 3Ds Max. We need to pay attention to this screen for a minute to make sure we select all the right options.
On the picture I highlighted all options that need to be checked, keep in mind that leaving other switches on might create another end result than we have in this guide.
We want to flip ZY-axis, this is a common setting used for exporting/importing to/from Poser like programs, not checking this may result in a flipped object that you need to rotated to get correct again.
We also want to import Texture coordinates and Normals (Import from file).
- Hint A small word of warning though before we move on, this concerns scaling in 3Ds Max, and can make things very complicated if you don’t know how to scale. We are not going to scale the imported objects as I know what I am doing, and I don’t always need to see the end result in 3D up close. The unit conversion from The Sims 3 to 3Ds Max is rather harsh by default, and if not scaled the object can’t be viewed up close in 3D very well. If you want to use scaled objects try playing around with the “Unit/Scale” settings on the “OBJ Import Options”, and keep checking in Milkshape how it turns out against the reference size object there.
Now we are basically done already, you can look around a little bit now to make sure your import has worked out correctly.
You need to see a solid object now in your perspective viewport (bottom right by default).
Saving you first Project as a reference Scene:
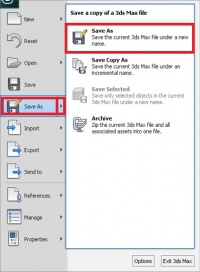
The next step is fairly easy, and is very much needed so you can load this scene with in a single click and don’t need to import things again. To do this go to the 3Ds Max icon on the top left corner of the program and select "Save As -> Save As”. Then navigate to your work folder and give it a common name.
Repeat these steps for all Exported meshes you want to replace, so when you are working on something you can always start again from this point if needed.
Making an Model.
Making a model is our next step; we are going to make a simple model that is more or less the same as the object we imported. We will only make a low-detail one, as the high-detail one is simply the same model but then with added detail levels.
Before you start to model you always need to figure out which details you want to go into what model, and which you want molded into your textures. I usually just make flat surfaces on low-detail models, at the most i do raised areas when i want a second level of detail. If this doesn't make any sense to you at this point, don't worry about it.
For now we don’t need much detail for doing a low-detail model, so start by loading your low-detail scene so we have a object to scale to. You can directly save this scene under a new name like “Modeling_New_end_Table” if you want, this creates an extra fail save.
Creating Simple Objects
Simple objects can form the basis of many models, making one or more objects collide into each other can make a whole other object then the primitive basic one was. This is the most used way of modeling to get object made in a quick workflow, but it’s not the most perfect way of making objects.
The simple objects often have overlapping areas as the objects are hanging inside each other. For the end result this does not really matter, as you won’t see these overlapping areas.
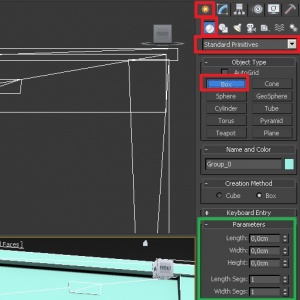
In 3Ds Max these objects are called “Standard Primitives” and can be found on the right hand tool bar if you dint change the 3Ds Max layout.
We are going to start out by using a box to replicated an evenly sized table top, simply select the option “Box” to start making one.
You will directly see a parameters box pop up and some other options, we won’t be using these but you can experiment with it for your own use.
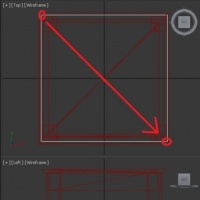
You can now click in an active view port to create your box around 2 axis’s, after doing the 2 axis you will be able to set a 3rd created the 3D aspect of the object.
- Hint Objects are created around the Length and Width axis first, regardless of witch viewport you use to make the object in. Keep this in mind when making an object if you intend to use the "Parameters" tab to edit your box after placing it.
Drag it to any height you want (moving the mouse up and down looking at the perspective viewport), just make sure the width and length are the same as I did more or less. It should be more or less the same size as the object we imported.
To clear the box creation mode right click in the active viewport.
Now we are going to move our box to the right position, and then scale it to size a bit more were needed.
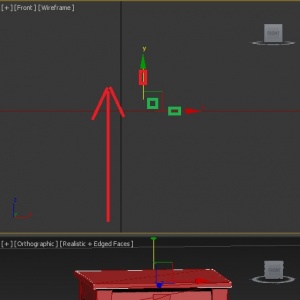
Use the front viewport to select your box if it’s not already selected, pressing the key “W” makes the move tool active so you can move the box in that front viewport up to the top of the table we have as reference.
As you can see I totally zoomed in to make the finally move on top of the bottom line of the reference table top
- Hint You can also select lines, points and other geometry to move something, just hover over it until your mouse icon changes to 4 arrows. To change the axis constrain press “F8”, although sometimes you need to press it twice to get the correct direction, this way can be faster than finding the tool around the object its control point.
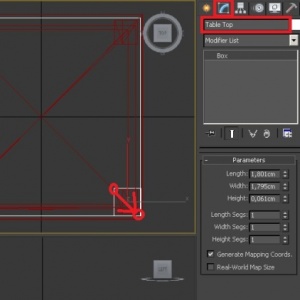
Now we will fine tune the table top later on, we first need to rename it and create the legs and other detail first. Go to the edit model toolbar and enter the name “Table Top” as shown, after this go back to making a box and create a box around a leg of the reference object like you did with the table top, this time to match the height as much as possible as well. Start working from the top viewport and use the perspective view as a reference view don’t worry about moving outside of the top of the screen for the height the mouse button will appear on the bottom again as soon as you scroll out.
Repeat this action until you have all 4 legs and the use the move tool to fine tune the left position over the reference model.
Or you can select you first leg, and press the “Shift” key while dragging it across the screen to another leg.
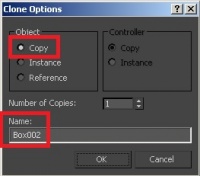
Once you release the mouse button a “Clone Option” menu will pop up, in this menu you need to select the “Copy” to object function and name the object “leg_2”.
Rename the one leg you haven’t renamed yet if you cloned them all, or rename them all if you made separate boxes. Then quickly scale them a little bit if needed and also move them a bit. For scaling use the “Tools -> Scale” menu, it works the same as the move tool. Or find the button on the top tool bar 2 icons over from the move tool to the right.
You can see now we already create a large portion of the table in a matter of seconds (if you don’t count the reading part, in my case writing ….).
I don’t want a center piece like this table with a drawer in it, i want to have 3 boards spread from bottom to top instead. To get this done we are going to start by making a box that is going to make up the same size later as the bottom board the reference object has.
You should be able to do this without help from here on out, so I’m going more into the creating 3 boards out of the one board. You just learned how to drag clone an object making the legs this time we are going to use another tool to make all the copy’s at once at the place we want them to be.
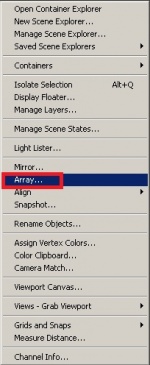
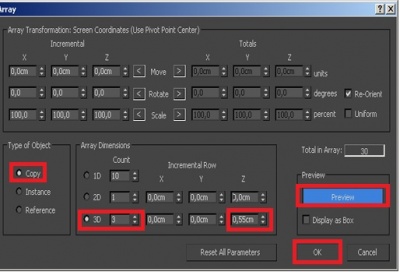
Create, scale and move a box to form the bottom board and call it “Board”, then use the “Tools -> Array” tool and see the new configuration window pop up.
Again select the “Copy” option and now let’s duplicate this thing around an axis for a set amount of centimeters (in my case). Click the “3D Array Dimensions” and enter a count of 3 then set a value of “0,55” on the Z–Axis, now click "Preview" and watch what happens. If you like what you see click “Ok” if not fine tune it to your taste and click “Ok”.
Now that we have the object we want we can start grouping and fine-tuning the scaling where needed.
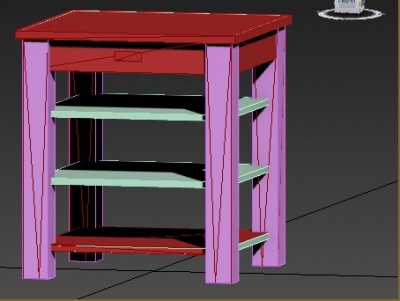
If you did it all correct you will get the following preview in your perspective view.
Colors may vary, as they are generated randomly when making objects.
Grouping simple objects:
