Sims 3 Lots
Introduction
So you want to share your lot that you've slaved over building and decorating for all to bask in your greatness? It's easy to do as long as you comply with all the necessary requirements. The less guesswork, the better! Please take the time to read through these guidelines as some key items have changed and may affect your upload. Pay close attention to what is required, and your upload will spend less time in the moderation queue and the more likely it is to get approved. Thanks!
Creating your Lot
Quality
|
|
Does your lot look nice? Does it have a good flow to it? Is the way it's laid out attractive, interesting, and enjoyable to look at?
Tip: Using Create a style-tool in TS3 can have a tremendous effect on how your lot will look. Please explore the possibilities of this tool. Selecting the patterns and colors yourself instead of using EA-made presets creates much more unique, and often better looking results.
A small tutorial here.
|
Playability
|
|
Is your lot going to be good to play with? Does it have a good layout that won't have sims stomping and complaining every few seconds? Strive to make lots that are not only nice to look at, but actually good to play with.
- Remember that while a lot may look big and grand, it may be extremely frustrating to players that a sim will spend two sim hours hiking from the front door to the kitchen just to make a sandwich.
- Even in very small houses you should try to avoid making corridors only one tile wide - sims will get stuck all too easily. Make sure that there's enough space for sims to pass by each other where there's going to be a lot of traffic. Make sure that objects your sims will need are actually useable: double beds for example must be accessible from both sides - sims can't climb over each other.
- Also, it can be annoying when big items like fireplaces or pianos get in the view of the player - playtest your lot to see how it works, both for you and the sims.
Exceptions to this are lots that are not meant to be played with - mazes, lots designed primarily as decoration for neighborhoods, and movie or picture sets.
|
Uploading your Lot
Packaging your Lot
|
|
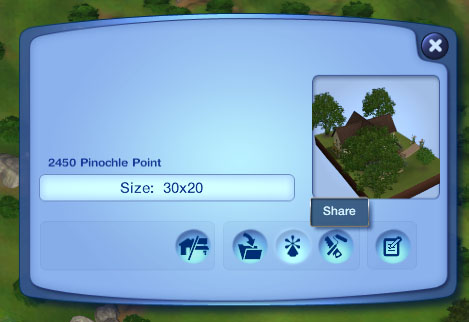
Once you have finished building your lot in the game, you will need to save it and then Edit Town to return to the neighborhood. From there select your lot and click the Share button on the lot panel.
Enter the lot name and description on the next screen, and then click the checkmark. When it's done, you'll have a new .sims3pack file on your computer.
Lots are saved to the Exports folder, which is located in My Documents\Electronic Arts\The Sims 3\Exports
|
Packaging Lots with no custom content
|
|
Installed sims3packs will package with your lot but package files do not do this. Some creators do not allow inclusion of cc in lots so you need to remove it when packaging.
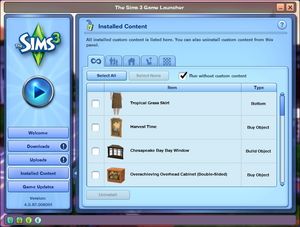
- Start Launcher
- Tick box "Run without custom content"
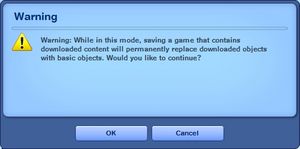
- Take note of the warning. You are just going to the neighborhood to package the lot - you do not want to enter the lot.
- Select the lot
- Click Share in Lot panel
|
Title and description
|
|
It's important that you include certain information so that players know what to expect when they use your creation!
The following information should be in the text description for your upload.
Title
You probably already have a name for your lot - it makes a good title for your upload.
Description
You need to write a decent description for your upload. You don't have to write a novel here, just at least a few sentences about your lot. It's nice to let people know you've put some careful thought into your creation. If your English is not good, you can ask for help writing a description in Creator Feedback.
|
Screenshots
|
|
The screenshots you take will show off the world you have made and allow people to see what they're downloading. Take some nice big (800+ pixels-ish on the smallest side is a good size to aim for), clear pictures to entice downloaders into using your lovely new creation.
Do not apply filters like sharpen, contrast, etc. to the required pictures, as downloaders want to see what your creation will look like in their game, not your skills at using Photoshop.
You will need to include at least:
|
Credits and Links for Included and Pictured Content
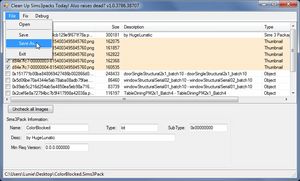
Before uploading your lots please scan it with CUSTARD. Content that is installed from sims3packs will package with lots, and some patterns will package even if you didn't use them on the lot. Note: Presets of EA patterns do NOT package with lots.
| Remove Custom Content with CUSTARD (*)
|
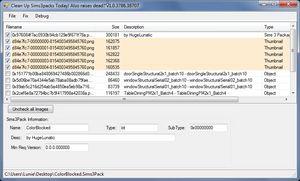
- Download Custard
- Open Sims3pack
- Untick cc you don't want to include
- File Save As...
|
| Content that CAN be Included
|
|
You may include items of the following types with your upload:
- Free, Redistributable Content: If a creator says that you may include their items in uploads, and the item is a free download, you are welcome to include that item in your upload on MTS. For a quick list of policies for a lot of major sites, see: Creator Policies
- Content You Have Made Yourself: If you have made content yourself that you have used, you certainly may include that item as well. If it is a new mesh you need to include all of the regular information in the text of your post (poly counts, where it shows in the catalog, etc.) you would expect for a new mesh.
- Terrain Paints (TS2): Do NOT remove any terrain paints from your sims2pack. This is the one exception to the non-redistributable policies/pay/must provide credit rules. If you remove terrain paints from a lot it can cause it to crash for downloaders. Due to this, all terrain paint creators should expect their content to be included no matter what. Please provide a link and credit for these items whenever possible, but if a terrain paint is not clearly marked with a creator's name/website, you may still include it and it will not be grounds for rejection.
If your upload contains custom content, you MUST include a LINK and CREDIT for EACH and EVERY custom content file included in the upload.
When uploading to MTS, the custom content wizard will require that you indicate the creator of each item, enter a description, and provide a link to the creator's site, profile, or original upload thread. The beauty of this system is that once somebody has entered that info for an item (or if it was uploaded to MTS originally), nobody else has do that again - it automatically gets added as credit from that point on. You are, however, responsible for making sure the links and credits are correct, even if the custom content wizard fills in the wrong information (perhaps because someone before you has entered the wrong info).
Please link to the creator's site if they have a site of their own, or if the creator posts at a forum site, link to the original upload thread or the creator's profile. You may NOT link to "ModtheSims" for items uploaded at MTS - you need to provide a more direct link to the actual creator.
We must all show the utmost respect for the people who create our content for us. Providing a simple credit and link is the least we can do to show our appreciation for being allowed to include someone else's work in our files. Nobody wants their work stolen, used without permission, or used without being credited.
Keep in mind that if your upload contains an item that someone else made, and that artist does not want their work to be redistributed, your upload will be removed at their request. You would be allowed to upload a new version that does not contain their content. For a quick list of policies for a lot of major sites (including an easy reference on ones that freely allow including their content), see: Creator Policies
|
| Content that CANNOT be Included
|
|
Please use CUSTARD/Clean Installer to remove all items of the below types from your file before uploading.
- Pay Items: As per the news item of November 2010, do not use pay items in your upload. A pay item is an item that you'd have to donate money to access if you went to the original creator's website. It doesn't matter if you can get it for free through a file sharing site - it's still a pay item. Don't use pay items in your screenshots either, even if they are not included. Links for "optional" or "recommended" content may be included as long as they are free sites only.
- You can use free items at TSR in MTS uploads. Any pay items - that is, ANY items by "Featured Artists" (FAs) at TSR cannot be used as their pay/free status does still change. Items by regular creators and "Select Artists" (SAs) CAN be used.
- Please also be aware that if, when uploading a sim, house, world, etc., where the custom content pictured is required, and you use an item by a creator at TSR... If that creator of the item you used becomes a Featured Artist (and thus, their work becomes pay), your upload may be tagged (hidden from public view). You will then need to switch the item to one that will stay free all the time. This doesn't apply to non-required items (hair shown in a picture where you're uploading clothing) though. If you don't like this possibility, please choose a different item to use in your sim, lot, and world uploads.
- Non-Redistributable Content: Even if an item is free, certain creators do not want their content to be included in uploads. This may be due to the content being experimental, problematic, or requiring additional instruction, or they may simply not wish to have their content distributed that way. It is your responsibility to check the policies of every creator whose content you use to see if it may be included. Items that are not clearly labeled as redistributable are not allowed - if you get special permission from the creator for such an item, please state it in the text of your post.
- If you cannot include an item, you may link to it in your post as "Required but Not Included" - if you remove it from your sims2pack file and then downloaders follow your link and install it themselves, it will show up properly on your lot. For more information on this topic, please read the Content Required But Not Included section found below.
- Items You Cannot Credit/Link: All items included with your upload must be properly credited. If you don't know where something came from, use something else.
- If you cannot remember where you got an item, try asking at our Where Can I Find? Forum to see if anyone knows where it is from - make sure to provide a picture and a description so people can help you track it down.
- If you still cannot find where it was from, you need to remove it from your upload. After doing this, please verify that it is not an item that is required for your upload to look right: temporarily cut and paste your Downloads folder elsewhere and see what your upload looks like in-game - some custom content will revert to the EA/Maxis item it's cloned from when the actual item is missing, some will just be entirely gone.
- Try replacing the missing item with something else - a Maxis item or something you can include -, and in any case re-take your screenshots.
- Please see the note under "Content that CAN be Included" under "Terrain Paints" for the exception to this rule!
- EA Store Content: All content by EA cannot be included in uploads. Please list it as Required but not included with a link, or as Recommended but not included with a link.
- Hacks: Uploads containing hacks are not accepted. Most Sims players do not realize that lots can contain hacks. Usually they are meant for just one game version and can cause problems if users have later expansions that the hack(s) are incompatible with. Users also usually do not want hacks they did not mean to download as they can change major elements of game play in undesired ways.
- Careers: Uploads containing careers are not accepted. They can cause similar problems to hacks due to incompatibility, and users generally want to download only the careers they want - not ones you happened to pack along with your upload.
- Sims: Lots containing sims are not accepted. If your lot has a family in it, please remove it with Clean Installer. Most people don't want to download a lot that is infested with someone else's sims, and there's actually a lot of problems that can come along with downloading other people's sims if they have not had their memories cleaned properly before packaging. If people want to download sims, they can download them separately.
- Redundant Recolours: If you scan your lot with Clean Installer and find that it has 50 recolors for the same item, remove the recolors that are not used. When you use other people's custom content, remember that you are literally borrowing it from them. Don't borrow 50 recolors when you're only actually using one. There's also no need to give someone tons more files than they need to fill up their Downloads folders - they can do that just fine on their own.
|
| Clean Lots
|
| It's sometimes easier if people choose to upload clean lots. A clean lot, simply, is a lot with no custom content whatsoever – or a bare minimum of custom content.
Why upload a clean lot?
- If you only use a small amount of custom content, it's no problem if you can't include it for some reason – a short shopping list will still be easy for downloaders to follow.
- If the content you have used is very popular – stuff from Holy Simoly or MaryLou for example –, it is often easier to just list it as "Required but not included" for those few who don't already have it.
- If you are on a Mac or cannot use CUSTARD/Clean Installer for some other reason, using only EA/Maxis content makes your life a lot easier – then you don't need to worry about unshareable/unwanted custom content in your lots.
- Many users prefer clean lots as they like to remodel/redecorate houses with their own selection of custom content. They prefer a nice, well-built clean slate that they can customize, rather a bunch of random custom content that they aren't going to use anyway.
- Files with no custom content are small, so it's quicker for you to upload and quicker for people to download.
- It's a lot easier on you in uploading – you don't have to check a ton of policies and track down links for everything.
- It's a lot easier on the staff that moderate house uploads – it takes a lot of time to check all the content links and policies and stuff on included content, and houses with little to no custom content often get approved quicker as a result.
To create a clean lot, use CUSTARD(TS3)/Clean Installer(TS2) to rid your finished lot of all custom content (except terrain paints1.) Or you can simply remove your Downloads folder before you start building, and use only EA/Maxis items – this will also make your game load a lot quicker, and the catalogue easier to browse.
- [1] TS2 Only. See "Content that CAN be Included: Terrain Paints"
|
Uploading
Once you have your creation made and screenshots taken, you need to make sure you have the correct files and information ready to do your upload.
| Zip, Rar, or 7z
|
| To upload your file(s) to MTS, you will need to compress them into an archive file, which makes them smaller and allows you to include many files in one download. The archive file formats we currently accept are .zip, .rar, and .7z.
For instructions on compressing your files into an archive, please see: Creator Guidelines: Creating Archive Files.
- Do not include multiple archives with the same contents - that is, please don't put your files in both a .zip as well as a .rar because some people only want .zip files. Choose one format.
- Do not double-compress your files... a .rar file inside another .rar file (or any other archive inside another) doesn't compress it anymore, and it makes it so we can't see the contents without downloading, and also just makes an extra step for the people downloading.
- The file size limit on MTS is 50 mb. If you exceed this limit you will need to split your archives. This should probably never come up except for large worlds for The Sims 3, or huge sets of smaller items.
|
| Good title
|
| You'll need a good title for your upload which describes what it is, and interests people in downloading it.
Good titles:
- Mission-Style Living-Room Set
- 10 Simmer Way (Large family home)
- Fluffy Party Dresses
Bad titles:
- My First Upload!
- Lipstick
|
| Good description
|
| In the main text of your upload, you'll need to write a good description of what you have made. The description must be about what you have made - what it is, what its features are, etc... You don't have to write a novel here, just a few sentences to get people interested. Please make sure this description is in English, don't over-use smileys/emoticons, and if necessary, run it through spellcheck and proofread for typos.
Good descriptions:
- This is an edit of the Mission furniture without the silly wooden armrest which makes this lovely set more versatile and suitable for any Arts & Crafts or Mission style home.
- Here are five dresses perfect for a special occasion. Each is different, with special details, and they come in blue, purple, pink, white, and green.
- This is a sim of actress Angelina Jolie, famous for her roles in Girl Interrupted and Tomb Raider.
Bad descriptions:
- This is my first upload... I don't know what to put here...
- My English is bad... just look at the pictures
- I really liked this dress so I made a sim to wear it!! I hope you like her!
|
| Lot Size (*)
|
| Please include the lot size in your upload description. You can find this on the lot info panel under Edit Town. While lots can be moved to larger plots, they cannot be moved to smaller ones, so this is important.
|
| Lot Price (*)
|
Please include the lot price in your upload description - both the furnished and unfurnished. You'll see this at the top left of the screen when in build mode.
- Starters must be under §16,500 furnished (+§2,000 each additional sim in family)
|
| Furnished Lots (*)
|
| Since the game has given the player the ability to purchase a lot furnished or unfurnished, please furnish all residential lots for Sims 3. It doesn't need to be fully decorated. But please include all the basic furnishings for survival: Kitchen, living room, bathroom and bedroom. Do NOT include a furnished and unfurnished version.
|
| Content Required But Not Included
|
| When you went through all of the custom content which is required for your uplaod, you may have found some items which you could not include and had to remove them.
For these items, you can make a "shopping list" for downloaders. Create a section in the text of your post, starting in bold, saying, "Content Required But Not Included" and then list each item which you had to remove, along with a credit and a link to the exact page where it may be found.
- Take care not to hotlink the necessary file as this drains the other site’s bandwidth.
In the event that this exact page cannot be linked to (i.e., site policy, JAVA difficulties, etc.), please link to the desired site’s home page and then provide adequate instructions to direct players to the necessary file. For example: ExampleSimSite.com > Downloads > Bedroom > Pink Fusion Set
That way, the download can get those items separately. If they download them separately and get your upload which was packaged with those items included, then the removed items will show up properly when people install it.
|
| Game Version & EPs/SPs (*)
|
In TS3 lots can be installed regardless of the expansions (EPs) or stuff packs (SPs) it was built with, as long as the downloader has the same patch version or greater. EP/SP specific content will just leave empty spaces. If you've used a considerable amount of content from an EP/SP you must list it as being required. Please list the base game version that the lot was built with. Finding Game Version
- If you would like to create lots which require only the expansion packs actually needed for the features you build you can use johna's AnyGameStarter.
|
| Upload in sets
|
| If you have created several items in a set, or similar items in the same sort of theme at the same time, please upload these together in a single set, all on one thread (instead of all separately, one by one, on different threads). This is easier for everyone: on our upload moderators, as they only have one thread to review rather than several... on you, as submitting a single thread is much quicker and easier than several... and on downloaders, as they can get everything they want all in one place rather than having to hunt around.
If you are doing a huge set, you can always break the set up into pieces, posting more screenshots along with the downloads as comments in the thread, as is done here and here. To do that, create a new thread in the Creator Issues Forum and arrange your thread there, using the first post as an introduction, and attach your uploads and images to subsequent posts in the thread. When you're done, PM a moderator to have it moved to the upload queue. For more information, read the message that displays when you go to post in Creator Issues.
|
Additional Stuff
- If your upload is rejected or marked as changes required and you're not sure why, ask in Creator Issues.
- If you're not sure whether your lots are ready for uploading, use the Creator Feedback Forum to get feedback on it.
