Difference between revisions of "Sims 3:Basic Face Overlays"
| Line 1: | Line 1: | ||
| − | UNDER CONSTRUCTION Y'ALL :D | + | <font size="6">UNDER CONSTRUCTION Y'ALL :D</font> |
==Face Overlays== | ==Face Overlays== | ||
| − | Face overlays are the common denominator to...well...all things face related in TS3. Using face overlays you can make: | + | Face overlays are the common denominator to...well...all things face related in TS3. Using face overlays and the Cas Texture + Unitool (CTU), you can make: |
[[Image:Sivlips.jpg|thumb|right|300px|3 Coloured Lipstick by Siv]] | [[Image:Sivlips.jpg|thumb|right|300px|3 Coloured Lipstick by Siv]] | ||
| Line 9: | Line 9: | ||
* Full-Face Costume Makeup | * Full-Face Costume Makeup | ||
* Facial Hair (beards, eyebrows, etc.) | * Facial Hair (beards, eyebrows, etc.) | ||
| − | * | + | * Contact Lenses |
| − | * | + | * Non-Default Teeth |
* Face Masks<sup>1</sup> | * Face Masks<sup>1</sup> | ||
* Beauty Marks/Freckles<sup>2</sup> | * Beauty Marks/Freckles<sup>2</sup> | ||
| Line 21: | Line 21: | ||
===What You'll Need=== | ===What You'll Need=== | ||
* [http://www.adobe.com/products/photoshop/family/ Adobe Photoshop] (purchase) or [http://gimp.org/ GIMP 2.0] (free) | * [http://www.adobe.com/products/photoshop/family/ Adobe Photoshop] (purchase) or [http://gimp.org/ GIMP 2.0] (free) | ||
| − | * The latest version of the [http://www.modthesims.info/download.php?t=364926 CAS Texture Unitool] (CTU) | + | * The latest version of the [http://www.modthesims.info/download.php?t=364926 CAS Texture + Unitool] (CTU) |
* DDS Plug-in for [http://developer.nvidia.com/object/photoshop_dds_plugins.html Photoshop] or [http://nifelheim.dyndns.org/~cocidius/dds/ GIMP] | * DDS Plug-in for [http://developer.nvidia.com/object/photoshop_dds_plugins.html Photoshop] or [http://nifelheim.dyndns.org/~cocidius/dds/ GIMP] | ||
* [http://www.modthesims.info/showthread.php?t=362412 S3PE] or [http://www.modthesims.info/download.php?t=362599 Postal Package Editor] (Optional) | * [http://www.modthesims.info/showthread.php?t=362412 S3PE] or [http://www.modthesims.info/download.php?t=362599 Postal Package Editor] (Optional) | ||
| Line 68: | Line 68: | ||
Play around with the texture until you get a finished product that looks more or less like mine.<br clear="all"> | Play around with the texture until you get a finished product that looks more or less like mine.<br clear="all"> | ||
[[Image:Finishedalpha.jpg|center]] | [[Image:Finishedalpha.jpg|center]] | ||
| + | |||
| + | ===Step 3=== | ||
| + | Switch back over to the main texture view. Nine-times-out-of-ten the main texture is either a flat light grey or a grayscaled image surrounded by black. Just to show a concept I'm going to add a little heart design in the middle of my blush texture. The best way to line up the image is to have the alpha channel visible while editing. Remember to keep the texture greyscaled. | ||
| + | |||
| + | [[Image:Editedtext.jpg|center]] | ||
| + | |||
| + | ===Step 4=== | ||
| + | When done editing, flatten your image as a .dds in DXT5 compression. | ||
| + | <blockquote> | ||
| + | =====RGB Mask===== | ||
| + | [[Image:Finishedmask.jpg|left|200px]] | ||
| + | After saving your overlay, it's a good time to go ahead and make a custom RGB Mask if you need to. If you haven't the slightest clue what a RGB Mask is, then follow the tutorial [[Sims_3:Basic_Mask_Editing| here]]. | ||
| + | |||
| + | Your finished mask should look similar to the one pictured. </blockquote> | ||
| + | |||
| + | |||
Revision as of 22:20, 23 September 2009
UNDER CONSTRUCTION Y'ALL :D
Contents |
Face Overlays
Face overlays are the common denominator to...well...all things face related in TS3. Using face overlays and the Cas Texture + Unitool (CTU), you can make:
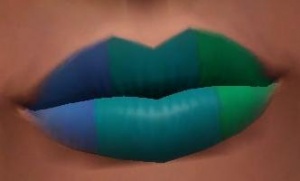
- Eyeshadow, Eyeliner, Lipstick and Blush.
- Full-Face Costume Makeup
- Facial Hair (beards, eyebrows, etc.)
- Contact Lenses
- Non-Default Teeth
- Face Masks1
- Beauty Marks/Freckles2
And, the list grows longer as we get more creative. Basically, if you want something to show up on the face, then you'll need to make it as a face overlay.
Difficulty
Although the basic concepts of making face overlays is easy, making them well is another story. Some prior knowledge on using your image editor is required, as I will not be holding your hand as much as I usually do throughout this tutorial. Also, keep in mind there is no one-size-fits-all tutorial so you'll need to do a bit of extra tweaking here and there.
What You'll Need
- Adobe Photoshop (purchase) or GIMP 2.0 (free)
- The latest version of the CAS Texture + Unitool (CTU)
- DDS Plug-in for Photoshop or GIMP
- S3PE or Postal Package Editor (Optional)
(I'll be using Photoshop 7.0, so if you're using a different program the screen shots will be different but the concept is the same.)
Before We Start...
I always like to give a little background information before starting a tutorial.
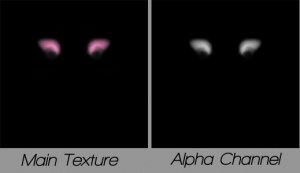
Face overlays are similar to the base textures that are used for clothing. They are composed of two parts: the main texture image and an alpha channel.
The main texture should always be left grayscale, it's only pictured purple for emphasis. In fact, most of the textures for makeup and beauty marks/freckles are left a flat white or grey with no added texture.
When working with these it's best to Extract a CAS Part type that is similar to the area you want to work with. For example, if you want to make an eyeshadow then extract a preexisting eyeshadow overlay and edit it to your liking.
What Else?
In addition to the face overlay, to make your project complete you'll need to make a RGB Mask to go with it. You'd treat the mask just like you would with clothing, use it to map out the different tintable areas of your CAS part. With face overlays, you can only recolor them with tints (solid colors), no patterns can be used.
Also, you can add a custom Face Specular to your creation. The specular texture is what adds shininess to the CAS part. Although the specular is rarely changed, they could possibly be used to add glossiness and shine to lip-gloss if done right.
The Tutorial
Preliminary
Using the tool of your choice (CTU is the easiest) extract the face overlay of a CAS part you wish to edit.
Note: If you're using a package editor like S3PE or Postal, all of the CAS part textures can be found in FullBuild0.package.
Once you've found the texture you wish to use, open it up in the image editor of your choice. Remember do 'NOT tick generate Mipmaps when you import the .dds texture.
For sake of this tutorial, I'll be using the afMakeupBlushHighBasic texture found under Adult-Female-Makeup.
Editing
Step 1
When you have the texture loaded, switch over to the channels view and click on the alpha channel.
Step 2
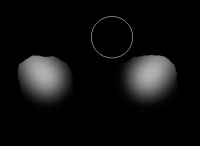
Edit up the alpha texture to your liking, use the eraser and/or the paintbrush to add details and such. Remember that black areas on the alpha are not visible and white areas are fully opaque. Any shades of grey give an transparent/translucent effect to the texture; the darker the grey, the more transparent the texture and vice-versa.
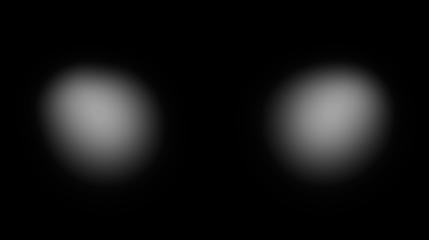
Notice the gradient (smooth transition from light to dark) on the edges of the blush. You should always leave soft edges on your face overlay texture (especially when creating makeup). If the edges are too harsh, the makeup will look painted on and blocky, and unless that was the look you were going for, hard edges should be avoided at all costs.
Using the eraser tool, I'm going get rid of the top points of the blush. Notice how I created those harsh jagged edges. To remedy this, I'm going to use the blur tool to soften up the edges. The Gaussian Blur filter is also a good tool to get nice smooth edges.
Play around with the texture until you get a finished product that looks more or less like mine.
Step 3
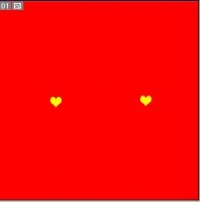
Switch back over to the main texture view. Nine-times-out-of-ten the main texture is either a flat light grey or a grayscaled image surrounded by black. Just to show a concept I'm going to add a little heart design in the middle of my blush texture. The best way to line up the image is to have the alpha channel visible while editing. Remember to keep the texture greyscaled.
Step 4
When done editing, flatten your image as a .dds in DXT5 compression.
RGB Mask
After saving your overlay, it's a good time to go ahead and make a custom RGB Mask if you need to. If you haven't the slightest clue what a RGB Mask is, then follow the tutorial here.
Your finished mask should look similar to the one pictured.
Notes
1 Face masks are handled differently so they will be discussed in a separate tutorial (coming soon).
2 Although you can make beauty marks using the methods above, if you wish to make them layerable and show up in the beauty mark/freckles section like the in-game EA beauty marks you'll have to do some extra coding with S3PE/Postal. It's not *hard* to do per se, but it's a little tedious.
