Tutorials:Building Great Realistic Houses - From the Ground Up/Exterior
Contents |
House Placement & Planning
- Using real life plans
- Overall house size and scale, and placement forward/backward/left/right on a lot
Foundations & House Shape
The shell of your house is its whole basis, and if it isn't right your entire house will suffer overall. If you are new to building, you will need to know about foundations and how they work and can be placed. If you're already experienced with foundations, you can skip ahead to the "Box or Not?" section.
Foundations
Proper use of foundations can really improve your house: they can add detail, allow you to have basements and cellars, and they can be quite attractive too. But, they are not without their issues...
Building foundations is the same in The Sims 2 and The Sims 3. You should use the basic brick foundation for the main base of the house. The other types of foundations (TS2's interior foundations and both the lattice ones from both games) are for special applications such as porch areas, but should not usually be the main base for your house.
Foundations on Even Terrain
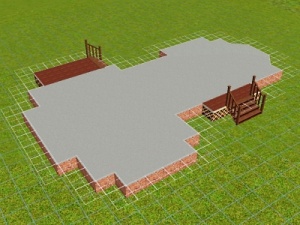
On an even lot, you simply need to plan out how you want your house to look. To the right is an example foundation. You can see the main area uses brick foundation, and the porch area uses the fenced foundation. As a general rule, always make sure you leave at least 1 tile for a porch between your front door will go and the stairs to the ground - otherwise your sims can't get in the house!
Foundations on Uneven Terrain
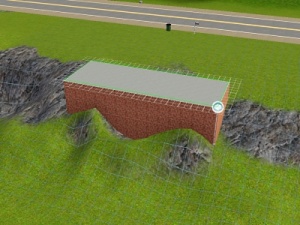
When building on uneven terrain, you must place the foundation from the highest point of the terrain. When you drag it out, it will be flat on top and it will change in height on the bottom according to the terrain level. You can build whatever house shape you like - just make sure that you start at the highest point. Also, when adding a section of foundation to connect to what you've already built, drag from the foundation to the empty space, not empty space to foundation - otherwise, they won't fit together.This type of foundation placement means that your stairs down from the foundation will not be the standard four-step height. When placing stairs to the ground, it may automatically lower or lift the terrain at the slightly so the stairs fit in properly without leaving a half step at the bottom. If you prefer to control the exact height yourself, you can... First, place the stairs and allow the game to adjust the terrain. Then, use the cheat constrainFloorElevation false (for Sims 3) or boolProp constrainFloorElevation false (for Sims 2) and then flatten the terrain at the bottom of the steps. The terrain will snap up around the steps and will leave you with a half step at the bottom. Remember to always turn the cheat off afterwards by repeating the cheat and changing "false" to "true."
Basements
Basements can only be done in houses with foundations. Adding a basement can be great for many homes, allowing extra space on small lots, and comparatively cheaper than making the same sized rooms when building starter homes.To create a basement, first design your foundation before starting on the basement.
You'll need to have the foundation tool selected. Hold down the ctrl key and delete the center of your foundation so that there is only ONE tile of foundation left as a border, all around the edge of your house. This open area is going to be your basement, but first you'll need to dig down to make it a full level depth.
Go to the modular stairs tool and place one set of stairs. Then at the bottom of the first set of stairs, place another set going further down, and at the bottom of the second set, place a third set. This bottom tile is the proper depth for your basement.
Delete the 3 sets of stairs and then use the level tool to level out the bottom of the basement so that it is flat. Now you can add stairs from the foundation above to the basement level, you can add walls and floors and furniture like a normal room, and texture the walls however you like. The only limit is that you cannot put any windows or doors in the basement (though there are ways around that for more advanced builders).
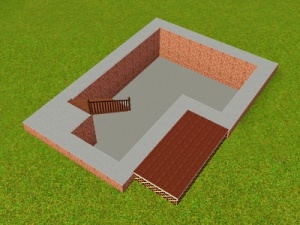
The picture to the right shows a foundation with the stairs leading down to it from the foundation above. this is what you should aim to have when you have finished.
Building Without Foundations
Building without using foundations is even easier than with foundations, and requires little explanation. You simply use the wall tool and begin putting the walls in whereever you like, in a flat area.
Houses without foundations can be less expensive as you don't have to purchase foundations and stairs to connect to them, but you also can't have a basement (unless you do a true TS2 sunken basement, but that's extremely advanced building). They can also be a little easier to play when it comes to switching levels, but they may not look as nice. Let the style of the house and what you want it to end up like be your guide, whether you use foundations or not.
Box or Not?
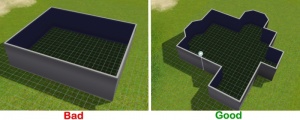
SO many people have problems with building box houses! A big fat box is not an attractive house in the real world, or in TS2/TS3!
Single Story Buildings
Buildings with only one level usually need to be a little more detailed than buildings with taller floors to make them interesting.To make an interesting single-story home, use small extensions to the structure. Start with a basic box (yes, a box, but it's just a building block, not the final structure). Then put a small extension of about 3x4 tiles, and then choose another side and add another - doesn't have to be the same size, or symmetrical in any way, and you can do it with diagonal edges, like a bay window. Several additions like this on the house will give it a lot more depth than a rectangular bungalow with just a bay window.
Again, you can use boxes as building blocks to make an overall non-boxy house. For example, begin with your living room as a box, then add another box somewhere else for the dining room, and another box for the kitchen, varying the sizes and the way they match up, using diagonal walls here and there, and so on, so that when you have placed all the rooms you get a much more interesting look.
Multi Story Buildings
When making a building that is two levels or more, you don't need to put SO much detail into every tiny aspect of your house, but overall it needs to not be a box. You can use the same basic techniques as you would for a single story home to make your first floor, but your second floor should be made slightly differently, which takes some different tricks.Ok the first thing I will cover is "dummy rooms", these are rooms that look real but aren't, if you look at the picture to your right you will se an example of dummy roofs on the third floor, those 2 rooms are in no way useable and are just there for effect; this works really well if you want to give the illusion of more space without much cost. Note from HP: What the heck does this mean? I don't get it.
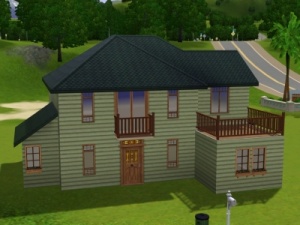
When building upper floors, don't just copy the lowest floor! Upstairs and downstairs the same shape looks looks really dull, no matter how interesting downstairs was. You can either leave spaces to place roofs (see picture to right: second floor on the left), or you can put a balcony to break it up (see picture to right: second floor on the right). These two techniques make the house more interesting and less rigid; a rigid house is a boring house. Of course, you don't have to go nuts and make a completely strange shaped building, but make sure there is variation and interest in the shape of your house!
Windows, Doors, Stairs & Arches
Windows and doors are magical objects. They allow you to see and pass through walls!
Disable Cheats
Make sure to turn off the moveObjects and snapObjectsToGrid cheats when placing build items like windows and doors - both cheats make it difficult or impossible to place items properly.
Windows
Windows are an absolute must for any house. They let in natural light, boost environment scores, and break up walls to make them look less repetitive. Proper window placement makes a house look more realistic and inviting.
Style
Always put care and thought into choosing the a correct and appropriate style of windows based on the style of the house - you wouldn't want shiny full-length ultra-modern windows on a classical grand Victorian house. Make sure your styles don't clash. Do a little research into building styles to see what general types of windows are used in that style or era. This same principal applies to all styles of houses, even if you are making something totally on your own, never seen before - the look and feel of the windows you use should match the look and feel of the house as a whole.
Type
This is probably the most important aspect of using windows - many builders make poor decisions when it comes to which type to use where. The style of the house can impact what types of windows you'd want to use overall - a modern beach house would tend to have larger windows than a Tudor-inspired house in the suburbs. Keep in mind the room type too - bedrooms, bathrooms, etc., should have windows sized and placed such that sims have a bit of privacy - you don't want a bathroom with full-length uncovered windows on the ground floor facing the street!
- Kitchens: Single or double-tile medium-sized windows in empty stretches of wall. Counter-height windows over counters. Don't use full length windows on sections of wall with counters on them!
- Living Room: Medium to large, half-height or full length, depending on the style of the house.
- Bathroom: Privacy or half-height medium windows with drapes. Second story bathrooms can have larger windows - just be aware of the placement and privacy.
- Bedroom/Dining Room/Office: Any, as long as it's appropriate to the house as a whole.
Placement
Not only do windows impact the environment scores on the inside of the house for the sims, but they also impact the players' or downloaders' perception of the house. From the interior, it may look good to have two windows in the nursery, but looking at the house from the exterior, two windows on that section of wall might look strange. Builders often either leave large sections of wall without, or add in far too many - either way looks weird. You also can't just place them anywhere - there needs to be a balance and flow to it that goes with the rest of the house. Avoid strange window placement by placing the windows on the exterior before you build the interior rooms, so you can make sure that the outside is aesthetically pleasing as well as the inside.
Note from HP: This section could use a few example pics of good and bad window placement
Doors
Proper use of doors is just as important as windows, and the two work together to create a harmonious overall look.
Style
This is the obvious one, of course - choose doors that fit the style of your home. Medieval doors on a modern house look just plain silly and makes it seem like you didn't care very much about your house. Generally, the nicest and biggest door of your house goes out front.
When choosing your front door, it should not only fit the style, but also match in color. Don't use a sliding glass door as your front door unless you've got a very good reason, and make sure you use a door that's appropriate to an exterior - interior doors are usually simpler looking. Take the time to find something that really matches your house.
You may have to rework the entrance a little bit for symmetry - if you had a 2-tile front door planned and your entry is 3 tiles, it's probably going to look a bit odd unless you put some extra effort into laying out the porch properly.
Placement
I went over it briefly in style, but placement is the very most important thing about doors, if you have a poorly placed door, it might not work, it could look ugly, or it could even look stupid. Basically, sliding glass doors don't lead to bedrooms, they take you outside. Interior doors are acceptable to lead outside, but don't always look fitting. All doors that have glass windows placed inside of them, are to take you outside or bring you back inside, not to lead you into another room in the house. In the sims 3 there has to be a full tile between a door and an object parallel to it, in the sims 2 it isn't necessary to have a full tile, you can have them lining a single tile corridor, but that is also a no no that will be covered later.
Stairs
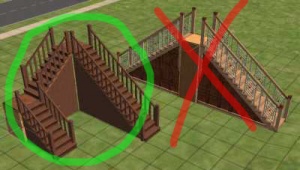
Consider giving up using the full stairs (the ones that reach all the way from one floor to the next). Why, you ask? We recommend using modular stairs instead of full ones because they can only be used by one sim at a time, which leads to traffic jams. Also, if you use the modular stairs inside, they will match the ones you used on your porch!
Arches
Arches are the best of both worlds. They care acceptable inside and outside, can lead to (most) rooms, and have a decorative and beautiful property. Since these wonders are basically doors, all of the same principals apply, except for placement.
Placement
Arches are very similar to doors. The only thing that is different for them is that they are more versatile. They can be placed anywhere inside or outside with the exception of being the way to enter a bedroom or bathroom. You can use them inside of bedrooms and bathrooms, they just can't function as the main point of entry, as that would be dumb and very...revealing. There are doors into bedrooms for a reason.
Roofing
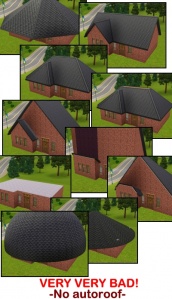
If you use autoroof, you are lazy. Lazy does not lead to nice houses! We understand that having the ability to click a button and have a roof pop up is really cool and convenient. And if you have ever used it you know how easy it is! But the main problem with autoroof is that it does a terrible job. Like, the epitome of ugly quality. Don't worry though, if you are a long time addict to autoroof, we can help. By trying to make your own roof you not only get better with each attempt, you also get a better roof 100% of the time.
Know Your Roofs!
First handy thing to know is which roof does what. This should help a bit!
- Hipped - Not paintable, Rectangular base, Forms pyramid
- Gabled - Two paintable sides, Rectangular base, forms triangular prism
- Mansard - Not paintable, Rectangualr base, goes up one level before flattening out [not effected by roof angle adjusters]
- Half Hip - One paintable side, Rectangular base, Hipped roof cut in half
- Half Gable - Three paintable sides, Rectangular base, Gabled roof cut in half
- Dome - Not paintable, Hemispherical base, Does not get removed by roofs above it
- Conical - Not paintable, Hemispherical base, Does not get removed by roofs above it
- Octagonal - Not paintable, Octangonal base, Does not get removed by roofs above it
- Hipped Pagoda - Not paintable, Rectangular base, TS2 ONLY
- Gabled Pagoda - Two sides paintable, Rectangular base, TS2 ONLY
Lots of roof types! Each has their own benefit and look best when combined with other roof styles. That is another downside to autoroof, it places all of the same kind of roof down on top of your house. It looks repetitive, icky, unnatural, impersonal, and lack luster. Some times autoroof CAN do a nice roof, but it is still recommended to be avoided, as this happens very rarely. Something else to take into consideration is the adjustment of roof height. As you can see to the right image, all of those roofs were rendered with the same roof height and the autoroof button. Some of them might not have looked as bad if I would have adjusted the slope of them. If you have mansion and garden stuff or TS3, then you are lucky enough to have the sliders. Nightlife introduced the "roofSlopeAngle [15-75]" cheat and seasons brought with it "individualRoofSlopeAngle [15-75]" making for more intricate, and much nicer, roofs.
Techniques to Break a Big Roof
It is generally accepted that if you roof is over two storys high, it is either a pyramid or a bad roof. So, if you are stuck with base game, there are ways to break up that roof of yours and make it look like it isn't so tall. These include...
- Adding Levels - You can add a level on to your house. This will require you to have 2 floors with a roof on it, there by breaking a continuous roof, and probably making it look better [final product may vary depending on how you build the second floor]
- Dormers - One of the easiest things to do is add in a dormer! If you have TS2, there is a section for it, if you have TS3, you are stuck making your own. For both games, making your own can lead to cooler effects, so be sure to try that out. If you don't know how to make one, or know what one is, all you do is go up a floor, make a rectangular room that you can see outside of the roof, then put a roof on top of that. By doing this you break repetition and make your house look better [Varies depending on placement and size].
- Different base - By base, I mean house. If your house is so square that it forces you to have a roof over 2 stories tall, then we have a whole other problem, and I will ahve to revert you back to the beginning of this tiptorial.
Driveways & Garages
It is always important when building a house, to have a driveway and garage fitting to the house, so below we are going to cover the bases of good drives and garages.
Driveways
Ok so driveways don't mean you need a garage, I am going to show you the main 2 different types os driveways, normal uses a garage and ring doesn't. You should read up about each for specific details on when to and when not to use them!
Normal Driveways
Right, normal driveways are just, as they sound, normal straight driveways; you would use this dirveway in a small house, a family house and some bigger houses, however really large housing and mansions should use the ring driveway for effect. Ok so with this driveway, you simple place 1-2 sets of driveway pieces of car placements pieces (depending on TS2 or TS3) and then you can decided to add on a garage at the end or not. Never, EVER use these directly at the front of your house unless the garage is built into the house, which only really happens in a semi detached home. You should always place them to the side of the house, they can touch the house, that is fine, but DON'T put them in the middle, or for that matter, at a completely random spot around the lot.
Ring Driveways
Ring driveways are used on very big houses and mansions, just as a note, they don't actually function if done in the sims 2, so if you are using sims 2 and want a driveway for the appeal then this is the one, but for functionality the above section is better. In sims 3, this type of driveway is completely functional because you are using the car placement object which can be rotated to any angle. So let's begin explaning it:
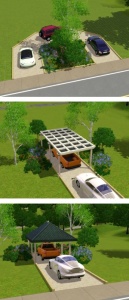
Ok there are 2 types of ring drives, the ones that start 1 car wide, split in the middle to form a circle then come back to 1 car wide at the top, this does not always look good and takes up a lot of room if you don't have lots of space for it; the second option is better and takes up less space, this starts at a 1 car wide drive, and then about 10 tiles down another one, they then curve in at the top to meet each other. (see image to the right for how the finished product should look).
Garages
Ok, garages don't have to be boring and unexciting, you can try to make them a tad more interesting; now i am not going to cover connecting garages to foundations because that is a whole different tutorial altogether, and if you want the video version of it you can find it here:
[Connecting Garages to Foundations Tutorial {TSS} ]
I will however cover both car ports and garages.
Normal Garages
Bog standard garages are just connected at the end of a drive in sims 2, in sims 3 they can be placed diagonally so you can get a bit more space to work with; when building a garage never do more than 2 garage doors, having 3 CAN look good on a HUGE building but never any more than that otherwise it will just look odd. Remember when building your garage, that not all garages are square boxes, you can add a litte detail to garages if you want, making them more "part of the house".
Car Ports
Car ports are a good alternative to building a garage, and they are cheaper, a car port is basically a roof supported by pillars to cover and protect you car on a minimal basis; however roofs don't always look good on carports, having a flat panel of tiles, covered by a grid of fencing. (see image to right for finished product). I have also given an image example of a roofed one, to show when it is done properly, that it can look good.
Patios
Lots of people have patios in there back garden, anything from a small table and chair with an old BBQ to a large extravagant patio with lots of seating and private kitchen. All in all, patios are a very popular edition to any house, but most people miss it out when building in the sims 2 and 3, so we need to fix that by teaching you the basics of good patios.
Decorative Patios
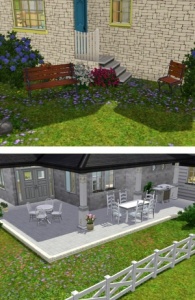
Decorative patios have no real function other than to look good and provide a place for your sims to sit, they don't contain any sort of dining furniture of cooking equipment. What you aim to do is fill the space with nice benches and potted plants and hanging plants to give it a homely feel. They can also come in a natural form which is just as effective and looks more tied in with the garden, for an example of a decorative patio see the picture to the right.
Functional Patios
Functional Patios are completely different to the decorative ones, they are there to serve a purpose, not just look pretty; so you want to use a wooden or metal dining table that will work outside, don't put an ornate old aged one outside, because it would just fall to pieces the next day in real life, remember the aim is to make it realistic. Get some matching chairs and put a BBQ near them. Now you have a functional patio, don't forget to add in potted plants as well for looks.
Tips
Ok well I thought we should provide you with some extra tips on how to get that patio looking better:
- Stick to a colour theme that fits your house, if you made a beach house have light colour, etc.
- Don't try and cram too much clutter into a small space.
- Use pillars and collumns on the patio so you can put up a roof that acts as a cover to the elements.
Pools and Outdoor Activities
Sims love to be outside. Especially if you have activities for them to take part in. In TS2, the seasons expansion pack introduced things such as gardening and fishing for your simmies to do. In TS3 these are included in base game, which is a plus. This section is dedicated to adding in objects that draw attention outside so your sim isn't a shut in for the rest of their short and meaningless lives.
Pools
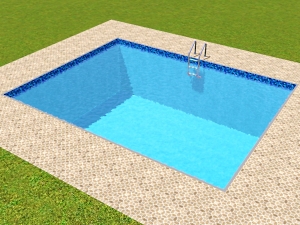
Pools enable sims to swim, if you weren't aware of the obviousness of that statement. They also give massive fun boosts and make a house more personal. Base game in TS2 and in TS3 both only allow rectangular pools. This is a break down of what we have so far.
- TS2/TS3 Base Game - Rectangular
- TS2 Nightlife - Diagonal
- TS2 Seasons - Circular Piece
- TS2 Bon Voyage - Swimmable Oceans
There are techniques for pools found here for TS2 to get things such as water slides, intricate shapes, and shallow pools. They are a feature that can really add realism to a house. Make sure to not make too big of a pool because it looks totally unrealistic and cheesy. Nobody likes a cheesy house!
Playground Equipment
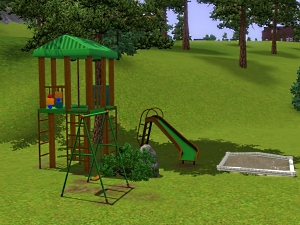
Kids can fish and swim, but something else they can do is have fun on the swings and other playground items. In OFB toys were introduced that could be placed in the yard for kids to play in, later on AL brought epic play ground toys as well. In TS3 things such as the sprinkler and playground equipment were included. This means you can have better community lots, since they are quite bad in TS3 as is. Items include...- Swings
- Slide
- Octopus Sprinkler (TS2 Open for Business)
- Lemonade Stand (TS2 Open for Business)
- Jungle Gym Tower (TS2 Apartment Life)
- Merry go Round (TS2 Apartment Life)
Etc. With the inclusion of terrain paint you can make sand pits and even dirt piles, they won't work, but it is an added detail. Little kids need some fun and teens need a place to vandalize. These will be a smart choice to add to your hood!
Landscaping
I would like to start this out on a serious note...Custom terrain paint is THE WORST EVIL you can do in TS2. Ok, maybe not that bad, but it is pretty bad. You can’t use CleanInstaller to remove terrain paint from a lot package. If you try to the lot ends up corrupted and flashes blue in the neighborhood. No one wants that. Unless you absolutely can not get by for a specific reason with just using the Maxis terrain paint, then I would never touch it. I learned this only after I had contributed to the Evils by releasing some terrain paint I made. I’m sorry, its bad and I have a hard time sleeping at night because of it. Ok, maybe not, but I have stopped using CC terrain paint in my lots.Flowers are also bad. They are way high poly, meaning they will lag the game. If you are one of the people who take the flowers, turns move objects on and plunks 4 flowers down in the same square rotated from each other. STOP IT. Flowers are ridiculously high poly to begin with; you just multiplied that number by 4. Using a few flower beds is ok; filling the front yard with them is not. Even lining the front walk is iffy. Try using a shrub or two in place of flowers on ends or corners, it looks pretty that way. Using some terrain paint underneath the flowers, shrubs, and trees also makes the landscaping look finished.
In TS3 something you want to avoid with landscaping is placing flowers, trees, bushes, and rocks on and level other than the ground. They cause some graphical issues the first time around, by appearing as floating foliage when working on lower levels. After saving and quitting they will then proceed to get locked onto that level, meaning you won't be able to delete them until they fall back down to the bottom level. A way of getting them to fall is by saving and exiting your game...a lot.
Now, looking through many submissions to the site, people seem to have this thought that having one tree or 4 flowers alont the front of a house is landscaping...I am here to tell you it is NOT landscaping. Landscaping required thought, effort, planning, harmony, balance, and terrain paint! Using border fences is a classic way of defining where your garden will be placed. It is really helpful if you place them first because they help you set a limit and makes things easier to plan. Your BEST friend for landscaping is going to terrain paint. No, not flowers, or trees, or even shrubs...terrain paint. Many times you will see "realism" stated when referring to landscaping. Broken down, these are the things you should do.
- Place dirt around the bottoms of trees
- Taller plants in back, shorter in front
- Use tree's and bushes
- Border fencing
- Define a walkway
- Not have dark green grass all across the lot
- Not have any terrain paint at all
- Don't have lots of fencing (a little is good, too much lags the game)
- Little or no flowers
Arranging Plants
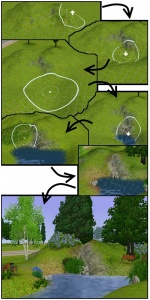
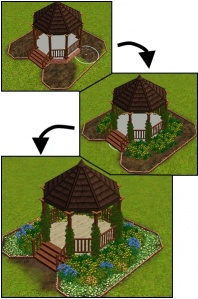
There is more method to it than you think! Over to the right you can see the process I went through to create a gazebo in a park I made for this tutorial. I included all of the steps that I did, including how I placed my foliage. Notice how the taller plants are in back and it works downwards into flat flowers. This is a step effect. It is going to be your best shot at proper landscaping, as it is very easy to do. Some other styles that would be fun to experiment with include...
- Convex
- Concave
- Line
- Triangle
- Rectangle
- Island
- Iwagumi (rock formation)
But those are all advanced tutorials for a different time and place. When arranging another HUE thing you should pay attention to is color. It is very hard to put bright red flowers next to a bright green plant because it kills your eyes. Be sensible when placing plants, think it through before you make the move. Some tips you can use are
- White and black make colors look move vivid
- Complimentary colors are on the opposite ends of the spectrum and hard to pull of, but when done properly makes a HUGE impact and impression.
- Triad forms a triangle and is easy on the eyes as well as easy to do. Each of the colors are equal distances from each other.
- Analogous colors are neighbor colors, like purple and red, they look nice together. Basic knowledge of primary and secondary colors makes this easy to understand.
- Monochrome colors are all the same, meaning all blue or red, etc. The concept of it is easy, but pulling it off without it getting repetitive is tricky.
As you can see, there is a who art behind something as simple as placing plants. People spend a lot of time, care, and consideration when trying to make their lot look more appealing from the outside. Good landscaping adds a curb appeal like nothing else, even. Placing a garden along the front of your house and maybe the corners of your walkway will make any house look more like a home.
Moar Terrain Peint!!11!
Yes, more terrain paint. You are probably going bonkers now wondering how their could possible be any more! Well, there is. There is actually enough that it gets it's own subsection and demonstration. People often neglect terrain paint either from being forgetful or because they don't know the importance of it. But, if you forget, you missed out on making your house better. Terrain adds depth, detail, and realism to your lots. It basically turns a yard into something personal, like a friend that you just walk on or something. Since you should now have a general idea of why terrain paint is so important, we can continue to some ideas to do with it!
Often times, I have experienced not being able to find a good tile to use for my walkway up to my house. This can be easily solved by making a dirt path by using terrain paint. All you do is select your tool and drag it up your lawn to your front door. In TS3 you have to option set softness of the tool, in TS2 you are going to be stuck patiently fading the dirt into the grass with light clicks. But this shows dedication and attention to detail which is ALWAYS a plus.
Around the trees is something beginners often forget about. Dirt is around the trunk of the tree's because little sunlight reaches down there, as well as water, so there is no way for grass to grow. So, something simple to do in both TS2 and TS3 is to take your smallest sized tool and put dirt around the bottom of the tree. Even cooler, if you have "Bon Voyage" installed for TS2, you get a lot of nice new terrains including pine needles, perfect for the pine trees!
There are many many many things you can discover and do with the terrain tools in both games. It is an excellent tool to play around with and enjoy.
Fencing & Final Touches
Ok before we come to the conclusion of our tutorial we are going to look at fences and finishing touches you can make to your house, all the little details count so make sure you read this section!
The right fence for the job...
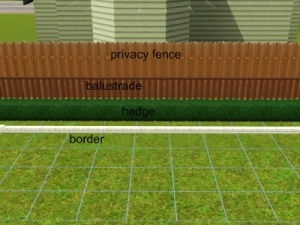
If you have a flower bed, you don't use a tall fence around it - instead, use a border fence, one of the short little ones. When you want to enclose a pool use the same small fence; this border fence also applies when you border a pathway or driveway. You use a taller fence when you want to surround a patio area or a balcony or porch; use the tallest fences and the brick and stone fences when you are surrounding an entire lot. HOWEVER they are high poly, so if you do put them all the way around the lot you end up with a whole lot of un needed polys that will slow down your game, so we advise you don't do wrap around fences on the edge of a lot! (for more on fencing see the "things to have fun with" section at the end of this tutorial.
Finishing the house up
When you finish up a house you must, MUST, MUUSSTT make sure that the whole thing fits together properly and it does not turn out as a complete hodge bodge of different techniques and designs. This is something that we cannot really teach you, you should do some research on real houses and houses other people have made to get a feel for how to match styles up. You just need to make sure that when adding in paths and wall paint on the outside of a house that they match with each other, with the planting and with the roof! So go get researching!!!
Things to have fun with
Well to round of the tutorial and all your hard work we thought we should throw in some things that might keep you entertained that you can play around with and test out for yourself
More with Fences and Halfwalls
I love using half walls and fences in interesting places, particularity bathrooms and kitchens. I like using full walls to make my own shower surround with the Uni shower. The half walls with the woodwork in them have popped up more than once to section off the toilet and shower area from a sink in my bathrooms. The ones with glass have done the same. In my less formal bathrooms the plain halfwalls go nicely next to the toilet as well.
Some of the more decorative fences can be used behind a sofa in the living room to divide the area, or in the kitchen to isolate the table. Some of the shorter fences look nice on the roof line of an old Victorian styled house. It all add visual interest. Too much and its over the top and corny, so everything in moderation, ok?
Terrain Paint tricks
One of my favorite things to do to make the house look like it belongs on the lawn is take the ‘Sparse and Spotty’ paint and line the outside of my house with it. Most houses don’t have perfect grass growing right up next to the house anyways and it helps to add a bit of a contact shadow where the house meets the grass.
If you have trees, try adding a few spots of ‘Park Mulch’ or whatever it was called underneath the tree trunk. If it’s a pine tree and you have the BV paint ‘Pine Needles’ that also looks great. Flowers and shrubs look great with 'Garden Soil' sprayed underneath them.
If you have a swingset out back (not on your balcony, remember furniture placement) try adding a bit of ‘Dirt’ directly underneath the swings and fading into the grass a bit in the direction of the swing. All that foot traffic prolly would kill the grass anyways. Another option is take that ‘Park Mulch’ stuff and make a playscape area.
Final Results
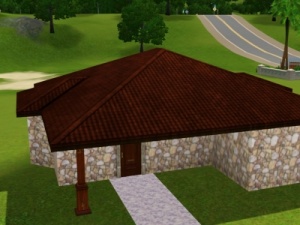
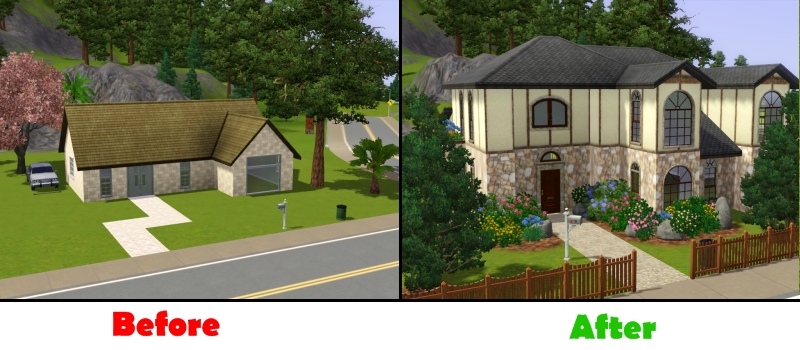
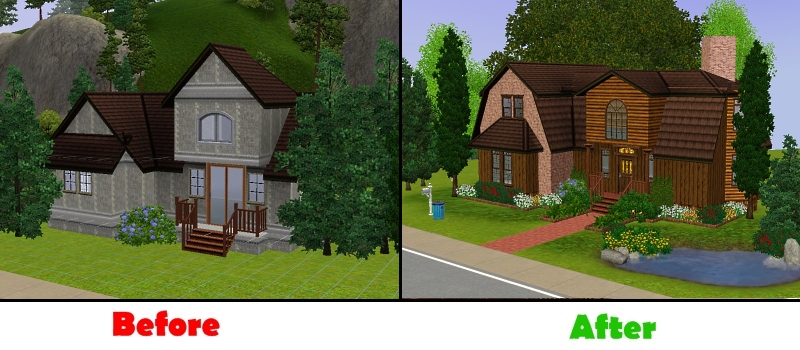
Below are 2 different houses made by Deluxe Designs and QBUILDERZ from MTS showing you the finalised versions of how our attempts to turn boxes into good houses turned out with and without foundations.

