Difference between revisions of "Tutorials:STF Conversion Tute Step 8"
From SimsWiki
(→Export Textures to IMG folder) |
|||
| Line 1: | Line 1: | ||
==STEP 8: Extracting The TS3 Mesh and Textures== | ==STEP 8: Extracting The TS3 Mesh and Textures== | ||
| − | + | <br clear="all" \>[[File:display-names-tags.jpg|thumb|alt=Alt text|display names tags]] | |
| − | + | ||
| − | <br clear="all" \> | + | |
| − | [[File:display-names-tags.jpg|thumb|alt=Alt text|display names tags]] | + | |
Now that you've cloned your package, extract the the mesh and textures. | Now that you've cloned your package, extract the the mesh and textures. | ||
| Line 14: | Line 11: | ||
| + | . | ||
===Export Textures to IMG folder=== | ===Export Textures to IMG folder=== | ||
| − | <br clear="all" \> | + | <br clear="all" \>[[File:export-resource-IMG.jpg|thumb|alt=Alt text|export IMG files]] |
| − | [[File:export-resource-IMG.jpg|thumb|alt=Alt text|export IMG files]] | + | |
* SHIFT and CLICK to Select all the IMG files. | * SHIFT and CLICK to Select all the IMG files. | ||
* Click on Resource (top of screen) | * Click on Resource (top of screen) | ||
| Line 26: | Line 23: | ||
| − | |||
| + | |||
| + | |||
| + | . | ||
===Export Mesh Parts=== | ===Export Mesh Parts=== | ||
| − | <br clear="all" \> | + | <br clear="all" \>[[File:export-mesh-parts.jpg|thumb|alt=Alt text|export mesh parts]] |
| − | [[File:export-mesh-parts.jpg|thumb|alt=Alt text|export mesh parts]] | + | * Look under the TAGs column. |
| − | * Look under the TAGs column. Select all 3 '''MLOD''' and the '''MODL''' ''TAGs'' | + | * Select all 3 '''MLOD''' and the '''MODL''' ''TAGs'' |
| + | * ''Export'' them all together to the to the main working folder | ||
* Minimize or close S3pe for now. | * Minimize or close S3pe for now. | ||
| + | |||
| + | |||
| Line 38: | Line 40: | ||
. | . | ||
===Move MLOD/MODL files into their own folders=== | ===Move MLOD/MODL files into their own folders=== | ||
| − | <br clear="all" \> | + | <br clear="all" \>[[File:move-mlods.jpg|thumb|alt=Alt text|Move MLODs and MODL files into correct folders]] |
| − | [[File:move-mlods.jpg|thumb|alt=Alt text|Move MLODs and MODL files into correct folders]] | + | |
* Open Windows Explorer or '''My Computer''' and navigate to your working folder. | * Open Windows Explorer or '''My Computer''' and navigate to your working folder. | ||
* Notice that each '''MLOD/MODL''' Group has it's own number. | * Notice that each '''MLOD/MODL''' Group has it's own number. | ||
Revision as of 15:14, 12 February 2011
Contents |
STEP 8: Extracting The TS3 Mesh and Textures
Now that you've cloned your package, extract the the mesh and textures.
- Open S3pe
- Prep S3pe - At the bottom of s3pe, put a check in the Display Names and Tags boxes
- Click File and Select Open
- Navigate to your new TS3 cloned package and Open it.
- You can stretch the name column out by clicking on the line between Name and Tag.
- Click on the TAG column heading to sort them.
.
Export Textures to IMG folder
- SHIFT and CLICK to Select all the IMG files.
- Click on Resource (top of screen)
- Select Export | to File
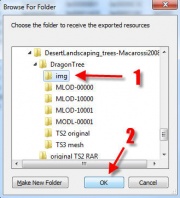
- Save all the IMG files and put them in the IMG working folder and click OK
.
Export Mesh Parts
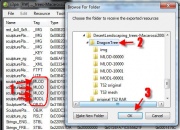
- Look under the TAGs column.
- Select all 3 MLOD and the MODL TAGs
- Export them all together to the to the main working folder
- Minimize or close S3pe for now.
.
Move MLOD/MODL files into their own folders
- Open Windows Explorer or My Computer and navigate to your working folder.
- Notice that each MLOD/MODL Group has it's own number.
- Move 00000000 MLOD to the MLOD-00000 folder
- Move 00010000 MLOD to the MLOD-10000 folder
- Move 00010001 MLOD to the MLOD-10001 folder
- Move 00000001 MODL to the MODL-00001 folder
- It is important that each file has it's own folder because Decompile splits them into into multiple files.


