Tutorials:3D Meshing Part III
| <<Back | Index | Next>> |
|---|
| 3D Meshing Part III | |
|---|---|
| Author | WesHowe |
3D Meshing, Part III: Textures and UVs
So we made a small pyramid, looked at the framework, and then looked at the surfaces. But, it still doesn't resemble real life much, unless we carefully plaster the surfaces and paint them all flat gray. It would be much nicer if it looked like real life.
Well, we can paint designs on our faces, unstead of just roller painting them. That is called texturing, and to do that we will also explore another mesh entity, the mysteriously named UV.
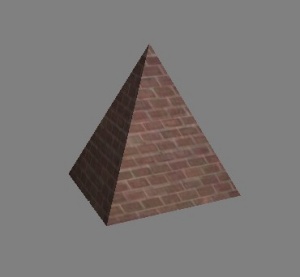
This is the same pyramid, but I created a texture material and applied it.
Here's how:
Go to your favorite search engine (at least 5% of the searches that hit this site are something other than google) and look for a "brick texture". Somewhere in all of those entries will be a free picture of bricks you like the style of. Right click on the picture and use "Save Picture As" to put the image (probably a jpg or png file) in the directory where you are working with MilkShape at.
NOTE: the desktop is not always a good place to work with MilkShape when using textures, because if the total filename gets too long, it gets truncated and things break, seeming inexplicably. Make a folder somewhere for your work.
Back to the task at hand, we need a Material. There is a tab for this named, Doh! Materials. Go there and click on the New button. MilkShape should make some new, gray material named "Material01". I didn't rename it, but you could. On the material you will see two buttons that say <none> on them. Click the top one. A file dialog box should open, use it to navigate to where you saved your brick picture and select that file.
When you finish that, you should have the bricks showing in the round space above your buttons, sort of a fish-eye view. This is just a preview of what the picture would look like spread on a globe and looking down from the top.
To see this on our pyramid, we need to apply the material to the pyramid. Materials are applied to selected groups, which makes for a somewhat awkward sequence. Click on the groups panel, and there should be a single group there named Box01. Highlight it and click on select.
Next go back to materials and highlight Material01 and then click on Assign. If you get an error message, you did something in the wrong order.
But nothing changed? Well, we need to change our rendering mode from flat shaded to textured. For this, you right-click in your perspective (or other) display window and pick textured from the pop-up menu. You should now have a scene similar to the one I posted above.
Now, the UV part gets tied into our discussion. In the example here, we just applied out texture image and it appeared. Behind the curtain, so to speak (shoo, toto!), the computer needed some extra definitions that tell it where on our texture image each corner of the triangle face goes. This is a pair of numbers called UV, and they form part of what will be called a UV map.
U and V are directions, just like X, Y and Z were. Actually, UV are part of UVW, the local space (coordinate system for the face) but since we are dealing with a flat face surface and a flat texture image we only need two values, for our relative left/right and up/down mapping. The U or V itself is a fractional number, ranging from 0.0 to 1.0, that measures from a corner of the picture either across or down, with 0.5 0.5 being the center.
We have a UV pair for every vertex (MilkShape set them up for us initially) and the computer uses the three sets defined for each face to essentially copy a triangle shaped piece from the image, paint it on the face, and then rotate and scale it according to the angle and distance it is being viewed from.
Later we will explore methods that are used to put all the faces on the same image map in different locations so that different parts are painted differently.
So, defined in the way they are used in TS2, every vertex we have has:
- A location (three floats)
- A Vertex Normal (three floats)
- A UV pair (two floats)
And every face is made of three index numbers, each of which points to a set of all three items we discussed above.
So this is all the basics we need for a non-bumpmapped un-animated object mesh for our game. This will be the simpler items, from road signs to paintings.
Questions and Answers
Question - by Fire - Yes i am following you, I am learning a few steps i did not know along the way Course i know a few things about milkshape as the years went by. I still get very stumpped on how things work so Wes 101 is a great thing for me.Although i am further along than this in milkshape (Not much though) the "Snap Together" was new to me, Thanks for that information, will make things so much easier.
Quote: Later we will explore methods that are used to put all the faces on the same image map in different locations so that different parts are painted differently.
Definately something i want to learn would be how to make the pyramid only visable with one side brick, then one side painted with maybe lets say Marble if i can?
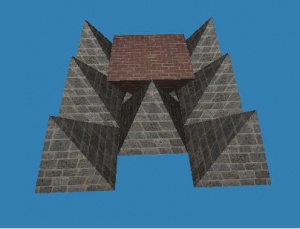
Here you can see i have been able to change the pyramids so they have alternative bricks but i cannot just do one side at a time.
Answer - by Wes - If you want to map different textures on different faces, you need to make a UV map by using the Texture Coordinate editor in MilkShape (under the Window menu, or CTRL-T).
However, the map that comes by default has all the cube faces laid on top of each other, so each face is all the same. There is a better way to make a pyramid, but not so easy.
I am not very good with MilkShape's Texture Coordinate (this is another name for UV) editor. I always load the MS3D file into Ultimate Unwrap 3D Pro and let it remake the UV map, then I save the file back out and I also make a UV map. This is essentially a blank graphic file with lines drawn for the edges of all the faces (there are options in the setup, though) and you load that into PhotoShop or PSP or Gimp or whatever and use it like a coloring book page... stay in the lines.
Then you remap the modified MS3D file using the new graphic file. There is a free UV mapper called UVMapper.exe (I don't have a link handy) that will do this, but you have to export your creation as an OBJ file, remap it, and import it back in. There are also fewer options on teh mapping, but it is free. UU3D costs two or three times what MilkShape does, but it can also open and save numerous file formats, including 3DS and the Torque DTS files.
<* Wes *>
Find more questions and answers on Wes's forum
| <<Back | Index | Next>> |
|---|

