Tutorials:Creating A World That Doesn't Suck - Basics
|
DO NOT EDIT WITHOUT DIRECT PERMISSION FROM TVRDESIGNS OR QBUILDERZ.
Controls and the User Interface
| Keyboard and Mouse Controls | |
|---|---|
| Select and manipulate stuff | Left mouse button |
| Zoom in/out | Middle mouse scroll W/S NumPad +/- |
| Look around | Middle mouse click |
| Pan camera view | Mouse right-click and drag Arrow Keys |
| Camera up/down | Q/F |
| Exit current tool | Esc |
| Delete selected object | Del |
Moving Around
Moving around in CAW can be kind of tricky. Here are the basic controls:
Practice moving around in CAW for a while before trying to edit - get used to the way the camera moves.
You can alter your camera's settings via View > Camera Settings. LOD Distance is the distance at which the grid and chunk boundaries disappear. The higher this is set, the further they are visible to when you are zoomed out.
|
Tip #1 - Move faster by using two controls that move you in the same direction! For example, use the mouse wheel to scroll up while using the up arrow key and you'll go twice as fast! Tip #2 - You can also hold down the shift key, in combination with the movement keys, to go faster. |
The User Interface
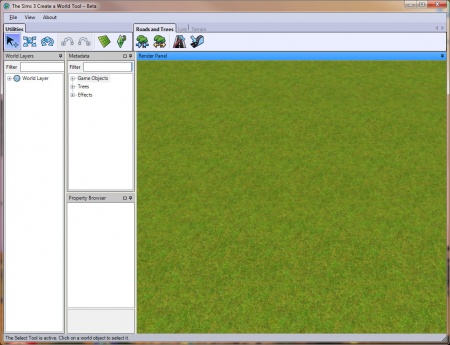
CAW's user interface is extremely daunting at first glance and it tends to turn a lot of creators away from using the program at all. However, perseverance will pay off; if you keep experimenting, learning and developing skills, you will soon be a master at locating that object or switching terrain tools.
Utilities Toolbar
This toolbar contains the select, move, rotate tools, as well as undo, redo, grid and the Edit in Game button. It is very easy to find, as it is clearly marked 'Utilities' and can be found in the top left of your CAW window.
File, View and About
In every program, these menus are present. In CAW, there are options and tools hidden in the View menu that aren't located within the actual layout of the program. These include:
- Fog - This option turns the mist that surrounds your world on or off. In newer versions of CAW, it also allows you to see the bottom of the ocean on your map.
- Show Chunk Boundaries - Use this when you are painting to determine if you have used more than 8 terrain paints in one chuck. If you have, that chunk will a red line around it.
- Time of Day - A useful little option to change the time of day so you can see how lights work within your world and how the sun sets over your town. You can also change the speed of time passage and, in newer versions of CAW, you can change the 'cloudiness' so that the world is either slightly foggier or clearer.
- Layers - This can be a useful little option that you can use if you want to turn off different world objects. Say you want to paint your world, and for that, you need to hide your trees. Just go to this, click Flora, and your trees are hidden for you. To un-hide a layer, just click it again.
- View Routing - This is a very important part of CAW. Routing is one of the major causes of lag within worlds. There is a section on routing later on.
- Rebuild Routing Data - This option needs to be used every time you are going to export your world. It refreshes the routing data that is shown when you select View Routing, so that it is up to date with the placement of your objects and lots.
Starting a New World
| Large | 2048px by 2048px |
|---|---|
| Medium | 1024px by 1024px |
| Small | 512px by 512px |
| Tiny | 256px by 256px |
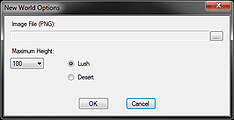
The first thing you want to do in this process is create a world. Simply go to File > New World or press Ctrl + N. You will be prompted with the input box to the right.
Click the '...' to select an Image File. This is the heightmap for your world and the size of your world is dependant on which image you choose. To the left is a small table with the choices.
The pixel size is set and the program will only accept height maps that are those dimensions.
Once you select your map size, you need to press okay and then you can select the maximum height of your terrain. To do this, click on the box that says 100 and select however tall you want the maximum height of your terrain to be. Most people using large or medium maps will probably want either 200 or 300, whereas if you are using a small or tiny map, your terrain will not need to be nearly as high.
|
Tip #3 - Once you start a world, you cannot change the map size. You can, however, import a new height map of the same dimensions. This will be covered later on. |
The last thing you have to do is select which set of base terrain paints you want. This won't really matter because, as this material will tell you, you shouldn't use the base CAW paint textures anyway; if you do, your world will not be nearly as nice as it could be. The most that this setting will do for you is allow you to get a vibe for what your world will look like after you paint it.
Exporting Your World
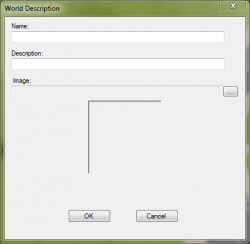
Exporting your world is the final step in the Create a World process. You need to export it to be able to share with others, as well as to use it in your own game. Before you export your world, you need three things. The first is a name, the second, a description, and the last thing you require is an image.
To change or add these three things, right click on your World Layer, which is the layer that has the globe next to it in your layers panel, and select 'Add Description'.
- Add the name of your world, this can be anything, but try and make it appropriate to features or locations in your world.
- Add the description of your world, whether it is a back story or just a description of what the world contains, this is important.
- Add your world image. This image can be anything, but you should really use a picture of your town, world or something around your world, so that a user knows what it is that they're installing. The image needs to be 256x256 pixels and it needs to be in an 8bit .PNG format. If it is not, and you go to click okay, you will be given an error message and you must re-choose your image.
Before you quit your world, you need to rebuild your routing data. Rebuilding your routing data means that the sims will be able to navigate correctly. If you do not do this, your routing will be distorted. This means that sims might sink into the ground, jump up in mid air, walk through solid objects, etc. To do this go to View > Rebuild Routing Data.
Now save your world, then go File > Close Current World. Next, go to File > Select World to Export and choose your .world file from your list of worlds. Click okay, and it will export your world for you.
If you don't know where your world is exported to, you can find it in C:\Users\(Your Username)\Documents\Electronic Arts\The Sims 3\Exports.
Layers
Layers are a very useful tool in Create a World that you can use to keep all of your objects, trees, spawners, effects and lots organised. Although completely optional, larger worlds with a lot of objects benefit greatly from this feature.
The first thing you will do when you start a new world is make a new layer. Without doing this, you can't place objects or lots.
- To create a layer, right click on your world layer on the left side of the window and choose Add Layer.
- To create a sub layer (a layer to organize content within a layer) right click on the layer you want to make a sub layer for and select Add Layer.
- To switch between layers, right click on the layer you want to make active and choose Make Active Layer.
- To delete a layer, right click on the layer you want to delete and choose Delete.
There are also other options you can choose when you right click on layers.
- Expand Selected Layers - This option opens each layer you selected so that you can see your objects.
- Collapse Selected Layers - Complete opposite of Expand Selected Layers, this collapses each layer you have selected.
- Delete all Object Managers - This option deletes all the lots on the selected layer.
- Delete all Objects - This deletes all objects on the selected layer.
- Add Lot - This is just another way to place lots.
|


