Difference between revisions of "Tutorials:Changing Lot Pictures"
From SimsWiki
(complete draft #1) |
m (Changing Lot Pictures moved to Tutorials:Changing Lot Pictures) |
||
| (9 intermediate revisions by 2 users not shown) | |||
| Line 1: | Line 1: | ||
| − | When a lot is uploaded to [[The Sims2 Exchange]] a number of pictures are | + | When a lot is [[uploaded]] to [[The Sims2 Exchange]] a number of pictures are automatically generated so that they can be used in the presentation of that lot. This includes, for example, an overall view of the lot which will appear both as a [[thumbnail]] on the [[Lot Listing]] page and full sized on the [[Lot Detail]] page. These images often leave much to be desired, especially if the lot is smaller in size. This article describes the use of [[SimPE]] to change these default pictures, replacing them with a user's customized image. Note that the original research for this article was conducted and documented by [[Stw402]] aka [[Tamlo31]]. |
| Line 9: | Line 9: | ||
* Move the desired lot into the [[lot bin]]. This has the effect of timestamping the lot making it easier to locate within SimPe. | * Move the desired lot into the [[lot bin]]. This has the effect of timestamping the lot making it easier to locate within SimPe. | ||
* Exit the game. | * Exit the game. | ||
| + | |||
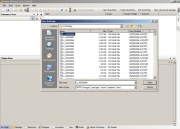
| + | [[Image:ChangingLotPictures1.JPG|thumb|Select the lot]] | ||
| Line 19: | Line 21: | ||
* Open that lot. | * Open that lot. | ||
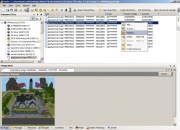
| − | + | [[Image:ChangingLotPictures2.jpg|thumb|Select the image to be replaced]] | |
* In the Resource Tree select '''Jpg/tga/png image'''. | * In the Resource Tree select '''Jpg/tga/png image'''. | ||
* Select '''Plugin view'''. | * Select '''Plugin view'''. | ||
| − | * The | + | * The picture will be located in one of the listed files most likely the 3rd of the list. |
* Export the picture to your desktop. | * Export the picture to your desktop. | ||
| Line 28: | Line 30: | ||
* Replace the file now on your desktop with a customized picture sized 300 x 300 pixels. | * Replace the file now on your desktop with a customized picture sized 300 x 300 pixels. | ||
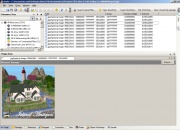
| − | + | [[Image:ChangingLotPictures3.JPG|thumb|Image after replacement]] | |
* Return to SimPe. | * Return to SimPe. | ||
* Right click on the file that was exported. | * Right click on the file that was exported. | ||
* Select '''Replace''' using the updated file on your desktop. | * Select '''Replace''' using the updated file on your desktop. | ||
| + | * Respond '''Yes''' if asked 'Should SimPe Reload?'. | ||
* Select '''File > Save'''. | * Select '''File > Save'''. | ||
* Exit SimPE. | * Exit SimPE. | ||
| Line 37: | Line 40: | ||
* Enter the game. | * Enter the game. | ||
| − | * The updated picture | + | * The updated picture can now be seen in the [[lot bin]]. |
| + | * Move the lot from the lot bin into the neighbourhood. | ||
* [[Upload]] the lot. | * [[Upload]] the lot. | ||
| Line 43: | Line 47: | ||
[[Category:Using SimPE]] | [[Category:Using SimPE]] | ||
| + | [[Category:Sims 2 Tutorials]] | ||
Latest revision as of 11:21, 31 December 2006
When a lot is uploaded to The Sims2 Exchange a number of pictures are automatically generated so that they can be used in the presentation of that lot. This includes, for example, an overall view of the lot which will appear both as a thumbnail on the Lot Listing page and full sized on the Lot Detail page. These images often leave much to be desired, especially if the lot is smaller in size. This article describes the use of SimPE to change these default pictures, replacing them with a user's customized image. Note that the original research for this article was conducted and documented by Stw402 aka Tamlo31.
- Before starting it is very important that a backup of the lot is made.
- SimPE must be installed on your machine.
- Enter the game.
- Move the desired lot into the lot bin. This has the effect of timestamping the lot making it easier to locate within SimPe.
- Exit the game.
- Enter SimPE.
- Select File > Open.
- Look in My Documents\EA Games\The Sims 2\LotCatalog.
- From the View Menu select Details.
- Sort the list by Date Modified.
- The lot should be the most recent lot changed since it was just moved into the lot bin.
- Open that lot.
- In the Resource Tree select Jpg/tga/png image.
- Select Plugin view.
- The picture will be located in one of the listed files most likely the 3rd of the list.
- Export the picture to your desktop.
- Replace the file now on your desktop with a customized picture sized 300 x 300 pixels.
- Return to SimPe.
- Right click on the file that was exported.
- Select Replace using the updated file on your desktop.
- Respond Yes if asked 'Should SimPe Reload?'.
- Select File > Save.
- Exit SimPE.
- Enter the game.
- The updated picture can now be seen in the lot bin.
- Move the lot from the lot bin into the neighbourhood.
- Upload the lot.
Be warned that if this lot is entered before it is uploaded the customized picture will be lost.


